Welcome to the charming and practical world of amigurumi! 🦔✨ Today, I’m excited to share my free crochet pattern for an Amigurumi Hedgehog Pin Cushion—a delightful and functional creation perfect for sewing enthusiasts, nature lovers, or anyone who enjoys crafting adorable and useful plush designs! 🧶 Whether you love stitching up tiny woodland creatures, experimenting with textured spikes, or simply want to add a whimsical hedgehog pin cushion to your handmade lineup, this pattern will guide you through crafting a beautifully sculpted plush with soft fur, tiny paws, and a touch of hedgehog cuteness! 🍂
This design embraces earthy tones, rounded shaping, and thoughtful details to bring a lovable and practical presence to your crochet projects! 🧶✨ I’ve carefully outlined each step to ensure your Amigurumi Hedgehog Pin Cushion turns out just right—ready to hold your pins in style or become a treasured handmade gift! 🎁 So grab your hooks, pick out warm browns, soft creams, and deep blacks, and let’s stitch up an adorable hedgehog pin cushion! 🦔
🦔 Amigurumi Hedgehog Pin Cushion Crochet Pattern
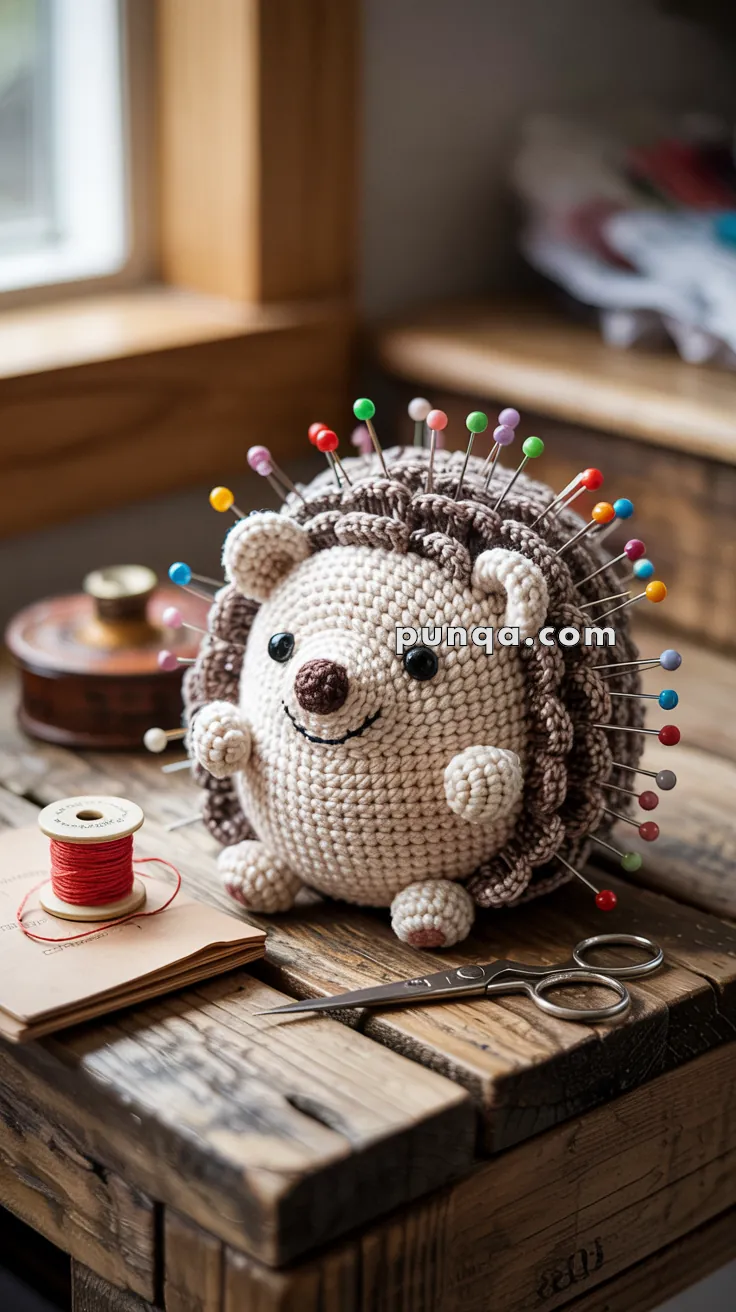
This irresistibly cute hedgehog doubles as a functional pin cushion — perfect for your crafting table! With its rounded body, cheerful face, and soft yarn “spines” designed to safely hold pins, this woodland buddy brings a touch of whimsy to your sewing setup. It’s a wonderful gift for crafty friends or a charming addition to your own tool kit. 🧶🧷✨
✨ Skill Level
Beginner to Intermediate – Involves basic shaping, facial features, surface loops, and optional embroidery.
📏 Finished Size
Approx. 4–5 inches (10–13 cm) tall using worsted weight yarn and a 3.0–3.5 mm hook.
🧶 Materials
- Worsted weight yarn in:
- Light beige (body)
- Chocolate brown (back “spikes”)
- Dark brown (nose)
- 3.0–3.5 mm crochet hook
- 10 mm safety eyes
- Embroidery thread (black for mouth)
- Tapestry needle
- Stitch marker
- Polyfill stuffing
- Sewing pins with colorful heads
🧵 Abbreviations (US Terms)
MR – Magic Ring
sc – Single Crochet
inc – Increase
dec – Decrease
sl st – Slip Stitch
ch – Chain
BLO – Back Loop Only
FO – Fasten Off
🧠 Body
With light beige yarn:
- MR, 6 sc
- inc x6 (12)
- (1 sc, inc) x6 (18)
- (2 sc, inc) x6 (24)
- (3 sc, inc) x6 (30)
- (4 sc, inc) x6 (36)
7–17. sc around (36) - (4 sc, dec) x6 (30)
- (3 sc, dec) x6 (24)
– Insert safety eyes between rounds 10–11, 6 sts apart
– Stuff body firmly - (2 sc, dec) x6 (18)
- (1 sc, dec) x6 (12)
- dec x6 (6)
FO and weave closed
🐽 Nose
With dark brown yarn:
- MR, 6 sc
- inc x6 (12)
- sc around (12)
FO and sew at center front between the eyes
Optional: Use a small bit of black embroidery thread to define nostrils
🐾 Arms (Make 2)
With light beige yarn:
- MR, 6 sc
- sc around (6)
3–4. sc around
FO and lightly stuff. Sew to sides of body, slightly forward-facing.
🐾 Legs (Make 2)
Same as arms but make 1 row taller:
- MR, 6 sc
2–5. sc around (6)
FO and sew to bottom of body, about 1 round up from base.
👂 Ears (Make 2)
- MR, 6 sc
- (1 sc, inc) x3 (9)
FO, fold in half to create curve and sew above eyes.
🦔 Back “Spikes”
With chocolate brown yarn (worked in surface ridges):
- Insert hook into back loops of round 5 and begin making ch 6, sl st into next st around the full circle.
- Repeat 2–3 layers of this from round 5 to round 12, layering the loops.
- For fluffier look, vary chain length between 5–7 stitches.
FO and weave in.
This creates the plush, spiny texture perfect for pin-holding.
😄 Face Embroidery
- Use black embroidery thread to stitch a simple smile beneath the nose
- Optional: Add blush with fabric paint or pink yarn
🧷 Finishing Touches
- Firmly stuff body so it’s stable
- Test with a few pins to ensure loops hold securely
- If using frequently, reinforce the inner stuffing with felt or muslin lining
💡 Customization Ideas
- Add a mini bow or flower crown
- Make multiple hedgehogs with different color schemes
- Use sparkly yarn for a magical hedgie twist
This sweet little hedgehog is as practical as it is precious — ready to protect your pins while keeping a smile on your face! 🦔🧵💖