Welcome to the cozy and heartfelt world of amigurumi! 💖✨ Today, I’m excited to share my free crochet pattern for an Amigurumi Heart Shaped Pillow—a soft and charming creation perfect for Valentine’s Day, home décor, or anyone who enjoys crafting adorable and meaningful plush designs! 🧶 Whether you love stitching up comforting shapes, experimenting with textured details, or simply want to add a sweet heart pillow to your handmade lineup, this pattern will guide you through crafting a beautifully sculpted plush with gentle curves, a squishy feel, and a touch of love-filled charm! 💕
This design embraces vibrant reds, soft pinks, and intricate shaping to bring a warm and inviting presence to your crochet projects! 🧶✨ I’ve carefully outlined each step to ensure your Amigurumi Heart Shaped Pillow turns out just right—ready to brighten up your space or become a treasured handmade gift! 🎁 So grab your hooks, pick out romantic hues, and let’s stitch up a delightful heart pillow! 💖
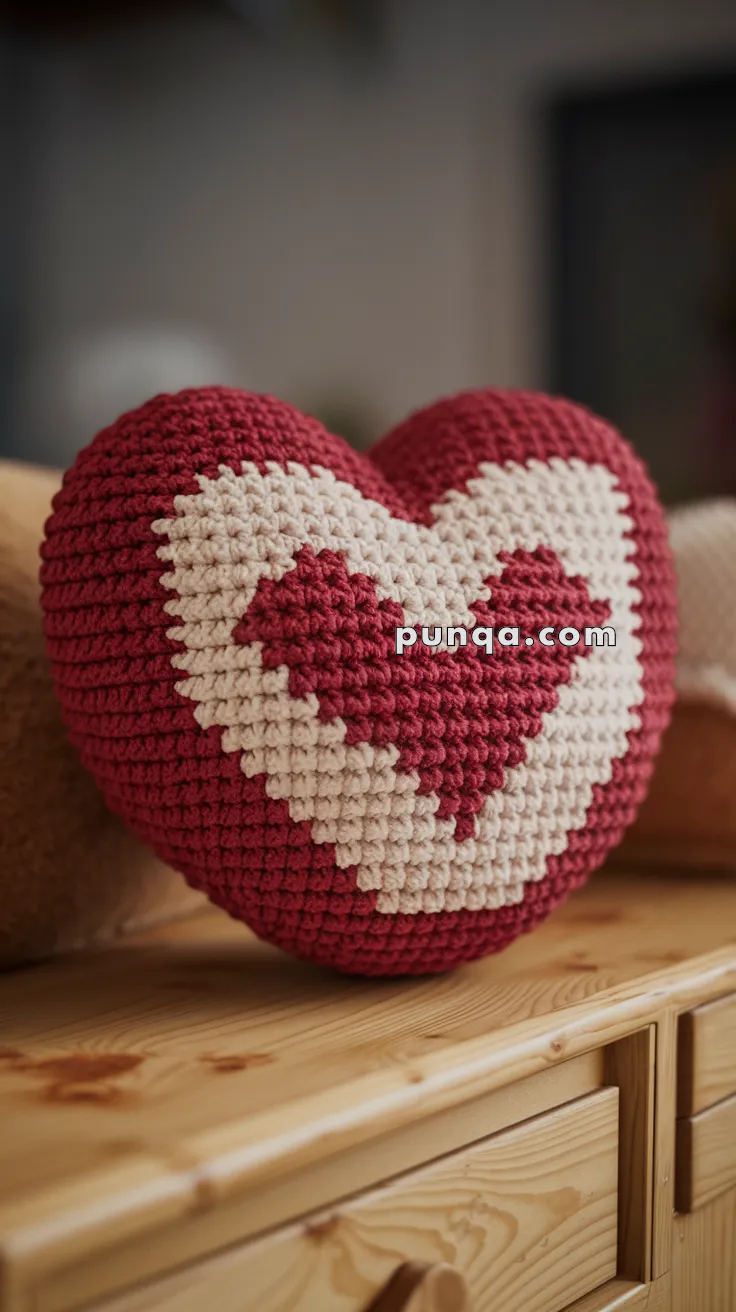
💖 Amigurumi Heart Shaped Pillow – FREE Crochet Pattern
This adorable heart-shaped amigurumi pillow is perfect for gifting, cuddling, or decorating your home with love! Featuring a charming two-tone pixel-style heart in the center, this pattern is a cozy and creative way to celebrate affection year-round.
Skill Level: Intermediate
Size: Approx. 10 inches (25 cm) wide when using worsted weight yarn and a 4.0 mm crochet hook
🧶 Materials
-
Worsted weight yarn
-
Color A: Red (main body)
-
Color B: Cream or light pink (inner heart design)
-
-
4.0 mm crochet hook
-
Tapestry needle
-
Polyfill stuffing
-
Stitch markers (optional)
🧵 Abbreviations (US Terms)
-
MR – Magic Ring
-
sc – Single Crochet
-
inc – Increase (2 sc in same stitch)
-
dec – Decrease (sc 2 together)
-
ch – Chain
-
FO – Fasten Off
❤️ Pattern Notes
-
The pillow is made of two identical flat heart panels worked in rows.
-
The design includes color changes to form a heart motif in the center.
-
Use tapestry crochet or yarn bobbins to manage color changes smoothly.
🔺 Heart Panel (Make 2)
Start from the bottom point of the heart using Color A unless otherwise indicated.
Row 1: ch 2, sc in 2nd ch from hook (1 st)
Row 2: ch 1, turn, inc (2 sts)
Row 3: ch 1, turn, inc in each st (4 sts)
Row 4: ch 1, turn, (sc, inc) x2 (6 sts)
Row 5: ch 1, turn, (2 sc, inc) x2 (8 sts)
Row 6: ch 1, turn, (3 sc, inc) x2 (10 sts)
Row 7: ch 1, turn, (4 sc, inc) x2 (12 sts)
Row 8: ch 1, turn, (5 sc, inc) x2 (14 sts)
Row 9: ch 1, turn, sc across (14 sts)
Colorwork Section: Rows 10–21 (14 sts per row)
Work in single crochet following the heart design chart or guide:
-
Start adding Color B stitches to form the pixel-style heart shape in the center.
-
Continue sc rows while switching between Color A and B to complete the motif.
Example (simplified guide):
Row 10: A A A A A B B A A A A A A
Row 11: A A A B B B B B A A A A A
Row 12: A A B B A A A B B A A A A
Row 13: A B B A A A A A B B A A A
Row 14: A B A A A A A A A B A A A
(Continue pattern to complete the heart)
🧷 Shaping Top Curves of Heart
Split the 14-stitch panel in half and work the top curves separately (7 sts each).
Left Curve:
Row 22: ch 1, turn, dec, 3 sc, dec (5 sts)
Row 23: ch 1, turn, dec, 1 sc, dec (3 sts)
Row 24: ch 1, turn, dec, sc (2 sts)
Row 25: ch 1, turn, dec (1 st)
FO.
Right Curve:
Join yarn to the 8th stitch of Row 21.
Repeat Rows 22–25 as for the left curve.
FO.
✂️ Assembly
-
Place the two panels together with the right sides facing out.
-
Join Color A yarn at any point along the edge.
-
sc around both panels, working through both layers.
-
Stuff with polyfill as you go.
-
Once fully stuffed, close the opening with sc and sl st to the first stitch.
-
FO and weave in all ends.
💡 Customization Ideas
-
Use pastel yarn for a baby gift or bridal shower.
-
Embroider initials or a date onto the cream heart.
-
Add a loop at the top to hang it on a door or wall.
This cozy and colorful heart is a simple but sweet way to say “I made this with love!” 💗