Brighten up any space with this Amigurumi Heart Flower in Pot crochet pattern! This charming design combines the warmth of a heart with the beauty of a blooming flower, creating a delightful handmade piece that radiates love and joy. Whether you’re crafting for a special occasion, adding a whimsical touch to your decor, or simply enjoy making nature-inspired amigurumi designs, this pattern lets you stitch up a heart-shaped flower bursting with personality! Perfect for gifting to loved ones or keeping as a cheerful reminder of kindness, this crochet creation brings a touch of handmade magic to every stitch. 🌸✨
Designed for customization, this pattern allows you to experiment with different shades of red, pink, or even pastel hues for a softer aesthetic. Add embroidered details, tiny accessories like a miniature bee or butterfly, or even create a full set of floral-inspired amigurumi for a charming display! Whether gifted as a heartfelt keepsake, displayed as a cheerful accent, or made simply for the joy of crafting, this Amigurumi Heart Flower in Pot is a fun and creative project—perfect for bringing a touch of handmade botanical magic to every stitch! 🧶💖✨
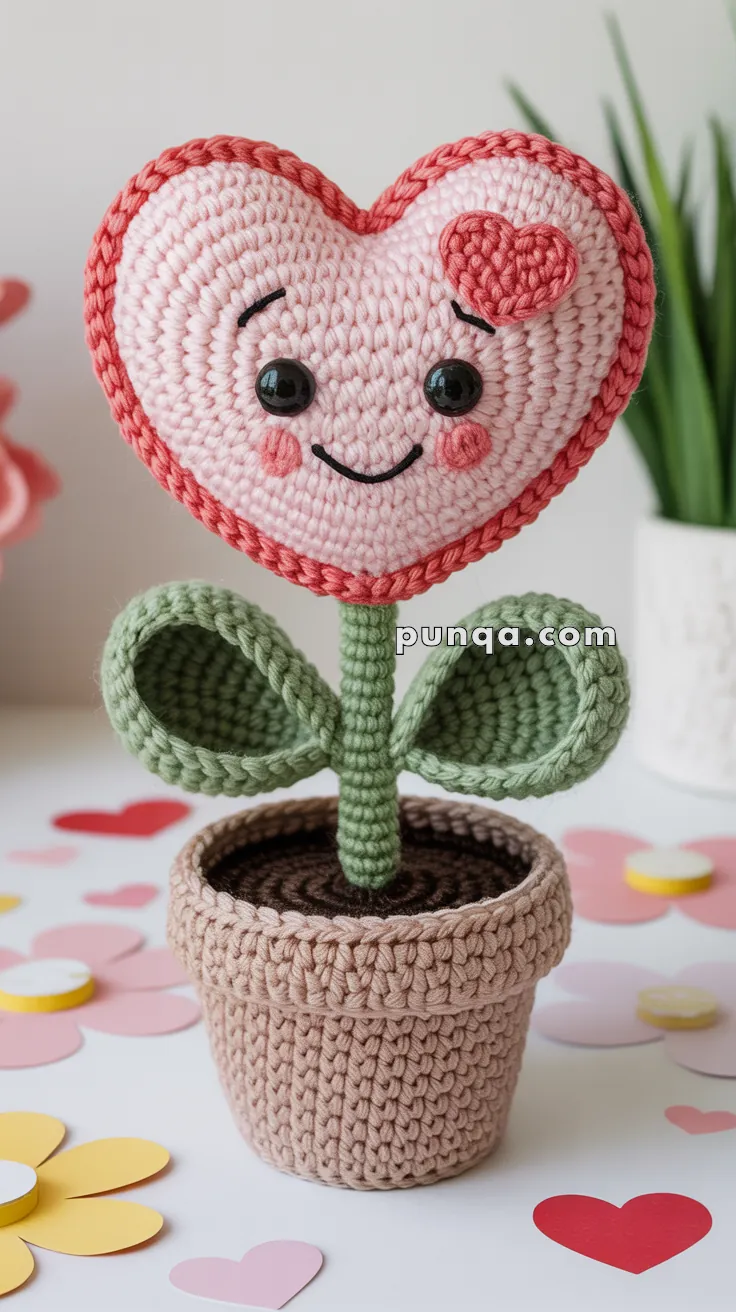
💕 Amigurumi Heart Flower in Pot Crochet Pattern
Plant some love in your home with this absolutely adorable heart flower! This sweet amigurumi features a smiling pink heart bloom with rosy cheeks, green leaves, and a charming terracotta-style pot. Perfect for Valentine’s Day, Mother’s Day, or any time you want to share a little handmade love. This eternal bloom will never wilt and makes the perfect gift for plant lovers and romantics alike! 🌸
✨ Skill Level
Beginner to Intermediate – Basic shaping with multiple components and simple assembly.
📏 Finished Size
Approx. 6–8 inches (15–20 cm) tall using DK weight yarn and a 4.0 mm hook.
🧶 Materials
Yarn (DK weight):
- Light Pink (heart flower main)
- Coral/Rose Pink (heart flower border & cheeks)
- Green (stem and leaves)
- Tan/Beige (flower pot)
- Dark Brown (potting soil)
Other supplies:
- Crochet hook: 4.0 mm (G/6)
- Tapestry needle
- Stitch markers
- Polyfill stuffing
- Safety eyes (8-10mm) OR black embroidery thread
- Black embroidery thread (for smile and eyebrows)
- Scissors
🧵 Abbreviations (US Terms)
MR – Magic Ring
sc – Single Crochet
inc – Increase
dec – Decrease
sl st – Slip Stitch
ch – Chain
rnd – Round
st – Stitch
FO – Fasten Off
CC – Color Change
💗 Heart Flower – Front Piece (Light Pink)
Rnd 1: MR, 6 sc (6)
Rnd 2: inc x6 (12)
Rnd 3: (1 sc, inc) x6 (18)
Rnd 4: (2 sc, inc) x6 (24)
Rnd 5: (3 sc, inc) x6 (30)
Rnd 6–8: sc around (30)
Creating the heart top curves: Rnd 9: 7 sc, (inc, 1 sc) x8, 7 sc (38)
Rnd 10: 7 sc, (inc, 2 sc) x8, 7 sc (46)
Rnd 11: sc around (46)
Shaping the heart point: Rnd 12: 15 sc, dec x8, 15 sc (38)
Rnd 13: 13 sc, dec x6, 13 sc (32)
Rnd 14: 11 sc, dec x5, 11 sc (27)
Rnd 15: 9 sc, dec x4, 10 sc (23)
Rnd 16: 8 sc, dec x3, 9 sc (20)
FO, leaving long tail for sewing.
💗 Heart Flower – Back Piece (Light Pink)
Repeat the same pattern as front piece.
Make two identical heart pieces
🌹 Heart Border Trim (Coral/Rose Pink)
For Front Heart: Join coral yarn to any stitch around heart edge
Rnd 1: Working around entire heart perimeter:
- 2 sc, sl st repeat around curves and sides
- At heart point: 3 sc, ch 2, 3 sc for pointed tip
- Join with sl st, FO
For Back Heart: Repeat same border trim.
💚 Stem (Green)
Rnd 1: MR, 6 sc (6)
Rnd 2–12: sc around (6)
Stuff lightly, FO leaving long tail.
🍃 Leaves (Make 2 – Green)
Rnd 1: MR, 6 sc (6)
Rnd 2: inc x6 (12)
Rnd 3: (1 sc, inc) x6 (18)
Rnd 4: (2 sc, inc) x6 (24)
Rnd 5–6: sc around (24)
Rnd 7: (2 sc, dec) x6 (18)
Rnd 8: (1 sc, dec) x6 (12)
Rnd 9: dec x6 (6)
Do not stuff. FO and flatten into leaf shape.
🪴 Flower Pot (Tan/Beige)
Rnd 1: MR, 6 sc (6)
Rnd 2: inc x6 (12)
Rnd 3: (1 sc, inc) x6 (18)
Rnd 4: (2 sc, inc) x6 (24)
Rnd 5: (3 sc, inc) x6 (30)
Rnd 6: (4 sc, inc) x6 (36)
Rnd 7: Working in back loops only, sc around (36)
Rnd 8–12: sc around (36)
Rnd 13: (4 sc, dec) x6 (30)
Rnd 14–15: sc around (30)
FO, leaving long tail. Stuff firmly.
🌱 Pot Rim (Tan/Beige)
Join yarn to front loops from Rnd 7 of pot
Rnd 1: sc in each front loop around (36)
Rnd 2: sc around (36)
FO.
🪨 Soil/Dirt (Dark Brown)
Rnd 1: MR, 6 sc (6)
Rnd 2: inc x6 (12)
Rnd 3: (1 sc, inc) x6 (18)
Rnd 4: (2 sc, inc) x6 (24)
Rnd 5: (3 sc, inc) x6 (30)
FO, leaving long tail. This will sit inside the pot.
💖 Small Heart Decoration (Coral/Rose Pink)
Rnd 1: MR, 6 sc (6)
Rnd 2: inc x6 (12)
Rnd 3: (1 sc, inc) x6 (18)
Shape into tiny heart: Rnd 4: Working to create heart curves – 6 sc, (inc) x6, 6 sc (24)
Rnd 5: 8 sc, dec x4, 8 sc (20)
Rnd 6: 7 sc, dec x3, 7 sc (17)
FO, flatten and sew to front of main heart as decoration.
🔧 Assembly Magic
- Prepare Heart Faces:
- Attach safety eyes to front heart piece (or embroider with black thread)
- Embroider black curved eyebrows above eyes
- Create smile with black thread in gentle upward curve
- Add small coral/pink circles for rosy cheeks
- Assemble Heart:
- Place front and back heart pieces together
- Stuff lightly with polyfill
- Sew around edges, leaving small opening at bottom point
- Insert stem into bottom opening and sew securely
- Attach Leaves:
- Sew leaves to either side of stem, about 1/3 down from heart
- Position leaves to curve naturally outward
- Prepare Pot:
- Stuff pot firmly to maintain shape
- Insert brown soil piece into top of pot
- The soil should sit flush with pot rim
- Final Assembly:
- Insert stem through center of soil into pot
- Adjust height so heart sits prettily above pot
- Secure stem base inside pot with additional stuffing if needed
- Add Heart Decoration:
- Sew small decorative heart to front of main heart flower
✂️ Finishing Touches
Facial Expression Tips:
- Position eyes slightly closer together for a sweeter look
- Make eyebrows subtle and curved for friendly expression
- Keep smile small and gentle
- Blush circles should be placed lower on the heart “cheeks”
Shaping the Heart:
- Gently pinch and shape the heart curves after stuffing
- The border trim helps define the heart shape
- Press the bottom point to create crisp heart silhouette
Leaf Positioning:
- Angle leaves slightly upward for a more natural plant look
- Leaves can be positioned asymmetrically for organic appearance
💡 Pro Growing Tips
- Heart shaping is key – Take time to sculpt those perfect curves
- Border makes the difference – The coral trim really defines the heart shape
- Stuffing balance – Heart should be plump but not overstuffed
- Pot stability – Firm stuffing keeps your flower standing tall
- Facial placement – Position features while pieces are flat for easier sewing
- Stem flexibility – Light stuffing allows for gentle posing adjustments
Customization Ideas:
- Make seasonal versions with different colored borders
- Add tiny embroidered details like sparkles or stars
- Create multiple flowers in different sizes for a garden
- Use variegated yarn for ombre heart effects
- Add small beads or buttons for extra texture
This charming heart flower brings eternal spring to any space and makes the perfect “plant” for those without green thumbs! Your handcrafted bloom will spread smiles and love wherever it’s displayed. 🌸💕