Creating an amigurumi haunted house is a delightful adventure that combines the charm of crochet with the whimsical spookiness of Halloween! 🎃 There’s something magical about watching a cozy yarn project transform into a mini haunted mansion, full of character and eerie detail. As a crochet enthusiast, I find immense joy in blending creativity with craft, and designing my own haunted house pattern is an opportunity to let my imagination run wild. Whether it’s adding little bats, ghosts, or a tiny Frankenstein peeking from the windows, each stitch adds personality and spookiness, turning simple yarn into a festive masterpiece.
The process of crafting an amigurumi haunted house begins with choosing the right colors and textures of yarn that capture the essence of a mysterious, spooky dwelling. I usually start by sketching my ideas and deciding on the size and features I want to incorporate. Once I have a plan, it’s time to dive into the actual crocheting, a soothing rhythm of loops and knots that gradually bring the haunted house to life. The best part? Adding the little details—like cobwebs and jack-o’-lanterns—that truly make the haunted house come alive. It’s a joyful challenge that results in a unique decoration, perfect for adding a touch of crochet charm to any Halloween display! 👻
🏚️ Amigurumi Haunted House Crochet Pattern
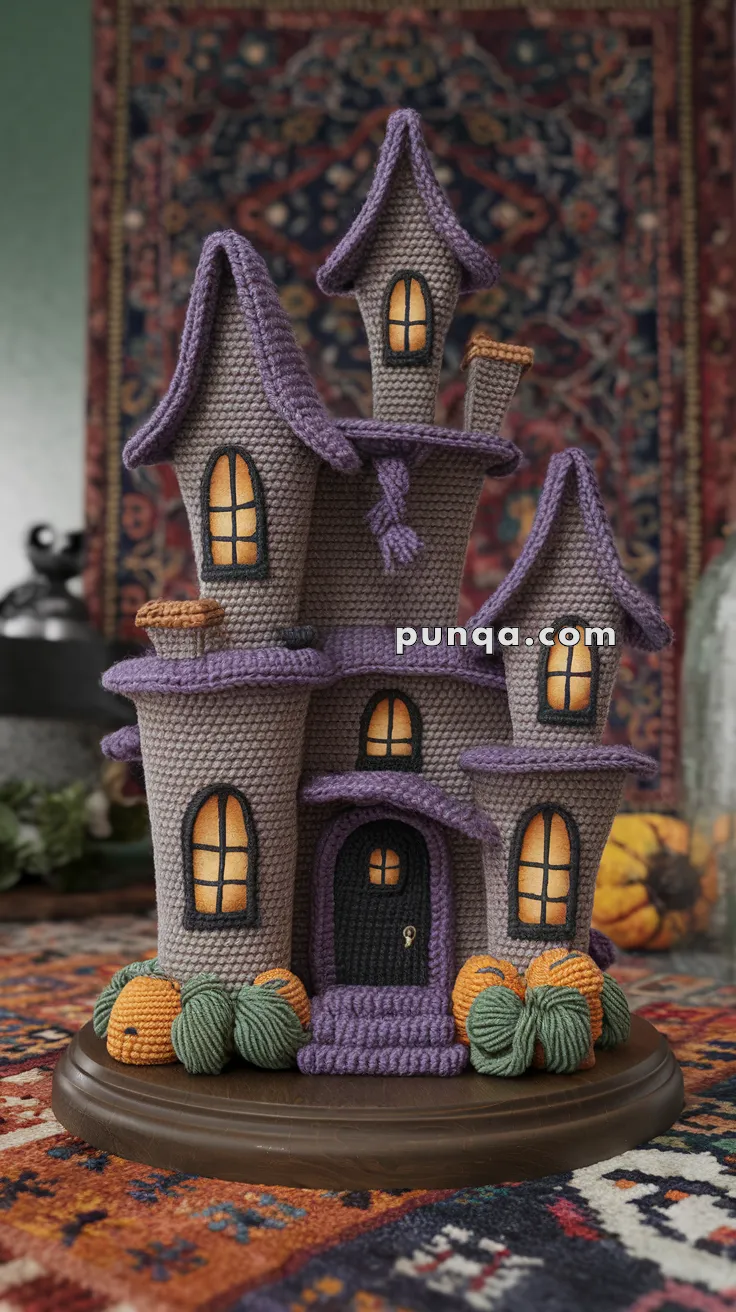
Bring eerie charm to your Halloween décor with this detailed Amigurumi Haunted House! Featuring five crooked towers, wavy purple roofs, glowing windows, pumpkins, and tiny chimneys, this handmade haunted mansion will become the spooky centerpiece of your display. Add a soft LED inside to make the windows glow — just like in the photo! 🎃✨
✨ Skill Level
Intermediate to Advanced – involves shaping multiple towers, angled roofs, embroidery, and detailed assembly.
📏 Finished Size
Approx. 10–12 inches (25–30 cm) tall when mounted on a wooden base.
🧶 Materials
-
Worsted weight yarn in:
-
Gray – walls
-
Purple – roofs, trim, stairs, rope
-
Black – doors and window outlines
-
Yellow/Orange – window glow
-
Brown – chimneys
-
Orange + Green – pumpkins
-
-
3.0 mm crochet hook
-
Fiberfill stuffing
-
Tapestry needle
-
Plastic canvas or cardboard (for roof and wall support)
-
Small LED tealight or fairy lights (optional)
-
Wooden display base (optional)
🔤 Abbreviations (US Terms)
MR – magic ring
sc – single crochet
inc – increase (2 sc in same st)
dec – decrease
ch – chain
sl st – slip stitch
FLO – front loop only
BLO – back loop only
FO – fasten off
🏠 Main Tower (Center Body – Gray)
Make 1
-
MR, 6 sc
-
inc ×6 (12)
-
(1 sc, inc) ×6 (18)
-
(2 sc, inc) ×6 (24)
-
(3 sc, inc) ×6 (30)
6–40. sc around (30) -
BLO sc around for roof trim edge.
42–45. sc around (30).
FO and stuff firmly.
🗼 Side Towers (Gray)
Tall Left Tower
1–35. Work same as main body.
FO and stuff firmly.
Short Right Tower
1–25. Work same as main body.
FO and stuff lightly.
🏚️ Mini Towers (Gray)
Make 2 – attach to upper roof platforms
-
MR, 6 sc
-
inc ×6 (12)
-
(1 sc, inc) ×6 (18)
4–15. sc around (18) -
BLO sc around for roof attachment.
FO, stuff lightly.
👉 Position one mini tower to upper-left roof, one to upper-right roof. These create the “layered spires” seen in the photo.
🟪 Crooked Roofs (Purple – 5 Total)
General Roof Pattern (use for all towers, adjusting height)
-
MR, 6 sc
-
inc ×6 (12)
-
(1 sc, inc) ×6 (18)
4–6. sc around (18) -
(2 sc, inc) ×6 (24)
8–10. sc around (24) -
(3 sc, inc) ×6 (30)
12–14. sc around (30) -
(4 sc, inc) ×6 (36)
16–22. sc around (36)
Add Curve Shape (for bent tops):
23. BLO sc around (36) → fold gently to create a curved tilt.
24–26. dec ×6 evenly to taper tip.
FO, stuff lightly.
🌀 Roof Trim (Wavy Edge)
Ch length to wrap base of each roof.
Row 1: sc across
Row 2: (sc, inc) repeat to create ruffle.
Join into a ring, sew around each roof base.
🚪 Door (Black + Purple Frame)
With black:
Ch 6, sc 5 across for 5 rows.
Decrease at top for rounded arch.
With purple, sl st around edges for border.
Add yellow yarn cross-stitch window at top.
FO and sew to main tower front.
🪜 Front Steps (Purple)
Ch 7, sc across 5 rows.
Make 2–3 layers. Stack and sew below door for 3D steps.
🪟 Arched Windows (Black + Yellow)
Make 7–8 windows total
With black:
Ch 4, sc in oval shape around chain for 3 rounds to form tall arch.
With yellow or orange, crochet a smaller oval (or use felt).
Place glow piece behind frame.
Embroider 2 vertical + 1 horizontal bar for panes.
Sew around towers and front façade.
🧱 Chimneys (Brown)
Large Chimney:
MR, 6 sc → inc ×6 (12) → sc 10 rounds. FO.
Small Chimney:
MR, 6 sc → inc ×6 (12) → sc 6 rounds. FO.
Attach large chimney to left mid-roof, small chimney to right mini roof.
🎃 Pumpkins (Orange + Green)
Make 5–6 total
-
MR, 6 sc
-
inc ×6 (12)
-
(1 sc, inc) ×6 (18)
4–6. sc around (18) -
(1 sc, dec) ×6 (12)
-
dec ×6 (6)
FO, close tightly.
Add green stem (ch 6, sl st back) and attach around base near steps.
🪢 Rope Accent (Optional)
With purple, ch 20 and braid 3 strands.
Attach below central roof overhang (optional decorative detail).
🧷 Assembly
-
Attach tall left and small right towers to main house.
-
Add mini towers to upper roof sections.
-
Sew roofs in place, tilt each slightly to create crooked appearance.
-
Add wavy trims.
-
Attach both chimneys.
-
Sew on door, windows, and steps.
-
Position pumpkins around base symmetrically.
-
Mount the entire piece on a round wooden base for stability.
-
Insert a small LED tealight or fairy light inside for glowing effect.
✨ Final Touch
Your Haunted House Amigurumi is complete!
Each tower leans just a little, every window glows warmly, and the whole piece has that spooky fairytale charm. Set it on a bookshelf or Halloween centerpiece — it’s a masterpiece of handmade Halloween décor. 🎃👻
🧵 Optional Add-ons
-
Embroider faint brick lines with gray yarn for realism.
-
Add wisps of yarn “vines” along towers.
-
Use matte fabric stiffener on roofs for extra curve hold.