There’s something undeniably charming about crafting an amigurumi hanging plant holder. 🌿🧶 With just a few balls of yarn and a crochet hook, I can transform simple materials into something both beautiful and functional. The allure of these creations lies in their ability to infuse a personal touch into any space. Imagine the joy of seeing a little crocheted basket holding a cascading plant, gently swaying from a hook in the ceiling. It adds a dash of whimsy and warmth to a room that no store-bought item could match. Plus, every piece is unique, a testament to the love and effort woven into each stitch.
The process itself is a delightful journey. I start by selecting vibrant colors of yarn that will bring my vision to life. Then, I dive into the meditative rhythm of crocheting, my hands moving almost instinctively as I craft each loop and twist. It’s a wonderful form of creative expression, allowing me to experiment with patterns and styles. As the plant holder begins to take shape, I get a thrill from seeing my ideas materialize. And finally, the moment arrives when I hang it up and step back to admire my handiwork—it’s a little piece of art that I’ve created, full of personality and joy. 🌟
🌱 Amigurumi Hanging Plant Holder Crochet Pattern
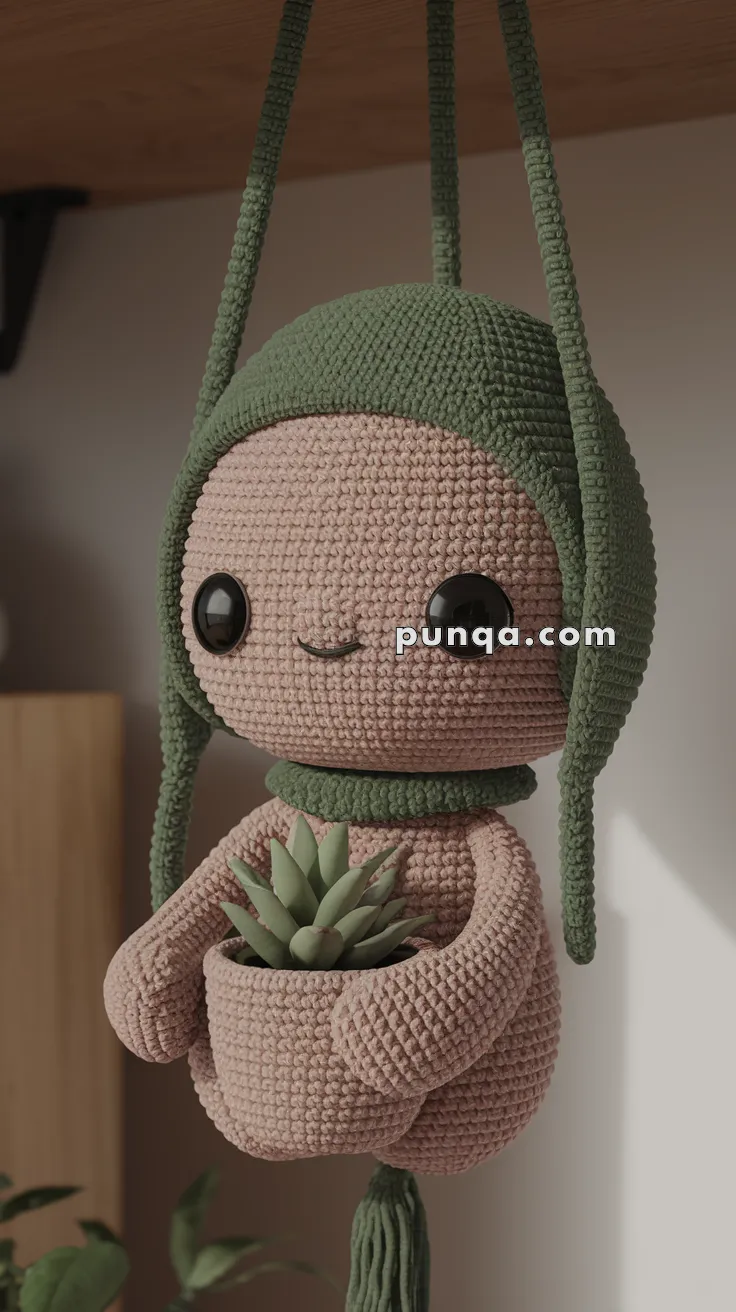
Bring a touch of warmth and whimsy into your space with this adorable hanging plant holder amigurumi. Designed to cradle a small succulent pot, this sweet character features a soft rounded body, a tall built-in pot, long hugging arms, a cozy oversized hood with long side flaps, and sturdy straps for hanging.
🧵 Skill Level
Intermediate – involves shaping, hood construction, tall pot shaping, and precise assembly.
📏 Finished Size
Approximately 25–30 cm (10–12 inches) tall (excluding hanging straps).
🧶 Materials
Yarn Amounts:
• Blush / skin-tone cotton yarn: 120–150 g
• Sage / olive green cotton yarn: 80–100 g
Other Supplies:
• 3.0 mm crochet hook
• 10–12 mm black safety eyes
• Polyfill stuffing
• Yarn needle & stitch marker
• Optional: small cardboard circle for pot base
• Optional: wooden ring for hanging
• Small artificial succulent
🪡 Abbreviations (US Terms)
MR – Magic Ring
sc – single crochet
inc – increase (2 sc in same stitch)
dec – decrease (sc2tog)
ch – chain
sl st – slip stitch
BLO – back loop only
FO – fasten off
🧠 Head (Blush/Yarn A)
R1: MR, 6 sc
R2: inc ×6 → 12
R3: (1 sc, inc) ×6 → 18
R4: (2 sc, inc) ×6 → 24
R5: (3 sc, inc) ×6 → 30
R6: (4 sc, inc) ×6 → 36
R7: (5 sc, inc) ×6 → 42
R8–18: sc around (42)
📌 Eye placement: Insert 10–12 mm safety eyes between Rounds 11–12, spaced 6–7 stitches apart for a closer, photo-accurate expression.
R19: (5 sc, dec) ×6 → 36
R20: (4 sc, dec) ×6 → 30
R21: (3 sc, dec) ×6 → 24
R22: (2 sc, dec) ×6 → 18
Stuff head firmly.
R23: (1 sc, dec) ×6 → 12
R24: dec ×6 → 6
FO.
🪴 Tall Pot + Torso (Blush/Yarn A)
This section forms the tall plant pot and the smooth torso above it.
🌿 Pot Section
R1: MR, 6 sc
R2: inc ×6 → 12
R3: (1 sc, inc) ×6 → 18
R4: (2 sc, inc) ×6 → 24
R5: (3 sc, inc) ×6 → 30
R6: (4 sc, inc) ×6 → 36
R7: (5 sc, inc) ×6 → 42
R8: BLO sc around (42)
R9–18: sc around (42)
📌 Optionally insert a cardboard circle for structure.
🌿 Torso
R19: (5 sc, dec) ×6 → 36
R20–24: sc around (36)
R25: (4 sc, dec) ×6 → 30
R26–30: sc around (30)
R31: (3 sc, dec) ×6 → 24
R32–33: sc around (24)
R34: (2 sc, dec) ×6 → 18
R35: (1 sc, dec) ×6 → 12
R36: sc around (12)
FO. Stuff firmly.
✋ Arms (Make 2 – Blush/Yarn A)
Arms in the photo are long and create a wrapping “hug” around the pot.
Use this slightly extended version:
R1: MR, 6 sc
R2: (1 sc, inc) ×3 → 9
R3–14: sc around (9)
Stuff lower ⅔ lightly.
FO, leave sewing tail.
🌿 Hood With Long Side Flaps (Green/Yarn B)
Hood Cap
R1: MR, 6 sc
R2: inc ×6 → 12
R3: (1 sc, inc) ×6 → 18
R4: (2 sc, inc) ×6 → 24
R5: (3 sc, inc) ×6 → 30
R6: (4 sc, inc) ×6 → 36
R7–16: sc around (36)
FO.
📌 Fit note: The hood should sit low on the head, covering the top ⅔ of the head and reaching close to eye level, just like in the photo.
Side Flaps (Make 2)
Ch 16
Row 1: sc in 2nd ch from hook and across (15)
Rows 2–18: sc across (15)
FO.
Assemble Hood
Sew one flap to each side of hood, positioned from R10 to R16 so they frame the face and hang down straight.
🌿 Side Straps (Make 2 – Green/Yarn B)
Ch 55–60 (to match photo length)
Row 1: sc in 2nd ch and across
Rows 2–3: sc across
FO.
Attach each strap to the bottom of a side flap.
They should hang down to the bottom of the pot or slightly below.
🌿 Hanging Straps (Make 2 – Green/Yarn B)
Choose based on where you’ll hang the doll:
• Shelf height: ch 90–100
• Higher hanging: ch 120–140
Row 1: sc in 2nd ch and across
Rows 2–3: sc across
FO.
Sew both straps to the top center of the hood, or attach to a wooden ring.
🌿 Neck Ring (Green/Yarn B)
Ch 14–16
Row 1: sc across
Rows 2–3: sc across
FO.
This sits neatly between the head and torso.
🌸 Face Embroidery
Embroider a very small, gentle curved smile, about 3–4 stitches wide, centered just below the eyes for a soft, sweet expression.
🌱 Assembly
1. Join Head to Body
Sew the 12-st head opening to the 12-st torso opening.
Slip the neck ring around the seam and secure in place.
2. Attach Hood
Place hood so that it sits low on the head and sew around the base.
Make sure side flaps frame the face.
3. Attach Arms
Sew arms between Rounds 16–20 of the body (upper pot area).
Position them so they curve forward and meet at the front of the pot.
4. Add Straps
Attach side straps to the bottom of the flaps.
Attach hanging straps to the top of the hood or to a wooden ring.
5. Add Succulent
Insert a small artificial succulent or mini planter inside the pot.
🌿 Your Hanging Plant Buddy Is Complete!
With its cozy hood, hugging arms, tall pot body, and adorable sweet face, this amigurumi plant holder brings joyful charm to any space. Hang it in your living room, near a window, or in your plant corner for a delightful handmade touch. 🌱💚