Bubble, bubble, stitch and trouble! 🧙♀️🧶 The Amigurumi Halloween Cauldron Wreath is a spooky showstopper that brews up charm, color, and a dash of mischief for your seasonal décor. With a bubbling cauldron at its center, surrounded by playful potion drips, creepy accents, and maybe even a few googly eyes, this wreath is perfect for welcoming trick-or-treaters or adding a handmade haunt to your home. It’s a festive fusion of whimsy and witchcraft that’s sure to cast a smile on anyone who passes by.
This pattern is a dream for creative crocheters who love mixing textures, bold Halloween hues, and quirky details. Customize your cauldron’s “brew,” add bats, spiders, or candy corn, and let your imagination bubble over! Whether you hang it on your door, display it above your mantel, or gift it to a fellow Halloween enthusiast, the Halloween Cauldron Wreath is a magical way to stir up spooky joy—one loop at a time. 🎃🕸️💜
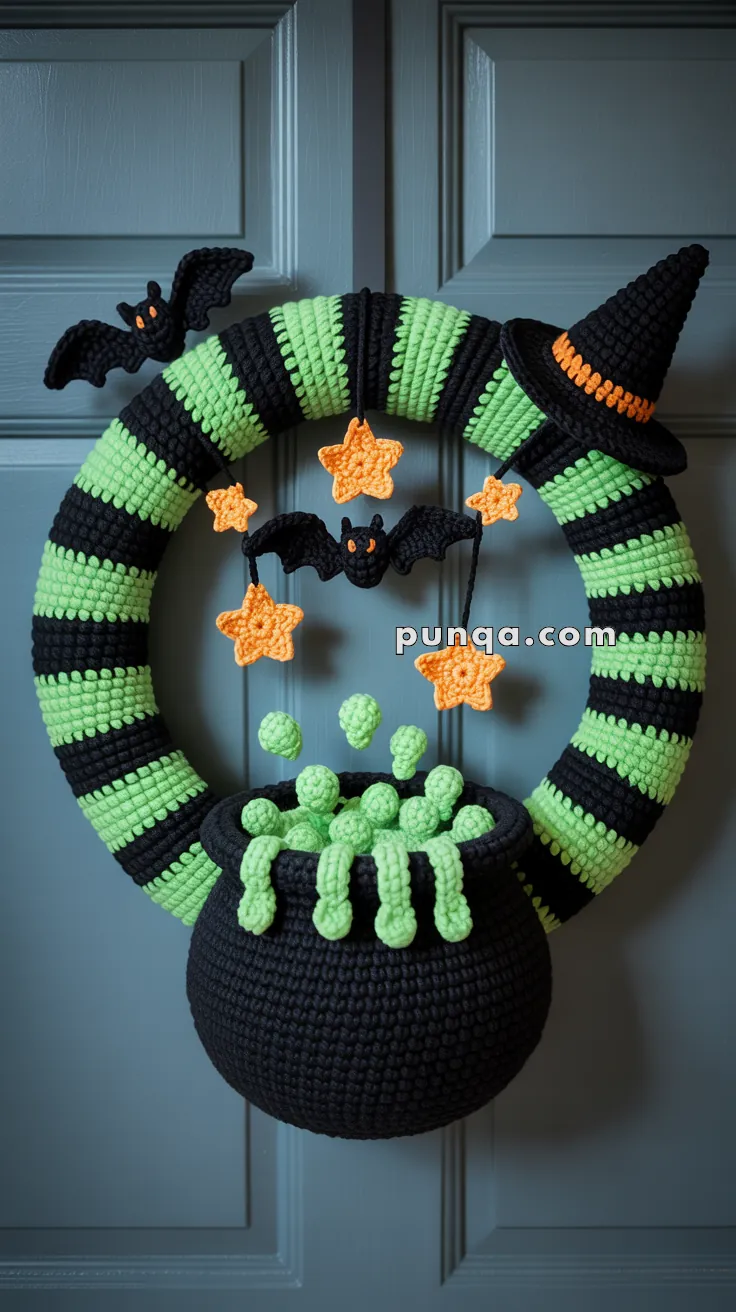
🧙♀️ Halloween Cauldron Wreath Crochet Pattern
Turn your front door into a spooky showpiece with this crochet Halloween wreath! It features a bubbling cauldron full of slime, glowing stars, fluttering bats, and a tilted witch’s hat — all stitched by hand for the perfect handmade touch.
✨ Skill Level
Intermediate – involves shaping, color changes, and sewing pieces together.
⏳ Estimated Time
12–15 hours
📏 Finished Size
- Wreath base: 30 cm (12 in) foam ring
- Overall size with decorations: approx.
- Height: 45–50 cm (18–20 in)
- Width: 35–40 cm (14–16 in)
- Depth: 12–15 cm (5–6 in)
🧶 Materials
- Worsted weight yarn (approximately):
- Black: 300g (cauldron, wreath stripes, bats, hat)
- Neon Green: 200g (slime + potion bubbles, wreath stripes)
- Orange: 50g (stars, hat band)
- Crochet hook: 3.5 mm (E/4)
- Fiberfill stuffing: approximately 200g
- Yarn needle
- Scissors
- Foam wreath base: 30 cm (12 in) diameter
- Hot glue gun and glue sticks (optional, for securing parts)
- Fabric stiffener or white glue (for stars)
- Stitch markers (helpful for tracking rounds)
🪡 Abbreviations (US Terms)
- MR = Magic Ring
- sc = single crochet
- inc = increase (2 sc in same stitch)
- dec = decrease (sc2tog – insert hook in next 2 sts, yarn over, pull through both, yarn over, pull through all loops)
- ch = chain
- sl st = slip stitch
- hdc = half double crochet
- dc = double crochet
- st(s) = stitch(es)
- FO = fasten off
- [ ] = total stitch count for that round
- × = repeat instructions the specified number of times
📝 Gauge
Not critical, but keeping consistent tension will ensure pieces fit together well. Approximately 18 sc × 20 rows = 10 cm (4 in) square
🎃 Pattern Instructions
1. Wreath Cover (Black & Green Stripes)
Note: Work in rows, turning at the end of each row.
- Ch 31
- Row 1: sc in 2nd ch from hook and each ch across [30 sc], turn
- Rows 2–5: ch 1, sc across [30], turn (continue with black)
- Rows 6–10: ch 1, sc across [30], turn (switch to neon green)
- Rows 11–15: ch 1, sc across [30], turn (switch to black)
- Rows 16–20: ch 1, sc across [30], turn (switch to neon green)
Continue alternating 5 rows black, 5 rows neon green until piece measures approximately 95–100 cm (38–40 in) long, or enough to wrap snugly around your wreath base. You should have approximately 16–18 complete stripes.
End with a black stripe. FO, leaving a long tail for sewing.
Wrap around foam wreath base and sew short ends together using whip stitch or mattress stitch. Adjust tightness so cover fits snugly without puckering.
2. Cauldron (Black)
Note: Work in continuous spiral rounds. Use a stitch marker to track beginning of rounds.
Body:
- MR, 6 sc [6]
- inc in each st around [12]
- (sc, inc) ×6 [18]
- (2 sc, inc) ×6 [24]
- (3 sc, inc) ×6 [30]
- (4 sc, inc) ×6 [36]
- (5 sc, inc) ×6 [42]
- (6 sc, inc) ×6 [48]
- (7 sc, inc) ×6 [54]
- (8 sc, inc) ×6 [60]
- (9 sc, inc) ×6 [66]
- (10 sc, inc) ×6 [72] 13–16. sc around [72] (4 rounds even)
- (10 sc, dec) ×6 [66]
- (9 sc, dec) ×6 [60]
- (8 sc, dec) ×6 [54]
- (7 sc, dec) ×6 [48]
- (6 sc, dec) ×6 [42]
- (5 sc, dec) ×6 [36]
- (4 sc, dec) ×6 [30]
- (3 sc, dec) ×6 [24]
Before closing: Stuff cauldron very firmly, especially at the bottom and sides. Shape as you stuff to create a rounded pot shape.
- (2 sc, dec) ×6 [18]
Continue stuffing.
- (sc, dec) ×6 [12]
FO, leaving a long tail (about 50 cm). Thread tail through remaining 12 sts and pull tight to close. Weave in end securely.
Thick Rim:
Attach black yarn to any stitch at the top opening edge of cauldron (round 12, where it’s widest at 72 sts).
- ch 1, sc in each st around, join with sl st to first sc [72]
- ch 1, (sc, inc) ×36, join with sl st [108]
- ch 1, sc in each st around, join with sl st [108]
- ch 1, (sc, dec) ×36, join with sl st [72]
- ch 1, sc in each st around, join with sl st [72]
As you work: Lightly stuff the rim after round 3 for a padded, dimensional rim effect.
FO, leaving a long tail for attaching to wreath. Weave in end securely.
3. Slime Drips (Neon Green, make 7–8)
Note: Work in continuous spiral rounds.
- Ch 10, join with sl st to first ch to form ring [10]
- sc in each ch around [10] 3–12. sc around [10] (10 rounds even)
Variation: Make 2–3 drips with 14 rounds instead of 12 for varied lengths.
Stuff very lightly (just enough to hold tube shape). FO, leaving a long tail (about 30 cm) for sewing.
Attach drips evenly spaced around the cauldron rim, positioning them to hang downward naturally.
4. Potion Bubbles (Neon Green)
Make a total of 9–10 bubbles in varying sizes. Stuff each bubble firmly to create round, three-dimensional spheres.
Small Bubbles (make 4):
- MR, 6 sc [6]
Stuff. FO, leaving 20 cm tail. Thread tail through all 6 sts and pull tight to close.
Medium Bubbles (make 3):
- MR, 6 sc [6]
- inc in each st around [12]
- sc around [12]
Stuff firmly. FO, leaving 20 cm tail. Thread tail through all 12 sts and pull tight to close.
Large Bubbles (make 2):
- MR, 6 sc [6]
- inc in each st around [12]
- (sc, inc) ×6 [18] 4–5. sc around [18] (2 rounds)
Stuff very firmly. FO, leaving 20 cm tail. Thread tail through all 18 sts and pull tight to close.
Extra Large Bubble (make 1):
- MR, 6 sc [6]
- inc in each st around [12]
- (sc, inc) ×6 [18]
- (2 sc, inc) ×6 [24] 5–6. sc around [24] (2 rounds)
- (2 sc, dec) ×6 [18]
Stuff very firmly. FO, leaving 20 cm tail. Thread tail through all 18 sts and pull tight to close.
Assembly note: Arrange bubbles in a dense, vertical cluster at the front/center base of the cauldron (like a spine or tower). Place 6–7 bubbles clustered tightly together, then add 2 bubbles spilling over the rim, and position 1–2 smaller bubbles floating upward between the cauldron and stars.
5. Witch Hat (Black + Orange Band)
Note: Work cone in continuous spiral rounds.
Cone:
- MR, 4 sc [4]
- sc around [4]
- (sc, inc) ×2 [6]
- sc around [6]
- (2 sc, inc) ×2 [8]
- sc around [8]
- (3 sc, inc) ×2 [10]
- sc around [10]
- (4 sc, inc) ×2 [12]
- sc around [12]
- (5 sc, inc) ×2 [14]
- sc around [14]
- (6 sc, inc) ×2 [16]
- sc around [16]
- (7 sc, inc) ×2 [18]
- sc around [18]
- (8 sc, inc) ×2 [20]
- sc around [20]
- (9 sc, inc) ×2 [22]
- sc around [22]
- (10 sc, inc) ×2 [24]
- sc around [24]
- (11 sc, inc) ×2 [26]
- sc around [26]
- (12 sc, inc) ×2 [28]
- sc around [28]
- (13 sc, inc) ×2 [30]
- sc around [30]
- (14 sc, inc) ×2 [32]
- sc around [32]
Cone should measure approximately 12–14 cm (5–5.5 in) tall at this point.
Stuff lightly, focusing on the tip and middle sections. Bottom should remain flexible for attaching brim.
Brim:
Join with sl st to round 30. Do not turn.
- ch 3 (counts as first dc), 2 dc in same st, 3 dc in each st around, join with sl st to top of ch-3 [96 dc]
- ch 3, dc in each st around, join with sl st to top of ch-3 [96]
- ch 1, sc in each st around, join with sl st [96]
FO, leaving long tail for sewing. Weave in ends. Shape brim to lay flat.
Orange Band:
With orange yarn:
- Ch 50
- Row 1: sc in 2nd ch from hook and each ch across [49]
- Row 2: ch 1, turn, sc across [49]
FO, leaving tails for sewing.
Wrap band around base of hat cone (just above the brim) and sew or glue ends together in back. Sew top and bottom edges of band to hat to secure.
6. Stars (Orange, make 5–6)
- MR, 10 sc, join with sl st to first sc [10]
- (ch 4, sl st in 2nd ch from hook, sc in next ch, hdc in next ch, sl st in next st of ring) ×5
This creates 5 pointed star arms.
FO. Weave in starting tail securely. Leave ending tail long (about 30 cm) for attaching to wreath.
Stiffening: Mix equal parts white glue and water. Apply mixture to stars with a brush or sponge. Shape points while damp and let dry completely on wax paper (4–6 hours or overnight).
7. Bats (Black with Orange Eyes, make 2)
Note: Work body in continuous spiral rounds.
Body:
- MR, 6 sc [6]
- (sc, inc) ×3 [9] 3–5. sc around [9] (3 rounds)
Stuff lightly. FO, leaving long tail (about 40 cm) for attaching wings and sewing to wreath.
Wings (make 4 total – 2 per bat):
Main wing section:
- Ch 17
- Row 1: Starting in 2nd ch from hook: sl st, sl st, sc, sc, hdc, dc, dc, dc, dc, hdc, sc, sc, sl st, sl st, sl st [15 sts]
Do not FO. Continue to wing tip.
Pointed tip:
- Ch 9
- Row 2: Starting in 2nd ch from hook: sl st, sl st, sc, hdc, dc, hdc, sc, sl st [8 sts]
FO, leaving 25 cm tail for sewing.
Attach wings to each side of bat body, positioning them angled upward and outward for a flying pose. Sew securely using the tails.
Eyes (embroider on each bat):
Using orange yarn and yarn needle, embroider two small eyes on the bat’s face using French knots or satin stitch:
- Make small circles (about 3–4 wraps for French knots)
- Position eyes on rounds 2–3 of body, spaced 2–3 sts apart
Alternatively, you can use tiny orange beads or safety eyes if preferred.
🧷 Assembly Instructions
Step 1: Prepare Wreath Base
Ensure wreath cover is securely sewn and fits snugly on foam base with no gaps.
Step 2: Attach Cauldron
Position cauldron at the bottom center of the wreath. The cauldron should rest on the wreath and extend slightly forward. Using the long tail from the cauldron rim and a yarn needle, sew through the back of the cauldron into the wreath cover with multiple tight stitches. Reinforce with hot glue on the back side if needed.
Step 3: Add Slime Drips
Space 7–8 slime drips evenly around the cauldron rim (approximately every 9–12 stitches). Sew the top of each drip to the underside of the rim using the long tail. Vary lengths by choosing different drips (12-round vs. 14-round versions) and positioning them at different points on the rim.
Step 4: Arrange Potion Bubbles
Main cluster: Create a dense, vertical stack of 6–7 bubbles directly in front of the cauldron base, building them up like a spine. Start with the XL bubble at the bottom, then layer large, medium, and small bubbles on top. Sew each bubble to the one below it and to the wreath/cauldron for stability.
Spillover: Position 2 bubbles on or near the cauldron rim as if overflowing.
Floating: Attach 1–2 small bubbles in the space between the cauldron and where the stars will go, using yarn tails to sew to the wreath base.
Step 5: Attach Witch Hat
Position witch hat at the upper right of the wreath (approximately 1–2 o’clock position), tilted at about a 30–45 degree angle to the right. Sew through the brim and into the wreath cover at multiple points for security. Add hot glue to the back of the brim for extra hold.
Step 6: Add Stars
Attach 5–6 stiffened stars to the top center area of the wreath (10–2 o’clock position). To create a floating/dangling effect:
- Cut varying lengths of black or green yarn (8–15 cm)
- Tie one end to the back of each star
- Sew the other end to the wreath at different depths to create visual interest
- Position stars at different heights – some near the wreath surface, others dangling 2–5 cm away
Alternatively, sew stars directly to the wreath if you prefer a flatter look.
Step 7: Position Bats
Sew one bat among the stars in the upper center area, and position the second bat slightly to the left or right. Angle the bats as if they’re flying around the magical scene. Sew through the body and into the wreath securely.
🌟 Finishing Touches
Blocking & Shaping
- Steam block the wreath cover if stripes aren’t laying completely flat – hold a steam iron 2–3 cm above the surface (do not touch) and let steam penetrate the fibers, then smooth with your hands
- Shape the cauldron to ensure it’s rounded and symmetrical
- Curl bat wings slightly by dampening with water and shaping by hand
- Adjust brim of witch hat to ensure it’s flat and even
Stiffening
- Stars: Must be stiffened as described in pattern (glue/water mixture)
- Optional for hat brim: Apply light starch spray to help brim hold its shape
Reinforcement
- Check all attachments – tug gently on each element to ensure it’s secure
- Add extra stitches where needed, especially on heavy pieces (cauldron, hat)
- Hot glue backup: For long-term durability, add small dots of hot glue to the back of major attachments
Final Details
- Weave in all ends securely with at least 5 cm woven through stitches
- Trim excess yarn close to work (but not too close – leave 2–3 mm)
- Fluff stuffing in any pieces that look flat
- Clean surface with a lint roller to remove any yarn fibers or dust
🎃 Display & Care
Hanging
Use a sturdy wreath hanger appropriate for the weight (approximately 400–500g total). Hang on:
- Front door (covered porch recommended)
- Interior wall using a nail or command hook
- Mantel (propped or hung)
- Door inside home
Care Instructions
- Spot clean only – use damp cloth for small marks
- Keep dry – not suitable for outdoor use in rain
- Avoid direct sunlight for extended periods to prevent color fading
- Store flat in a box or garment bag during off-season
- Protect from pets – dangling elements may be tempting to cats!
Storage
When Halloween season ends:
- Remove from display area
- Gently reshape any compressed elements
- Place flat in a box with tissue paper between layers
- Store in cool, dry place
- Check annually for any needed repairs
💡 Tips & Troubleshooting
Common Issues
Wreath cover too loose:
- Work fewer rows or use a smaller hook for tighter gauge
- Add elastic thread to every 5th row for stretch
Wreath cover too tight:
- Work more rows or use a larger hook
- Gently stretch fabric before sewing ends together
Cauldron leans or won’t stay in place:
- Add more stuffing for structure
- Sew through cauldron into foam base at multiple points
- Use hot glue generously on back
Stars won’t hold shape:
- Apply additional coats of stiffener
- Let dry completely between coats (overnight)
- Use heavier starch spray as alternative
Bubbles look flat:
- Stuff more firmly – they should feel hard
- Close opening more tightly
- Use smaller bubbles if stuffing is difficult
Bat wings droop:
- Use stiffer yarn or add a light coat of stiffener
- Sew wings in place at multiple points
- Wire can be inserted into wings for permanent structure (wrap in yarn first)
Customization Ideas
- Color variations: Try purple and orange, black and white, or traditional orange and black
- Add glitter: Mix glitter into stiffening solution for sparkly stars
- LED lights: Attach battery-operated fairy lights behind bubbles for glow effect
- Personalization: Add a small “Welcome” sign or family name below cauldron
- Scale up/down: Use larger/smaller wreath base and adjust component sizes accordingly
Happy crafting and happy haunting! 🕷️🧙♀️🦇✨