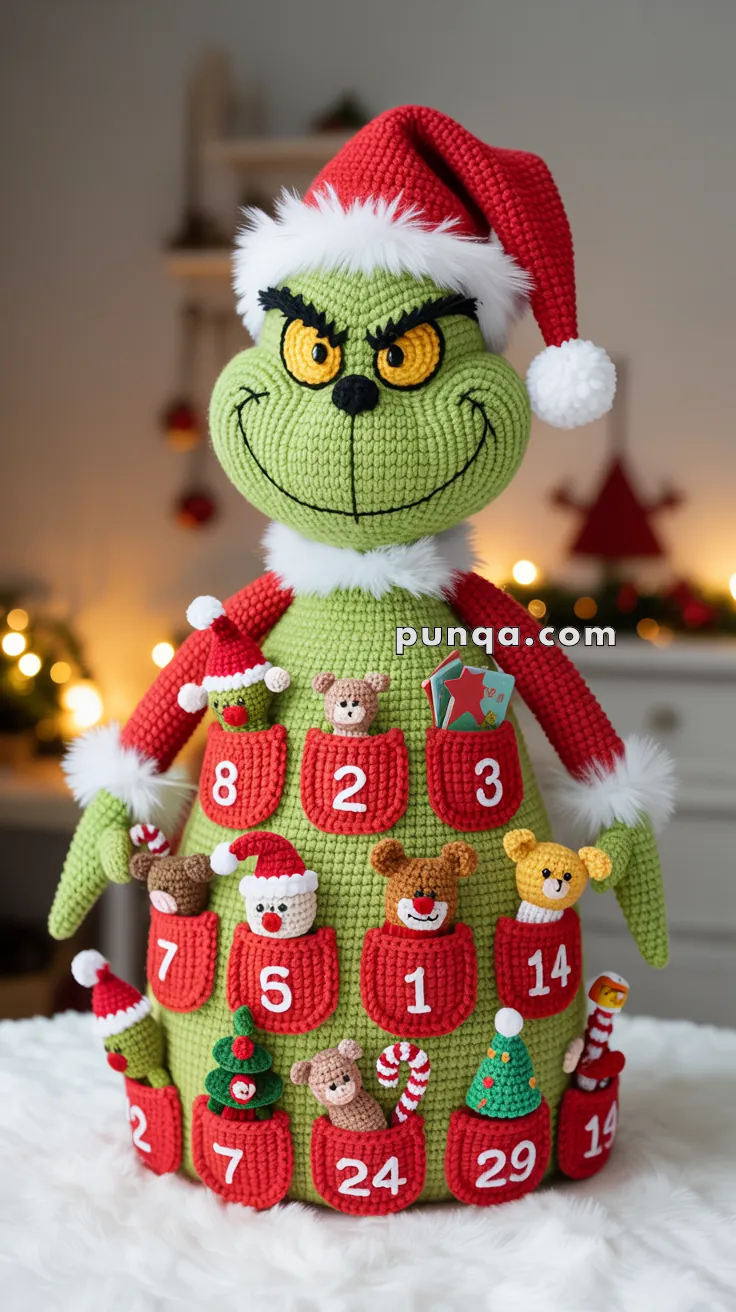
Add a mischievous twist to your holiday countdown with the Amigurumi Grinch Advent Calendar, a crochet project that’s as whimsical as it is festive! 💚🎄🧶 Standing tall with a sculpted face, bushy eyebrows, furry hat trim, and long expressive arms, this Grinch is ready to hold twenty-four pockets filled with tiny toys and treats. His fully rounded cone-shaped body and reinforced base ensure stability, making him a sturdy and eye-catching centerpiece for your seasonal décor.
With optional wire armature for poseable arms and a stable upright head, this advent calendar is both playful and practical. Whether displayed on a mantel, entryway table, or used as part of a cherished Christmas countdown tradition, the Amigurumi Grinch Advent Calendar is a joyful way to crochet laughter, holiday spirit, and a sprinkle of handmade magic—one loop at a time! 🎅✨🧵
💚Amigurumi Grinch Advent Calendar Crochet Pattern
This plush Grinch Advent Calendar is a festive showpiece designed to bring holiday mischief and charm to your home. Standing tall with a sculpted face, bushy eyebrows, furry hat trim, and long expressive arms, this Grinch holds twenty-four pockets filled with tiny toys and treats. The fully rounded advent body creates a sturdy cone silhouette, while the reinforced base ensures stability. Optional wire armature allows poseable arms and a stable upright head. Whether displayed on a mantel, entryway table, or as part of a Christmas countdown tradition, this project creates a whimsical handmade heirloom for the season.
✨ Skill Level
Advanced
This pattern includes:
- Sculpted amigurumi shaping
- Faux-fur finishing
- Embroidery for facial expression
- Optional wire armature
- Multiple sewn components
📏 Finished Size
Using super bulky chenille yarn and a 6.5–7.0 mm hook:
- Height: approx. 48–55 cm (19–22 in)
- Base diameter: approx. 30–34 cm (12–13½ in)
🧶 Yarn Type & Amounts
Recommended Yarn
- Super bulky chenille yarn (smooth, dense) for the main doll
- Faux-fur yarn for trims
- DK cotton yarn for pockets, eyes, and mini toys
Yarn Amounts (Approximate)
Main Doll (Chenille):
- Light chartreuse green – 450–500 g
- Red – 180–220 g
- White faux-fur – 80–100 g
Details & Toys (DK yarn):
- Yellow – ~10 g
- Black – ~10 g
- Mixed brown, beige, cream, red, green – ~40–50 g total
🪡 Tools & Notions
- 6.5–7.0 mm crochet hook (main doll)
- 3.0 mm crochet hook (details & toys)
- Polyester fiberfill
- Tapestry needle
- Stitch markers
- Scissors
- Optional:
- 2 mm aluminum wire or pipe cleaners (arms/head support)
- Cardboard or plastic base (17–18 cm diameter)
- Hot glue
- White felt for numbers 1–24
🧵 Abbreviations (US Terms)
MR – magic ring
sc – single crochet
inc – increase
dec – decrease
hdc – half double crochet
sl st – slip stitch
ch – chain
BLO – back loop only
FLO – front loop only
st(s) – stitch(es)
🟩 Head (Light Green)
R1: MR 6
R2: inc ×6 (12)
R3: (sc, inc) ×6 (18)
R4: (2 sc, inc) ×6 (24)
R5: (3 sc, inc) ×6 (30)
R6: (4 sc, inc) ×6 (36)
R7: (5 sc, inc) ×6 (42)
R8: (6 sc, inc) ×6 (48)
R9–R13: sc around (48)
R14: (7 sc, inc) ×6 (54)
R15: sc around (54)
R16: (8 sc, inc) ×6 (60)
R17: (3 sc, dec) ×12 (48)
R18: sc around (48)
R19: (2 sc, dec) ×12 (36)
Insert optional vertical support wire.
R20: (sc, dec) ×12 (24)
Stuff firmly
R21: dec ×12 (12)
R22: dec ×6 (6)
FO and close tightly.
🟨 Eyes (Make 2 – Yellow DK)
R1: MR 6
R2: inc ×6 (12)
R3: (sc, inc) ×6 (18)
Flatten slightly when sewing.
Embroider black vertical pupils with a thin outline. Angle eyes downward toward the center.
🖤 Eyebrows (Make 2 – Black Chenille)
Ch 10
Sc 9
Sl st, sc 7, sl st
Fold slightly and sew in a dramatic downward curve.
👃 Nose (Green)
R1: MR 5
R2: inc ×5 (10)
R3–R4: sc around (10)
Stuff lightly and sew between the eyes, slightly low.
😈 Mouth
Surface slip stitch a wide curved smile from cheek to cheek.
Add short downward curves at each end.
Embroider a vertical line from nose to lip.
🎅 Santa Hat (Red)
R1: MR 4
R2: sc 4
R3: (sc, inc) ×2 (6)
R4: sc
R5: inc ×3 (9)
R6: sc
R7: (2 sc, inc) ×3 (12)
Continue increasing every 2–3 rounds until reaching 48 sts.
Work 6–8 rounds evenly.
Hat Brim (White Faux-Fur)
Attach faux-fur yarn at hat base.
Work 2–3 rounds of tight hdc.
Brush thoroughly and trim lightly if needed.
Add a faux-fur pom-pom.
🧣 Neck Ruff (White Faux-Fur)
Ch 42
Hdc across
Brush heavily.
Wrap around neck seam and sew in place.
🟥 Arms, Hands & Wrist Ruffs (Make 2)
Sleeve (Red)
R1: MR 6
R2: inc ×6 (12)
R3–R10: sc around (12)
Hand & Palm (Green)
R11: sc around (12)
R12: (2 sc, inc) ×4 (16)
R13: sc around (16)
Fingers
Finger 1:
Attach yarn at palm front
Ch 6, sc back 5, sl st into palm
Finger 2:
Skip 1 st
Ch 7, sc back 6, sl st
Finger 3:
Skip 1 st
Ch 6, sc back 5, sl st
Thumb
Attach yarn to side of palm
Ch 4, sc back 3, sl st into palm
Lightly shape fingers with stuffing or embroidery tension.
Wrist Ruff (White Faux-Fur)
Attach faux-fur yarn at wrist join.
R1: hdc evenly around
R2: hdc in FLO for fullness
Optional third round for extra fluff.
Brush thoroughly.
Insert optional wire through arm. Stuff lightly.
🟩 Advent Body (Green – Bell Shape)
R1: MR 6
R2: inc ×6 (12)
R3: (sc, inc) ×6 (18)
R4: (2 sc, inc) ×6 (24)
R5: (3 sc, inc) ×6 (30)
R6: (4 sc, inc) ×6 (36)
R7: (5 sc, inc) ×6 (42)
R8: (6 sc, inc) ×6 (48)
R9: (7 sc, inc) ×6 (54)
R10: (8 sc, inc) ×6 (60)
R11: (9 sc, inc) ×6 (66)
R12: (10 sc, inc) ×6 (72)
R13–R28: sc around (72)
R29: (5 sc, inc) ×12 (84)
R30: (6 sc, inc) ×12 (96)
R31–R36: sc around (96)
Stuff firmly.
🛠 Reinforced Base
Insert a 17–18 cm cardboard or plastic circle.
R37: BLO sc around (96)
R38–R40: sc around (96)
FO and weave in ends.
🟥 Advent Pockets (Make 24 – Red DK)
Ch 12
Sc 11
Rows 2–12: sc 11
Top edge: sl st, sc 9, sl st
Sew in neat vertical rows around the lower body.
🔢 Numbers
Cut numbers 1–24 from white felt.
Sew or glue one number onto each pocket.
🧸 Mini Toys
Create small DK-weight toys sized to fit inside pockets:
Stuff lightly and add simple embroidered faces.
🧵 Final Assembly
- Sew head securely to body
- Cover neck seam with faux-fur ruff
- Attach arms high on torso
- Shape hands inward slightly
- Sew pockets evenly
- Attach numbers
- Place toys into pockets
- Position hat at an angle and secure
💫 Final Thoughts
This Grinch Advent Calendar is designed to be expressive, sturdy, and unmistakably Grinch-like. With sculpted hands, fluffy trims, dramatic proportions, and a fully functional advent layout, it becomes a joyful holiday centerpiece that can be enjoyed year after year.
Take your time with shaping and finishing—the details are what truly bring this mischievous character to life.
Happy crocheting and Merry Grinchmas! 💚🎄