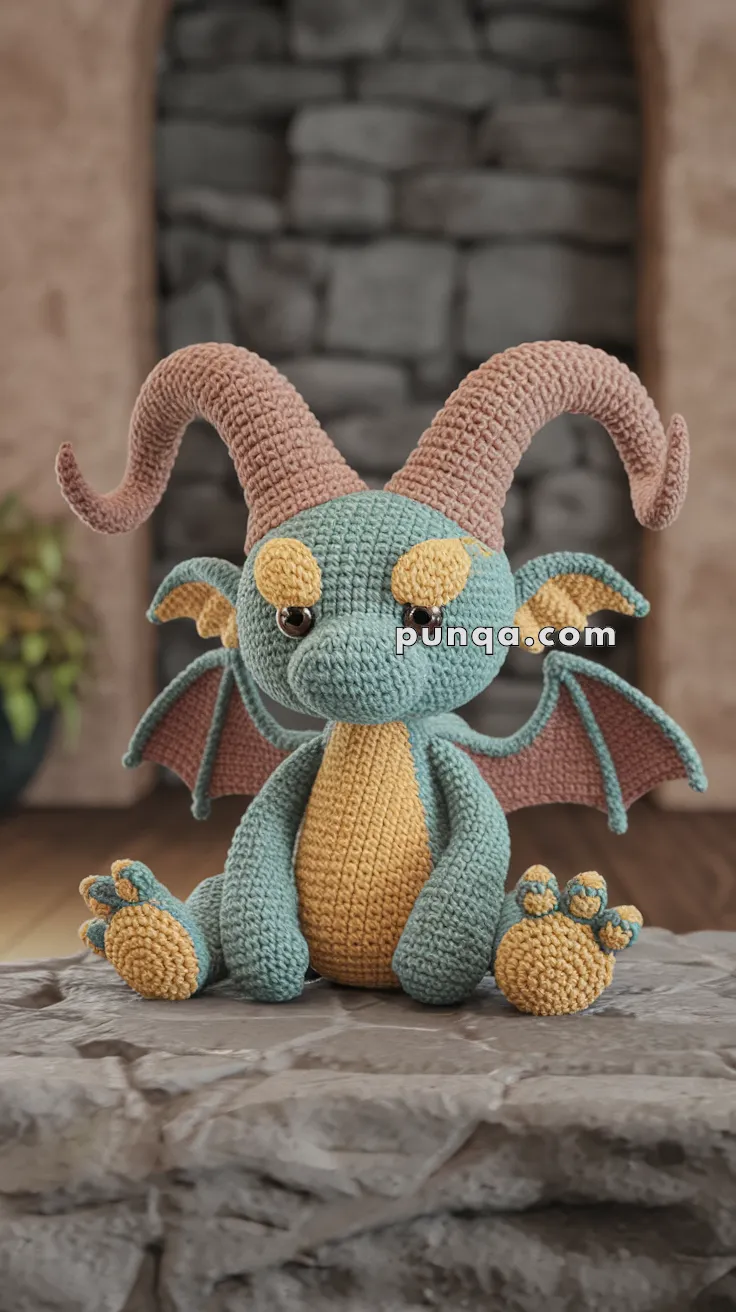
Step into a world of cozy fantasy with the Amigurumi Gorgon Dragon, a crochet project that’s as magical as it is adorable! 🐉🧶 Carefully crafted to match the reference design, this dragon features a soft teal body, golden belly, curled ram-style horns, expressive eyes, wide bat wings, a rounded snout, and chunky little paws. Sitting proudly with its feet forward and wings slightly open, it captures the charm of a storybook creature brought to life in yarn.
Perfect for fantasy lovers, collectors, or anyone who enjoys whimsical handmade décor, this dragon makes a stunning display piece for shelves, desks, or cozy corners. Fun to stitch and delightful to showcase, the Amigurumi Gorgon Dragon is a joyful way to crochet imagination, character, and a sprinkle of handmade magic—one loop at a time! ✨🌙🧵
🐉✨ Amigurumi Gorgon Dragon Crochet Pattern
Create a cuddly fantasy dragon with a softly rounded teal head, broad snout, expressive golden brows, pointed ears, enormous curled ram horns, dusty-rose bat wings, a warm golden belly, long relaxed arms, and oversized paw pads with tiny toes.
The dragon is designed in a stable seated pose. Its pear-shaped body supports the large head and horns, while the hind legs rest forward and the wings open gently behind the shoulders. Separate belly, eyebrow, ear, paw-pad, and wing-membrane pieces add depth without complicated tapestry colorwork.
✨ Skill Level
Intermediate to Advanced
This project includes:
- Large amigurumi shaping
- Dimensional muzzle construction
- Double-layered pointed ears
- Long sculpted ram horns
- Optional wire reinforcement
- Layered bat-wing construction
- Separate belly appliqué
- Individual fingers and toes
- Pose-based assembly
- Light facial and body sculpting
📏 Finished Size
Using worsted-weight cotton or cotton-blend yarn with a 3–3.25 mm hook, the finished dragon measures approximately:
- 28–31 cm (11–12¼ in) tall while seated
- 22–25 cm (8¾–9¾ in) wide from wingtip to wingtip
- 18–20 cm (7–8 in) across the feet
- Approximately 35–38 cm (13¾–15 in) tall when the horns are measured fully upright
Finished size may vary according to yarn, hook, tension, stuffing, and horn shape.
🧶 Yarn Requirements
Use smooth worsted-weight yarn with good stitch definition.
- 🩵 Muted teal or sage blue-green — 210–240 g
- 💛 Golden mustard — 60–75 g
- 🤎 Dusty rose-brown or warm taupe — 120–145 g
- 🖤 Black or dark brown — 5–8 g
Polyester fiberfill — approximately 280–350 g
Allow an additional 15–20 g of taupe yarn when making especially thick or long horns.
🧵 Materials
- 3–3.25 mm crochet hook
- Optional 2.75 mm hook for toes and small details
- Two 12 mm brown or black safety eyes
- Polyester fiberfill
- Tapestry needle
- Long doll-making needle
- Stitch markers
- Pins
- Scissors
- Optional 1.5–2 mm aluminum craft wire for the horns and wings
- Floral tape for wrapping wire
- Optional plastic pellets for sitting stability
- Optional plastic canvas for the foot soles
Safety eyes and internal wire are unsuitable for children under three. Use embroidered eyes and omit wire when making the dragon as a young child’s toy.
🔤 Abbreviations — US Terms
- MR — Magic Ring
- sc — Single Crochet
- inc — Increase: 2 sc in one stitch
- dec — Invisible Decrease
- sl st — Slip Stitch
- ch — Chain
- hdc — Half Double Crochet
- dc — Double Crochet
- tr — Treble Crochet
- BLO — Back Loop Only
- FLO — Front Loop Only
- FO — Fasten Off
Work in continuous rounds unless instructed otherwise.
🐲 Head
The head is a broad rounded oval with enough width to support the large horns, ears, eyes, brows, and muzzle.
Using teal yarn:
R1
MR 6.
(6)
R2
inc ×6.
(12)
R3
(1 sc, inc) ×6.
(18)
R4
(2 sc, inc) ×6.
(24)
R5
(3 sc, inc) ×6.
(30)
R6
(4 sc, inc) ×6.
(36)
R7
(5 sc, inc) ×6.
(42)
R8
(6 sc, inc) ×6.
(48)
R9–18
sc around.
(48)
Insert the safety eyes between Rounds 12 and 13, leaving approximately 10 stitches between the posts.
R19
(6 sc, dec) ×6.
(42)
R20
(5 sc, dec) ×6.
(36)
R21
(4 sc, dec) ×6.
(30)
Begin stuffing firmly.
R22
(3 sc, dec) ×6.
(24)
R23
(2 sc, dec) ×6.
(18)
Continue stuffing. Keep the forehead rounded and leave the lower-front area slightly flatter for the muzzle.
R24
(1 sc, dec) ×6.
(12)
R25
dec ×6.
(6)
FO and close.
Gently shape the head into a wide oval rather than a perfect sphere.
🐽 Broad Rounded Muzzle
The muzzle is a horizontal oval that projects clearly from the lower face.
Using teal yarn:
R1
Ch 8.
Starting in the second chain:
6 sc, 3 sc in the final chain.
Continue along the opposite side:
5 sc, inc.
(16)
R2
inc, 5 sc, 3 inc, 5 sc, 2 inc.
(22)
R3
(3 sc, inc) ×5, 2 sc.
(27)
R4–7
sc around.
(27)
R8
(7 sc, dec) ×3.
(24)
R9
sc around.
(24)
Lightly stuff, keeping the back opening flexible.
FO, leaving a long sewing tail.
🪡 Attaching and Sculpting the Muzzle
Pin the muzzle beneath the eyes.
It should:
- Sit horizontally
- Be centered between the eyes
- Project forward
- Remain wider than it is tall
- Cover part of the lower face
- Tilt only slightly upward
Sew the upper edge first.
Add more stuffing before closing the lower edge if needed.
Using teal yarn and a long needle, add one gentle sculpting stitch across the underside. Pull only slightly to create a soft central dip.
👃 Nostrils and Smile
Using dark-brown or black embroidery yarn:
- Stitch one tiny nostril on each upper side of the muzzle.
- Add a very small curved mouth beneath the center if desired.
Keep the expression subtle so the eyes and brows remain the focal point.
💛 Eyebrow Patches — Make 2
The eyebrows are thick golden ovals positioned above the eyes.
Using mustard yarn:
R1
Ch 6.
Starting in the second chain:
4 sc, 3 sc in the final chain.
Continue along the opposite side:
3 sc, inc.
(12)
R2
inc, 3 sc, 3 inc, 3 sc, 2 inc.
(18)
R3
sc around.
(18)
FO, leaving a long tail.
Flatten each piece into a slightly angled oval.
🪡 Attaching the Eyebrows
Position the brows above and slightly inward from the eyes.
Angle the inner edges downward and the outer edges upward.
The brows should partly overlap the top edges of the safety eyes without covering them.
Sew around the edges using mustard yarn.
👂 Outer Ears — Make 2
The ears point sideways and slightly downward.
Using teal yarn:
R1
MR 4.
(4)
R2
(1 sc, inc) ×2.
(6)
R3
(2 sc, inc) ×2.
(8)
R4
(3 sc, inc) ×2.
(10)
R5
(4 sc, inc) ×2.
(12)
R6
(5 sc, inc) ×2.
(14)
R7–10
sc around.
(14)
Do not stuff.
Flatten and FO, leaving a long sewing tail.
💛 Inner Ears — Make 2
Using mustard yarn:
R1
Ch 8.
Starting in the second chain:
sl st, sc, hdc, 2 dc, 5 dc in the final chain.
Continue down the opposite side:
2 dc, hdc, sc, sl st.
FO.
Sew one inner panel to the front of each teal ear, leaving a teal border visible.
Pinch each ear base inward to create a shallow cup.
🪡 Attaching the Ears
Place the ears on the sides of the head, slightly behind the eyes and below the horn bases.
Angle them outward and gently downward.
Reinforce the pinched bases several times.
🐏 Curled Ram Horns — Make 2
The horns are worked from the narrow tip toward the broad base. They are long, thick, and curved outward before turning downward and inward.
Using dusty rose-brown or taupe yarn:
R1
MR 6.
(6)
R2–5
sc around.
(6)
R6
(1 sc, inc) ×3.
(9)
R7–10
sc around.
(9)
R11
(2 sc, inc) ×3.
(12)
R12–16
sc around.
(12)
R17
(3 sc, inc) ×3.
(15)
R18–22
sc around.
(15)
R23
(4 sc, inc) ×3.
(18)
R24–29
sc around.
(18)
R30
(5 sc, inc) ×3.
(21)
R31–36
sc around.
(21)
R37
(6 sc, inc) ×3.
(24)
R38–42
sc around.
(24)
Stuff the tip lightly and the wider section more firmly.
FO, leaving a very long sewing tail.
🔧 Optional Horn Wire
Cut a length of aluminum wire slightly shorter than each horn.
Fold both ends into closed loops.
Wrap the entire wire with floral tape.
Insert it while stuffing, ensuring it remains completely surrounded by fiberfill.
Never allow an exposed wire end to touch the crochet fabric.
🌀 Shaping the Horns
Shape each horn into a broad inverted curve:
- Begin with the base rising upward from the head.
- Curve the middle outward.
- Bend the upper section forward.
- Turn the narrow tip downward.
- Curl the tip gently inward.
The horns should mirror each other.
Without wire, run a long strand of matching yarn along the inner side of each horn. Pull gradually to shorten the inner edge and form the curve.
🪡 Attaching the Horns
Pin the broad horn bases high on the head behind the eyebrows.
The bases should sit close together but not touch.
Sew around each 24-stitch opening several times.
Add hidden support stitches from the horns to the upper head so they remain upright.
🐲 Pear-Shaped Body
The body is large, rounded, and visibly wider at the bottom than at the shoulders.
Using teal yarn:
R1
MR 6.
(6)
R2
inc ×6.
(12)
R3
(1 sc, inc) ×6.
(18)
R4
(2 sc, inc) ×6.
(24)
R5
(3 sc, inc) ×6.
(30)
R6
(4 sc, inc) ×6.
(36)
R7
(5 sc, inc) ×6.
(42)
R8
(6 sc, inc) ×6.
(48)
R9–18
sc around.
(48)
Begin stuffing firmly.
R19
(6 sc, dec) ×6.
(42)
R20–22
sc around.
(42)
R23
(5 sc, dec) ×6.
(36)
R24–26
sc around.
(36)
R27
(4 sc, dec) ×6.
(30)
R28–29
sc around.
(30)
R30
(3 sc, dec) ×6.
(24)
Finish stuffing. Keep the lower body broad and slightly flattened.
FO, leaving a long tail for attaching the head.
💛 Golden Belly Panel
The belly panel is a long tapered oval sewn to the front of the body.
Using mustard yarn:
R1
Ch 15.
Starting in the second chain:
13 sc, 3 sc in the final chain.
Continue along the opposite side:
12 sc, inc.
(30)
R2
inc, 12 sc, 3 inc, 12 sc, 2 inc.
(36)
R3
(5 sc, inc) ×6.
(42)
R4–11
sc around.
(42)
R12
(5 sc, dec) ×6.
(36)
R13
sc around.
(36)
R14
(4 sc, dec) ×6.
(30)
FO, leaving a long sewing tail.
Flatten the panel into a vertical oval.
🪡 Attaching the Belly Panel
Position the narrower end near the upper chest and the broad end over the lower belly.
The panel should:
- Begin beneath the neck
- Extend almost to the base
- Remain centered
- Cover most of the front torso
- Leave teal visible at both sides
Sew around the edge using mustard yarn.
💪 Long Arms — Make 2
The arms are broad at the shoulders and taper toward the rounded hands.
Using teal yarn:
R1
MR 6.
(6)
R2
inc ×6.
(12)
R3
(1 sc, inc) ×6.
(18)
R4–7
sc around.
(18)
R8
(4 sc, dec) ×3.
(15)
R9–18
sc around.
(15)
R19
(3 sc, dec) ×3.
(12)
R20–22
sc around.
(12)
Stuff the hands and lower arms lightly.
Leave the shoulder ends softly stuffed.
Flatten the upper openings.
FO, leaving long sewing tails.
👍 Fingers — Make 6
Each hand has three small rounded fingers.
Using teal yarn:
R1
MR 5.
(5)
R2–3
sc around.
(5)
FO.
Sew three fingers side by side to the end of each arm.
Angle them slightly inward.
🪡 Attaching the Arms
Position the arms high on the sides of the body.
Angle them downward and inward so the hands rest beside the belly.
Sew through the flattened upper openings.
Tack each hand lightly to the lower body if a fixed seated pose is desired.
🦵 Hind Thighs — Make 2
The hind thighs are rounded pieces placed beside the lower body.
Using teal yarn:
R1
MR 6.
(6)
R2
inc ×6.
(12)
R3
(1 sc, inc) ×6.
(18)
R4
(2 sc, inc) ×6.
(24)
R5
(3 sc, inc) ×6.
(30)
R6–11
sc around.
(30)
R12
(3 sc, dec) ×6.
(24)
R13
(2 sc, dec) ×6.
(18)
Stuff firmly.
FO, leaving a long tail.
Sew one thigh to each lower side of the body.
🐾 Large Foot Pads — Make 2
Using mustard yarn:
R1
Ch 8.
Starting in the second chain:
6 sc, 3 sc in the final chain.
Continue along the opposite side:
5 sc, inc.
(16)
R2
inc, 5 sc, 3 inc, 5 sc, 2 inc.
(22)
R3
(3 sc, inc) ×5, 2 sc.
(27)
R4–6
sc around.
(27)
R7
(7 sc, dec) ×3.
(24)
Stuff firmly.
FO, leaving a long sewing tail.
Flatten the back opening while keeping the front rounded.
🐾 Toes — Make 6
The toes are teal with mustard tips.
Begin with mustard yarn:
R1
MR 5.
(5)
R2
sc around.
(5)
Switch to teal.
R3–4
sc around.
(5)
FO.
Make three toes per foot.
Sew them in a fan along the upper edge of each foot pad.
🪡 Attaching the Feet
Sew one completed foot in front of each thigh.
The mustard pad should face mostly forward.
Angle the toes slightly upward so they remain visible.
The feet should sit wide enough apart to stabilize the dragon.
🐉 Tail
The tail is tapered and curves behind the seated body.
Using teal yarn:
R1
MR 6.
(6)
R2
(1 sc, inc) ×3.
(9)
R3
(2 sc, inc) ×3.
(12)
R4
(3 sc, inc) ×3.
(15)
R5
(4 sc, inc) ×3.
(18)
R6–16
sc around.
(18)
R17
(4 sc, dec) ×3.
(15)
R18–24
sc around.
(15)
R25
(3 sc, dec) ×3.
(12)
R26–32
sc around.
(12)
R33
(2 sc, dec) ×3.
(9)
R34–38
sc around.
(9)
Stuff lightly as you work.
FO and close.
Sew the broad end to the lower back and curve the tail around one side.
🦇 Wing Membranes — Make 2
The wings have dusty rose-brown membranes surrounded by teal edging.
Using dusty rose-brown yarn:
Row 1
Ch 23.
Starting in the second chain, sc across.
(22)
Row 2
Ch 1, turn, sc across.
(22)
Row 3
Ch 1, turn, dec, 18 sc, dec.
(20)
Row 4
Ch 1, turn, sc across.
(20)
Row 5
Ch 1, turn, dec, 16 sc, dec.
(18)
Row 6
Ch 1, turn, sc across.
(18)
Row 7
Ch 1, turn, dec, 14 sc, dec.
(16)
Row 8
Ch 1, turn, sc across.
(16)
Row 9
Ch 1, turn, dec, 12 sc, dec.
(14)
Row 10
Ch 1, turn, sc across.
(14)
Row 11
Ch 1, turn, dec, 10 sc, dec.
(12)
Row 12
Ch 1, turn, sc across.
(12)
Row 13
Ch 1, turn, dec, 8 sc, dec.
(10)
FO.
The wide edge forms the outer wing and the narrow edge attaches near the body.
🩵 Teal Wing Border
Join teal yarn to one lower corner of the membrane.
Work sc evenly around the two side edges and outer top edge.
At the three lower fan points, work:
sc, ch 3, sc in the same location.
This creates the softly scalloped bat-wing outline.
FO, leaving a long tail.
🩵 Wing Ribs
Using teal yarn, surface-crochet or embroider three raised lines across each membrane:
- One line from the wing base to the upper outer point
- One line from the base to the center lower point
- One line from the base to the outer lower point
Work two passes over each line for a thicker frame.
🔧 Optional Wing Wire
Cut a wire slightly shorter than the outer wing edge.
Fold both ends into loops and wrap with floral tape.
Sew the wrapped wire beneath the teal border using small matching stitches.
Do not leave any wire exposed.
🪡 Attaching the Wings
Pin the narrow ends high on the back behind the shoulders.
Angle the wings outward so the membranes remain visible from the front.
Sew the inner edges firmly to the body.
Add one hidden stitch between each upper wing edge and the back of the head if additional support is needed.
🪡 Main Assembly Order
For the cleanest result, assemble in this order:
- Complete and stuff the head.
- Attach the muzzle.
- Add the eyes and eyebrow patches.
- Sew on the ears.
- Complete and shape both horns.
- Attach the horns.
- Complete and stuff the body.
- Sew on the belly panel.
- Attach the head to the body.
- Sew on the arms and fingers.
- Attach the hind thighs.
- Complete the feet and toes.
- Sew the feet in place.
- Attach the tail.
- Complete and attach the wings.
- Adjust the seated pose and horn curves.
🧷 Attaching the Head
Center the head over the body opening.
Because the horns add weight, reinforce the neck before sewing.
Add:
- Extra firm stuffing inside the upper body
- A tightly rolled cylinder of felt or stuffing through the neck
- Optional wrapped wire support for a display-only figure
Sew around the neck opening several times.
The head should remain upright with the muzzle pointing forward.
✨ Final Shaping
- Keep the head wide and softly rounded.
- Position the eyebrows prominently above the eyes.
- Angle the ears outward beneath the horns.
- Mirror the horn curves carefully.
- Keep the body visibly larger than the head’s lower half.
- Center the golden belly panel.
- Let the long arms rest beside the belly.
- Position the feet forward and widely spaced.
- Spread all three toes on each foot.
- Open the wings enough to show the membranes.
- Curve the tail behind one side.
- Confirm that the dragon sits without leaning backward.
💡 Stability Tips
- Place a sealed pouch of plastic pellets in the lower body.
- Stuff the hind thighs and foot pads firmly.
- Insert plastic-canvas ovals into the foot pads.
- Reinforce the head-to-body seam several times.
- Tack the arms lightly to the belly.
- Tack the feet to the thighs after checking their angle.
- Secure the horns to both the head and upper back when necessary.
- Keep the wing membranes lightly tensioned rather than stretched.
🧼 Care Instructions
Spot clean gently with a damp cloth.
Allow the dragon to air dry completely.
Avoid machine washing when wire, pellets, safety eyes, or plastic canvas are used.
Store upright without placing pressure on the horns, ears, wings, fingers, or toes.
🌟 Final Thoughts
Your cuddly horned dragon is ready to guard its favorite fantasy corner. 🐉✨
With its muted teal body, broad muzzle, sleepy golden brows, enormous curled horns, pointed ears, warm belly, long resting arms, dusty-rose wings, chunky paw pads, tiny toes, and proud seated posture, this mythical companion balances storybook sweetness with a wonderfully dramatic silhouette.
Happy Crocheting! 🧶🐲