Step into the world of bravery and magic with this Amigurumi Godric Gryffindor crochet pattern! Inspired by the legendary founder of Gryffindor House, this enchanting design captures his noble presence, flowing robes, and signature sword in every stitch. With intricate details like his regal attire and determined expression, this crochet Godric Gryffindor is perfect for adding a touch of wizarding charm to your handmade collection. Whether you’re crafting for Harry Potter fans, celebrating powerful historical figures, or simply enjoy making character-inspired amigurumi designs, this pattern lets you stitch up a miniature Gryffindor bursting with personality! 🦁✨
Designed for customization, this pattern allows you to experiment with different shades of deep red and gold, embroidered details, or even tiny accessories like a miniature lion emblem or spellbook for extra flair. Craft a classic Godric Gryffindor with rich hues, create a whimsical version with bold colors, or even stitch up a full set of Hogwarts-inspired amigurumi for a spellbinding display! Whether gifted as a cherished keepsake, displayed as a magical accent, or made simply for the joy of crafting, this Amigurumi Godric Gryffindor is a fun and creative project—perfect for bringing a touch of handmade wizarding magic to every stitch! 🧶💖
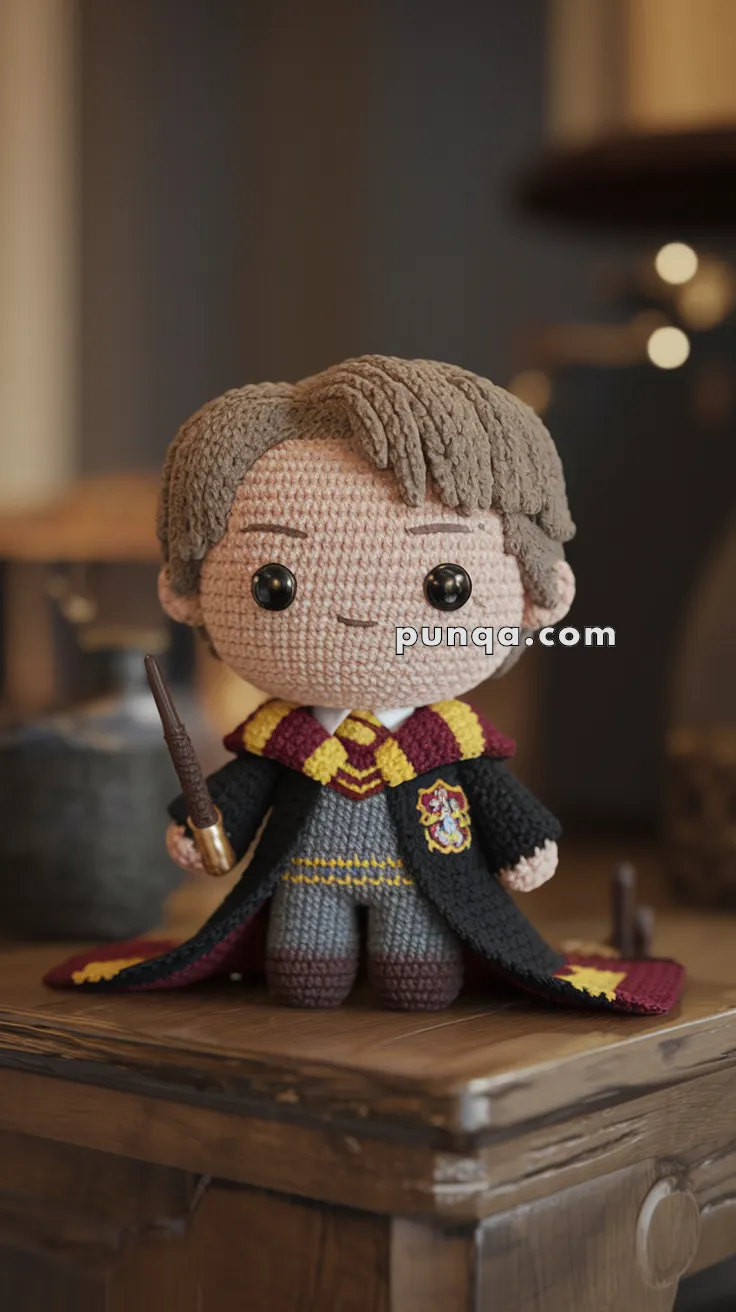
🦁 Amigurumi Godric Gryffindor Crochet Pattern
Bring bravery and nobility to your amigurumi collection with this dashing doll inspired by the legendary founder of Gryffindor. Great for display or gifting to your favorite Harry Potter fan!
✨ Skill Level
Intermediate — uses basic shaping, assembly, color changes, chenille hair construction, and minor embroidery.
📏 Finished Size
~20–22 cm tall (varies slightly by yarn density and gauge).
Proportions match the photo:
-
Large round head
-
Short, stocky torso
-
Short limbs
-
Simple clothing sections
-
Scarf is the most visually bold accent
🧶 Materials
Yarn (soft chenille/bouclé recommended):
-
Skin tone
-
Dark gray (pants & shirt)
-
Brown (shoes & wand)
-
Black (robe exterior)
-
Burgundy (scarf stripes, robe hem stripes)
-
Gold (scarf stripes, robe hem stripes, crest)
-
Beige/dark-blonde chenille (hair)
Notions:
-
10–12 mm black safety eyes
-
Small white felt eye circles
-
Fiberfill
-
4.0 mm hook
-
Yarn needle & scissors
-
Optional blush
🔤 Abbreviations (US)
MR – magic ring
sc – single crochet
inc – increase
dec – decrease
sl st – slip stitch
ch – chain
FO – fasten off
blo – back loop only
Worked in continuous rounds unless noted.
🧔 Head (oversized & tall)
Skin-tone chenille.
MR, 6 sc
R2: inc ×6 = 12
R3: (sc, inc) ×6 = 18
R4: (2 sc, inc) ×6 = 24
R5: (3 sc, inc) ×6 = 30
R6: (4 sc, inc) ×6 = 36
R7: (5 sc, inc) ×6 = 42
R8: (6 sc, inc) ×6 = 48
R9–26: 48 sc
(18 straight rounds gives the tall head seen in the photo)
Place safety eyes between R14–15, spaced ~8–9 stitches apart, with white felt disks behind them.
Decrease:
R27: (6 sc, dec) ×6 = 42
R28: (5 sc, dec) ×6 = 36
R29: (4 sc, dec) ×6 = 30
R30: (3 sc, dec) ×6 = 24
R31: (2 sc, dec) ×6 = 18
R32: (sc, dec) ×6 = 12
R33: dec ×6 = 6
Stuff firmly as you go.
FO and close.
👂 Ears ×2
MR, 6 sc, sl st, FO.
Flatten slightly.
Sew to sides between R13–16, centered behind eye line.
💇 Hair (chenille cap + layered fringe)
Hair Cap Base
(Beige/blonde chenille)
MR, 6
R2: 12
R3: 18
R4: 24
R5: 30
R6: 36
R7: 42
R8: 42 sc
FO with tail.
Place on head and sew around hairline, leaving forehead area unobstructed.
Side-Swept Fringe Panel
Cut 12–16 strands (5–6 cm).
Sew along right front hairline in a diagonal band.
Lay them toward the left eyebrow direction to recreate the soft swoop.
Trim for shape.
Back Hair Strips
Sew two short rows of strands at the back of the cap to create fullness at rear crown.
Keep hair plush but not messy — photo style is smooth and tidy.
🧍 Compact Body (shirt/pants integrated)
Dark gray chenille.
MR, 6
R2: 12
R3: 18
R4: 24
R5: 30
R6–14: 30 sc
(Short torso, accurate to photo)
Stuff lightly.
FO, leaving long tail for attaching head.
🦵 Legs ×2 (short & simple)
Start brown (shoes):
MR, 6
R2: 12
R3: (sc, inc) ×6 = 18
R4–5: 18 sc
Switch dark gray (pants):
R6: (2 sc, dec) ×4 + 2 sc = 14
R7–16: 14 sc
FO first leg.
Make second, do not FO.
Join legs:
ch 3, attach to first leg.
R17–22: sc around both legs + chain bridge (~31 sts total)
Light stuffing only in upper legs and join area.
Sew to body bottom centered.
Little of the legs show once robe is on — just the gray below hem and brown shoe tips.
✋ Arms ×2 (small hands, full black sleeves)
Skin tone:
MR, 6
R2: 6 sc
R3: (sc, inc) ×3 = 9
R4: 9 sc
Switch black:
R5–13: 9 sc
FO.
Stuff only glove area.
Attach high on body sides.
🧣 Gryffindor Scarf (burgundy + gold stripes)
This is a thick, simple, bold strip — the key photo element.
With burgundy:
ch 45
R1: sc 44
R2: switch to gold, sc 44
R3: gold, sc 44
R4–5: burgundy, sc 44
R6–7: gold, sc 44
R8–9: burgundy, sc 44
(Continue this 2-row striping until scarf is ~20–22 cm long)
FO.
Wrap once around neck, both ends hanging forward.
Tuck ends under front of robe slightly.
Scarf edges must slightly protrude past robe collar for photo match.
🧥 Black Robe (straight, simple, with horizontal hem stripes)
Base Robe
Black chenille.
ch 36
R1: sc 35
R2–22: sc 35
This makes the robe length long enough to cover torso and most of legs, just like photo.
FO.
Drape robe over doll’s shoulders.
The robe is an open-front rectangle, not tapered, not panel-shaped.
Stitch shoulders to top of body so robe does not slide.
Do not sew sides closed — it should hang straight.
Hem Stripes
Add two thick horizontal stripes at bottom edge:
Attach burgundy at lower hem:
R1: sc across entire robe width
Switch to gold:
R2: sc across
Switch to burgundy again:
R3: sc across
This creates the bold triple-stripe trim visible in the photo.
If you see sleeve-edge color trim on your model, you may add thin single burgundy lines at sleeve ends.
Otherwise sleeves stay solid black.
🛡 House Crest (embroidered on left chest)
Using burgundy, surface stitch a small shield shape on the left chest of the robe (not the scarf).
Outline in gold all around.
Fill center with a simple gold lion suggestion:
-
vertical central line
-
short diagonal mane lines
-
tiny paw ticks
Keep crest small (approx. 1.5 cm tall).
Position crest just above mid-chest and slightly toward left side.
🪄 Wand (dark brown, tapered handle)
MR, 5
R2–8: 5 sc
R9: inc in 1 st = 6
R10: 6 sc
Add single gold band:
R11: 6 sc in gold
Switch brown:
R12–14: 5 sc
Stuff lightly.
Attach to right hand pointing outward.
😌 Facial Finish
Brows:
Short, simple, slightly angled brown lines placed just above eyes.
Mouth:
Tiny straight dark stitch.
Optional soft blush under eyes.
This matches the calm, gentle expression in the photo.
🧵 Final Assembly
-
Sew head firmly to body.
-
Attach arms.
-
Add legs to bottom of body.
-
Place robe and stitch shoulders to secure, leaving all other parts open and loose.
-
Embroider crest onto left robe chest.
-
Wrap scarf once around neck so both ends hang forward (do not tie).
-
Adjust hair fringe to sweep across forehead.
-
Stitch wand into right hand.
The robe should fall low, with stripes clear, legs only slightly visible, and shoes peeking below hem — exactly like the photo.
☕ Display Styling
Tilt head slightly left or right.
Make sure scarf ends remain in front.
Keep crest neatly centered under scarf edge.
Let robe hem flare naturally.
🪄 Done!
You’ve summoned your very own Godric Gryffindor amigurumi doll! Whether you’re gifting it to a wizarding world fan or adding it to your own magical collection, this noble founder is sure to shine.