Creating an amigurumi goblin trickster is like embarking on a magical journey filled with whimsy and creativity! 🧶✨ If you’re anything like me, there’s something irresistibly charming about these mischievous little characters. Their playful expressions and colorful details bring a touch of fantasy to any space, and the process of making them is just as delightful as the finished product. Crafting these goblin tricksters allows me to tap into my imagination and turn yarn into something extraordinary, one stitch at a time. It’s a chance to escape into a world where goblins aren’t just from fairy tales—they’re right at my fingertips, ready to cause a bit of mischief!
Now, let’s talk about the process of creating these little wonders. It begins with choosing the perfect yarn, a spectrum of vibrant colors that will bring the goblin’s cheeky personality to life. 🧙♂️ I love the way each stitch slowly brings out the character’s details, from their pointy ears to their cheeky grins. Following the amigurumi pattern is like reading a treasure map, guiding me through each step with clear instructions and little surprises along the way. It’s incredibly satisfying to see how a simple ball of yarn transforms into a lovable trickster, thanks to some patience, creativity, and a bit of magic. The best part? Each goblin comes out unique, with its own quirks and charm, ready to bring a smile to anyone who sees it! 🎉
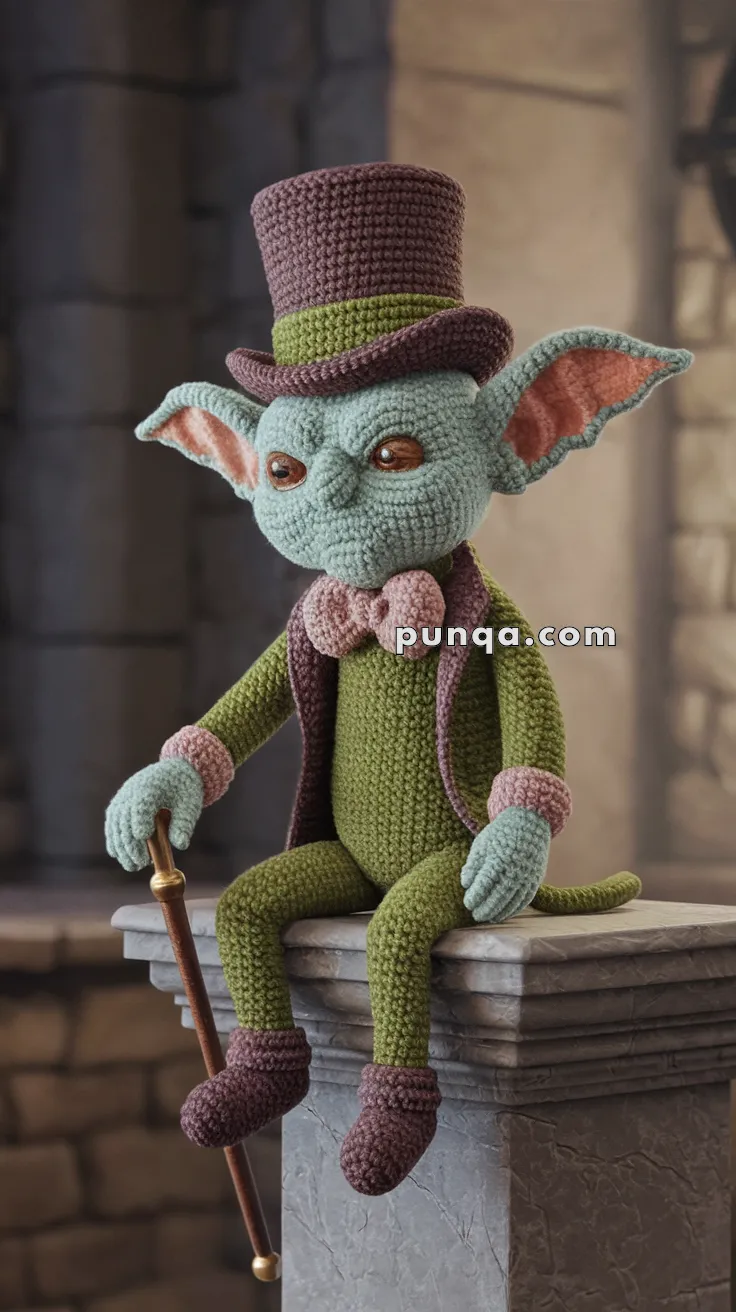
🧶 Amigurumi Goblin Trickster Crochet Pattern
Meet your mischievous yet dapper little goblin! With his tall hat, pointed ears, tailored jacket, and cane in hand, this charming character brings a touch of whimsy to any fantasy collection. Whether displayed on a shelf or given as a handmade gift, he’s sure to make everyone smile.
✨ Skill Level
Intermediate – Includes shaping, sewing, color changes, and garment assembly.
📏 Finished Size
Approximately 28–30 cm (11–12 inches) tall when made with DK-weight yarn and a 2.5–3 mm hook.
🧵 Materials & Yarn Amounts
-
Light Mint Green (skin) – 40 g
-
Olive Green (body and pants) – 30 g
-
Burgundy / Deep Plum (jacket, hat, shoes) – 40 g
-
Rose Pink (bow tie, cuffs, ear details) – 10 g
-
Peach (inner ears) – small amount
-
Gold or brown (optional cane detail) – small amount
-
Black or dark brown embroidery thread – for brows, mouth, and facial details
-
Fiberfill stuffing – approx. 50 g
-
Safety eyes (10–12 mm)
-
Crochet hook: 2.5–3.0 mm
-
Stitch marker, yarn needle, scissors
-
Optional: pipe cleaners or floral wire for poseable limbs
🪡 Abbreviations (US Terms)
MR – Magic Ring
sc – Single crochet
inc – Increase (2 sc in same stitch)
dec – Decrease (sc2tog)
ch – Chain
sl st – Slip stitch
BLO – Back loop only
FLO – Front loop only
FO – Fasten off
🧠 Head
With light mint green:
-
MR, 6 sc
-
inc ×6 (12)
-
(sc, inc) ×6 (18)
-
(2 sc, inc) ×6 (24)
-
(3 sc, inc) ×6 (30)
-
(4 sc, inc) ×6 (36)
7–14. sc around (36) -
(4 sc, dec) ×6 (30)
-
(3 sc, dec) ×6 (24)
-
(2 sc, dec) ×6 (18)
-
(sc, dec) ×6 (12)
-
dec ×6 (6)
FO, weave to close.
🧷 Details:
-
Insert 10–12 mm safety eyes between rounds 9–10, spaced 8 stitches apart.
-
Embroider a small nose bump with a few raised stitches.
-
Add slight brow ridges above the eyes using surface slip stitches.
-
Stuff firmly to keep the head round with a slightly elongated back.
🦇 Ears (Make 2)
With light mint green:
-
MR, 6 sc
-
(sc, inc) ×3 (9)
-
sc around (9)
-
(2 sc, inc) ×3 (12)
5–8. sc around (12) -
(3 sc, inc) ×3 (15)
10–11. sc around (15)
FO, leaving a long tail.
Outline the inner ear with rose pink yarn or crochet a separate small peach oval to sew inside. Pinch base slightly before sewing to sides of the head above eye level.
👃 Nose
With mint green:
-
MR, 6 sc
-
inc ×6 (12)
3–6. sc around (12) -
(sc, dec) ×4 (8)
Stuff lightly and sew to face between the eyes for a pointed goblin nose.
🧥 Body
With olive green:
-
MR, 6 sc
-
inc ×6 (12)
-
(sc, inc) ×6 (18)
-
(2 sc, inc) ×6 (24)
-
(3 sc, inc) ×6 (30)
6–12. sc around (30) -
(3 sc, dec) ×6 (24)
14–16. sc around (24) -
(2 sc, dec) ×6 (18)
18–20. sc around (18)
FO, stuff firmly.
👖 Pants
With olive green:
-
Ch 28, join to form ring.
2–8. sc around (28) -
BLO sc around (creates waistband ridge).
10–14. sc around.
FO, leaving tail for sewing.
Lightly stuff the pants to keep shape. These will serve as both the goblin’s trousers and the structural base for seated posture.
Optional: Crochet separate legs to insert for firmer sitting pose:
MR, 6 sc → (inc ×6) (12) → R3–8 sc around (12).
🦵 Legs (Optional Separate Version)
If you prefer individual legs, follow the optional leg instructions above and sew under the body at a forward angle so the goblin sits naturally.
🥿 Shoes (Make 2)
With burgundy yarn:
-
MR, 6 sc
-
inc ×6 (12)
3–4. sc around (12) -
(sc, dec) ×4 (8)
6–8. sc around (8)
Stuff lightly. FO.
Add an upper shoe cuff: work 1 FLO round of sc in burgundy around ankle for a finished edge. Slightly curve the toe upward before sewing to pants.
🧤 Arms / Sleeves (Make 2)
With burgundy yarn:
-
MR, 6 sc
-
(sc, inc) ×3 (9)
3–12. sc around (9)
Switch to mint for hands:
13–15. sc around (9)
Stuff lightly. FO.
Add a pink cuff: attach rose pink yarn in FLO of R12, work one round of sc for a clean edge.
Sew to body sides at shoulder height.
🎀 Bow Tie
With rose pink yarn:
-
Ch 8, sc in 2nd ch and across (7).
2–4. sc across (7).
FO and wrap center tightly several times to create bow shape.
Sew under chin.
For a puffier bow, lightly stuff the sides before wrapping the center.
🧢 Top Hat
With burgundy yarn:
-
MR, 6 sc
-
inc ×6 (12)
-
(sc, inc) ×6 (18)
-
(2 sc, inc) ×6 (24)
-
BLO sc around (24)
6–10. sc around (24) -
(3 sc, inc) ×6 (30)
-
(4 sc, inc) ×6 (36)
-
(5 sc, inc) ×6 (42)
-
sc around (42)
FO and weave in ends.
Optional: Add a narrow olive green band around base for accent.
Sew hat slightly tilted for character.
🧥 Jacket
With burgundy yarn:
-
Ch 36, sc across (35).
2–8. sc back and forth to desired length (approx. 5–6 cm).
Fold in half to form body. Leave center front open.
Sew side seams halfway up to form armholes.
Attach sleeves directly into armholes.
Lapel: Attach yarn at neckline, sc around the opening evenly, and fold outward to form collar.
Sew jacket onto body while goblin is in seated pose for natural drape.
🦴 Tail
With olive green:
MR, 6 sc
2–10. sc around (6)
FO, leaving a long tail. Stuff lightly and curve upward before sewing to back.
🪄 Cane
Use a short piece of brown pipe cleaner or thin dowel, approx. 8–10 cm long.
Add a gold or pearl bead on top as a handle.
Place under one arm and stitch the hand around it to hold securely.
🪡 Assembly
-
Sew head to body securely.
-
Position arms slightly forward and sew in place.
-
Attach ears high on the head, angled slightly outward.
-
Sew jacket and pants onto the goblin while seated.
-
Add hat, bow tie, and cane.
-
Embroider mouth with a small smirk and dark brown or black thread.
✨ Finishing Touches
-
Embroider small black pupils on white safety eyes for personality.
-
Fold jacket lapels slightly upward for a standing collar look.
-
Add light shading with pink yarn inside ears and cheeks.
-
Pose legs at a slight forward angle for seated balance.
-
Optionally, insert pipe cleaners in arms for flexibility.
💫 Final Thoughts
Your goblin trickster is now complete — ready to charm, scheme, and show off his impeccable style. His tiny hat, puffy bow tie, and mischievous grin bring out all the fantasy flair that makes amigurumi so special. Display him on a shelf, or let him become the quirky star of your handmade collection.
🧶✨ May your stitches be even, your stuffing smooth, and your goblin delightfully cheeky!