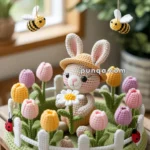
Send a little handmade magic with this Amigurumi Gnome Greeting Card crochet pattern! Inspired by the charm of whimsical gnomes, this delightful design features a tiny gnome holding a cheerful greeting, ready to bring smiles to anyone who receives it. With its adorable hat, cozy beard, and playful details, this crochet gnome adds a unique and heartfelt touch to any special occasion. Whether you’re crafting for loved ones, creating a one-of-a-kind card, or simply enjoy making themed amigurumi designs, this pattern lets you stitch up a lovable gnome bursting with personality! 🎩✨
Designed for customization, this pattern allows you to experiment with different colors, embroidered details, or even tiny accessories like a miniature flower or festive banner for extra flair. Craft a classic gnome with bright hues, create a pastel version for a dreamy aesthetic, or even stitch up a full set of greeting card-inspired amigurumi for a joyful display! Whether gifted as a heartfelt keepsake, displayed as a cheerful accent, or made simply for the joy of crafting, this Amigurumi Gnome Greeting Card is a fun and creative project—perfect for bringing a touch of handmade celebration to every stitch! 🧶💖
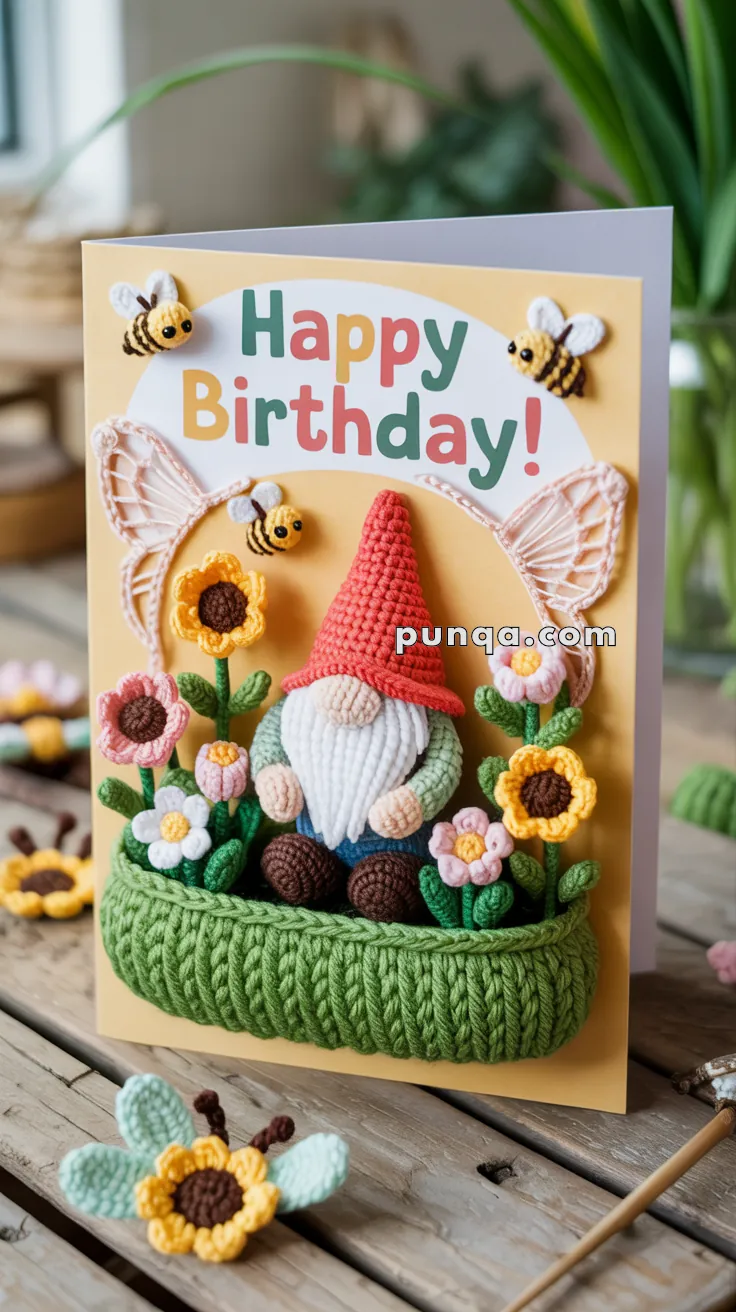
🎂 Amigurumi Gnome Greeting Card Crochet Pattern
Celebrate with charm! This delightful gnome birthday card combines soft amigurumi details with a handmade touch, turning any birthday wish into a heartfelt keepsake. With cheerful flowers, buzzing bees, and a smiling gnome nestled in a yarn basket, it’s sure to make someone’s day special!
✨ Skill Level
Intermediate – Multiple small parts, shaping, and hand-sewing required.
📏 Finished Size
Fits a standard 5×7″ greeting card. Amigurumi pieces are small (1–3 inches).
🧶 Materials
- Yarn (Cotton DK or Fingering Weight):
- Red (Gnome Hat)
- White (Beard, Flowers)
- Beige (Face & Hands)
- Green (Leaves, Shirt)
- Brown (Shoes & Flower Centers)
- Yellow & Pink (Flowers)
- Black (Bee Stripes & Eyes)
- Crochet hook: 2.0–2.5 mm
- Tapestry needle
- Hot glue gun or strong craft glue
- Scissors
- Cardstock greeting card (blank or printed)
- Lightweight stuffing (polyfill or yarn scraps)
🧙 Gnome Pattern
🧴 Gnome Body (Green Shirt)
- MR, 6 sc (6)
- inc x6 (12)
- (1 sc, inc) x6 (18)
4–6. sc around (18) - (1 sc, dec) x6 (12)
Stuff lightly - dec x6 (6), FO and close.
🧦 Gnome Shoes (Make 2 – Brown)
- MR, 6 sc (6)
- (1 sc, inc) x3 (9)
- sc around (9)
FO, flatten and sew to base of body.
🧤 Gnome Hands (Make 2 – Beige)
- MR, 5 sc (5)
- sc around
FO, sew to each side of the body.
🧔 Gnome Nose (Beige)
- MR, 4 sc
- sc around
FO and sew above beard area.
🧔♂️ Gnome Beard (White)
- ch 5, sc in 2nd ch and back (4)
- ch 3, sl st back – repeat for fringe beard
Make 5–6 rows and sew below nose.
🎩 Gnome Hat (Red)
- MR, 4 sc (4)
- (1 sc, inc) x2 (6)
- (2 sc, inc) x2 (8)
Continue increasing every 2–3 rounds until 18–20 st
sc 2 more rounds, FO
Stuff lightly and sew over head/beard.
🌸 Mini Flowers (Make Assorted – White, Pink, Yellow)
Flower Head
- MR, 5 sc in color of choice
- ch 2, 2 dc in same st, ch 2, sl st to next – repeat around
FO, leave tail to attach.
Flower Stem + Leaves (Green)
- ch 6–8, sc back down
- ch 4, sl st back (leaf) – repeat
FO and glue behind flower head.
🐝 Bees (Make 2)
Bee Body
- With yellow: MR, 6 sc
- With black: sc around (6)
- With yellow: sc around
- With black: sc around
Stuff lightly - dec x3, FO
Embroider face and attach mini wings (ch 3 loops)
🧺 Basket Base (Green)
- ch 15
- sc in rows for 4–5 rounds
- Switch to working in round, sc around to form a shallow “tub”
- FLO sc for top edge for defined rim
FO and attach to bottom of card with glue.
✂️ Assembling the Greeting Card
✅ Step-by-Step Guide
- Prepare your card
- Use a sturdy cardstock base (blank or pre-printed “Happy Birthday!”)
- Make sure it opens vertically for best effect.
- Layout
- Arrange your amigurumi gnome, basket, flowers, and bees before gluing.
- Mark light pencil dots where parts go.
- Attach basket
- Hot glue or fabric glue the bottom of the basket base to the card.
- Mount gnome
- Glue or sew gnome gently into the basket.
- Add flowers
- Tuck and glue stems behind/around the gnome.
- Attach bees
- Glue bees in top corners. Add wings made from lace, wire, or sheer ribbon.
- Final touches
- Add optional glitter, stickers, or handwritten notes.
💡 Tips & Customization Ideas
- Use double-sided tape or Velcro dots if you want the gnome to be removable.
- Add a small crochet balloon or a banner in the gnome’s hand.
- Turn this into a seasonal card (Easter, Spring, Christmas) with color swaps.
- Use as a framed wall decor if you add a background!
This Amigurumi Birthday Card brings together handmade charm and joyful celebration—perfect for gifting a smile! 🧶💌🎉
🖨️ How to Make & Print a Greeting Card at Home with Amigurumi
🧾 What You’ll Need
✂️ Card Supplies
- Thick cardstock (200–300 gsm) — matte or semi-gloss
- Inkjet or laser printer
- Paper trimmer or scissors
- Bone folder (or back of a spoon) for folding
- Optional: Envelopes (5×7″ fits most designs)
🧷 For Amigurumi Assembly
- Hot glue gun or strong craft glue
- Crochet appliqués (gnome, flowers, bees, basket, etc.)
- Double-sided foam tape (optional for 3D lift)
- Printed graphics (e.g., “Happy Birthday!” text or background)
🧑🎨 1. Designing Your Card
You can:
- Use Canva, Microsoft Word, Google Docs, or Adobe Express (free online tools)
- Set your page size to A5 or half of A4/US Letter (5″x7″ is most common)
📐 Layout Tips
- Keep the top half clean for your amigurumi decorations
- Use bold, fun text like “Happy Birthday!” in the top center
- Leave space in the lower half for the yarn basket and gnome
- Use soft pastel or natural-colored backgrounds to make the crochet pop
🖨️ 2. Printing Your Card
- Set your printer to high quality or “best” print setting
- Choose A5 size or set margins to print half-fold if using A4/Letter
- Print on the landscape side, so you can fold it into a vertical card
- Let ink dry fully before folding or gluing
✉️ 3. Cutting & Folding
- If using full-page paper, trim the sheet to your desired card size
- Use a bone folder (or ruler + spoon) to crease neatly along the center
- Fold carefully and press flat under a book for a crisp shape
🧶 4. Assembling with Amigurumi
- Glue the yarn basket first at the bottom of the front panel
- Sew or hot glue the gnome into the basket
- Add flowers, bees, and wings using glue
- Optionally: Use foam tape under flowers or bees for 3D pop-out effect
Tip: Use minimal stuffing in each amigurumi piece to keep it flat and light for mailing.
🧡 5. Finishing Touches
- Add glitter, washi tape, stickers, or handwritten notes
- Insert into a 5×7″ envelope for gifting
- If mailing, check with your post office for thickness requirements and consider using a padded envelope