Add a touch of holiday magic to your crochet collection with this Amigurumi Gingerbread House pattern! 🏠✨ With its charming candy details, cozy frosting accents, and festive design, this project brings the warmth of the season to life in yarn form. Whether you’re crafting for Christmas décor, a heartfelt gift, or simply love whimsical amigurumi, this FREE pattern is a delightful addition to your collection.
Designed for intermediate crocheters, this pattern allows for customization in roof textures, candy decorations, and even tiny accessories like a miniature wreath or glowing windows to enhance its festive charm. Choose classic browns and whites for a traditional gingerbread look or experiment with pastel hues for a playful twist! Whether displayed as part of a holiday setup or gifted to a fellow crochet enthusiast, this amigurumi gingerbread house is sure to spread seasonal cheer. Grab your hook, select your favorite yarn, and let’s bring this cozy creation to life—one stitch at a time! 🧶✨
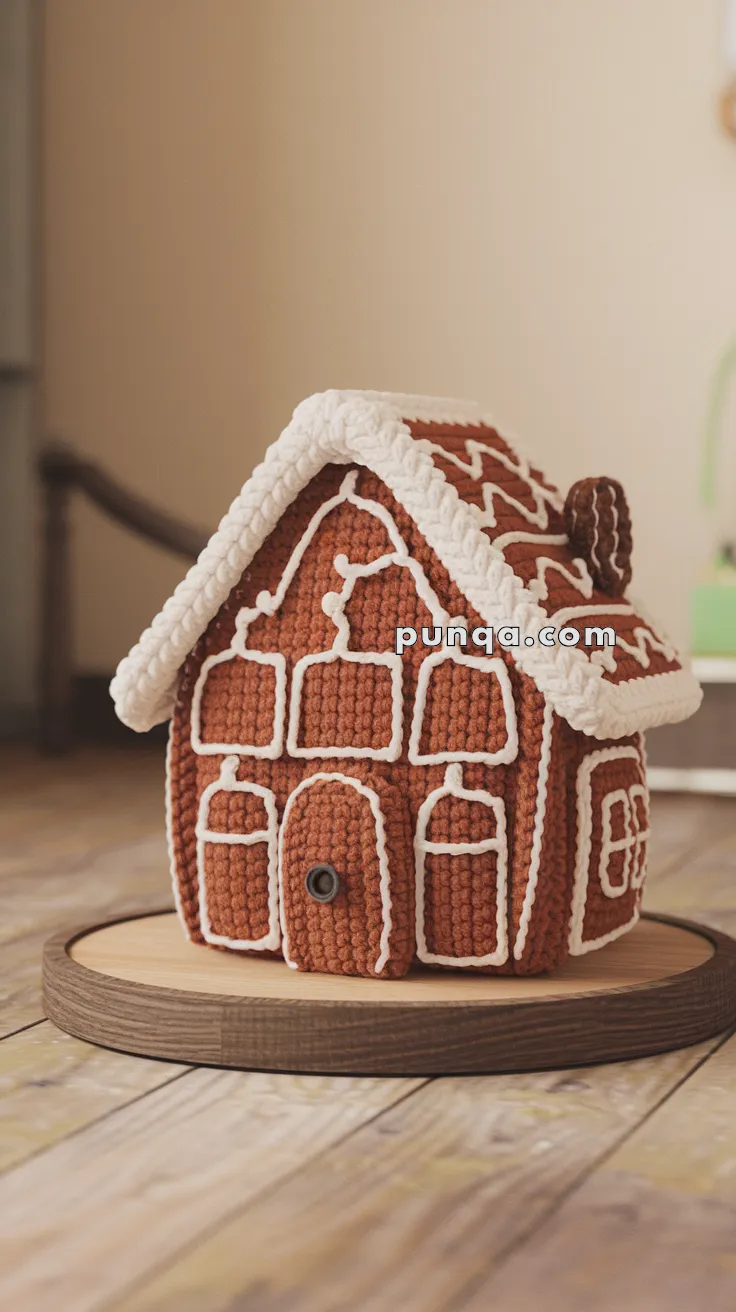
🏠 Amigurumi Gingerbread House Crochet Pattern
Welcome to the coziest holiday project of the season! This charming gingerbread house captures all the magic of a classic Christmas cookie house, complete with dimensional white “icing” details, adorable arched windows, decorative roof patterns, and a sweet little chimney. This soft sculptural piece will bring warmth and whimsy to your holiday décor.
✨ Skill Level
Intermediate – You’ll need to be comfortable with flat panel construction, shaping, assembly, and surface crochet or embroidery techniques for the detailed icing decorations.
📏 Finished Size
Approximately 18–20 cm (7–8 inches) tall and 15 cm (6 inches) wide, depending on your yarn weight, hook size, and tension.
🧶 Materials You’ll Need
Yarn (Worsted Weight or DK):
- Gingerbread Brown: 200–250g (main structure – walls, roof, chimney, window circles, door)
- White: 75–100g (all icing details, trim, roof decoration, window frames, door outline)
Crochet Hook: 3.5 mm (US E/4)
Other Supplies:
- Polyester fiberfill stuffing (or foam blocks for firmer structure)
- Stiff cardboard or plastic canvas pieces for walls, base, and roof support
- Tapestry needle
- Stitch markers
- Embroidery needle (for detailed icing work)
- Small dark button or bead (for door handle)
- Scissors
- Straight pins (for positioning before sewing)
- Hot glue gun (optional, for securing cardboard inside panels)
🪡 Abbreviations (US Terms)
- MR = Magic Ring
- sc = Single Crochet
- hdc = Half Double Crochet
- dc = Double Crochet
- inc = Increase (2 sc in same stitch)
- dec = Decrease (invisible decrease)
- ch = Chain
- sl st = Slip Stitch
- st = Stitch
- FO = Fasten Off
- BLO = Back Loop Only
🧵 Pattern Instructions
Work in rows (turning) for all flat panels unless otherwise noted. Use stitch markers to track your place.
🏠 Front Wall Panel (Brown)
This panel will have 3 windows in the middle section and 1 door at the bottom center.
Ch 26
Row 1: sc in 2nd ch from hook, sc across (25 sc); ch 1, turn
Rows 2–20: sc across (25); ch 1, turn
Shaping the Peaked Roof:
Row 21: dec, sc 21, dec (23); ch 1, turn
Row 22: dec, sc 19, dec (21); ch 1, turn
Row 23: dec, sc 17, dec (19); ch 1, turn
Row 24: dec, sc 15, dec (17); ch 1, turn
Row 25: dec, sc 13, dec (15); ch 1, turn
Row 26: dec, sc 11, dec (13); ch 1, turn
Row 27: dec, sc 9, dec (11); ch 1, turn
Row 28: dec, sc 7, dec (9); ch 1, turn
Row 29: dec, sc 5, dec (7); ch 1, turn
FO, leave a long tail for sewing.
🏠 Back Wall Panel (Brown)
Work exactly the same as Front Wall Panel. You can add windows if desired, but they won’t be visible when displayed against a wall.
🏠 Side Wall Panels (Brown) – Make 2
At least one visible side panel should have 1 window.
Ch 22
Row 1: sc in 2nd ch from hook, sc across (21 sc); ch 1, turn
Rows 2–20: sc across (21); ch 1, turn
FO, leave long tail for sewing.
🏠 Base Panel (Brown)
Ch 26
Row 1: sc in 2nd ch from hook, sc across (25 sc); ch 1, turn
Rows 2–21: sc across (25); ch 1, turn
FO, leave long tail. Cut cardboard rectangle to fit (approximately 9 cm × 7.5 cm).
🏠 Roof Panels (Brown) – Make 2
Ch 30
Row 1: sc in 2nd ch from hook, sc across (29 sc); ch 1, turn
Rows 2–24: sc across (29); ch 1, turn
FO, leave long tail for sewing.
🚪 Door (Brown)
Round 1: MR, 6 sc (6)
Round 2: inc ×6 (12)
Round 3: (sc, inc) ×6 (18)
Rounds 4–7: sc around (18)
FO, leave tail for sewing.
Flatten to create a small vertical oval door. Position at the very bottom center of the front panel (around rows 2-6).
🪟 Window Circles (Brown) – Make 5
(3 for front panel, 1 for each visible side panel)
Round 1: MR, 6 sc (6)
Round 2: inc ×6 (12)
Round 3: (sc, inc) ×6 (18)
Round 4: sc around (18)
FO, leave tail for sewing.
These will be sewn centered inside the white window frames (frames created first).
🧱 Chimney (Brown)
Round 1: MR, 6 sc (6)
Round 2: (sc, inc) ×3 (9)
Round 3: (2 sc, inc) ×3 (12)
Round 4: (3 sc, inc) ×3 (15)
Round 5: (4 sc, inc) ×3 (18)
Rounds 6–14: sc around (18)
FO, leave tail. Stuff firmly and sew to the right side of the roof, angled slightly.
🏗️ Assembly
Step 1: Prepare Cardboard Supports
Cut cardboard pieces for structure:
- Front/back panels: 9 cm × 7.5 cm (lower section)
- Side panels: 7.5 cm × 7.5 cm
- Base panel: 9 cm × 7.5 cm
- Roof panels: 10 cm × 8.5 cm each
Insert or glue cardboard pieces inside panels for rigidity.
Step 2: Construct the Box
Sew front, back, and two side panels together using whip stitch or mattress stitch. Ensure corners are square and aligned.
Step 3: Attach Base
Sew base panel to the bottom edge of the house structure.
Step 4: Attach Roof
Position roof panels at an angle meeting at the peak. Sew to the top edges of walls, then sew the two roof panels together along the center ridge. Allow slight overhang on front and back.
Step 5: Position Chimney
Sew the chimney to the right side of the roof near the edge, positioned as shown in photo.
❄️ White Icing Window Frames – The Key Detail!
This is what makes the windows look authentic. Each window has a WHITE rectangular frame with rounded/arched top, then a brown circle is sewn inside.
🪟 White Window Frame (White) – Make 5
Each frame is an arched rectangle shape.
Ch 13
Row 1: sc in 2nd ch from hook, sc across (12); ch 1, turn
Rows 2–14: sc across (12); ch 1, turn
Shaping the arched top (optional for more rounded look):
Row 15: dec, sc 8, dec (10); ch 1, turn
Row 16: dec, sc 6, dec (8); ch 1, turn
FO, leave long tail.
Creating the dimensional icing border:
Using white yarn and embroidery needle, work around the entire perimeter of each white frame:
- Work blanket stitch or chain stitch embroidery around all edges
- Make the outline thick and raised by working 2-3 passes
- Create extra detail at the rounded top
- Work a cross in the center of the frame (vertical + horizontal line) to create window panes
Assembly:
Position and sew 3 white frames in a horizontal row on the front panel (approximately rows 10-16, spaced 2-3 stitches apart).
Position and sew 1 white frame on each of the visible side panels.
Once frames are secure, center a brown circle inside each frame and sew in place.
The brown circle should be smaller than the white frame so the white shows around the edges, creating the icing border effect.
❄️ Door Icing Outline (White)
Using white yarn and embroidery needle, create a decorative outline around the door:
- Work chain stitch or blanket stitch around the door perimeter
- Work 2-3 passes for thickness and dimension
- Create an arched detail at the top
- Add vertical and horizontal lines on the door surface creating panels
- Work a decorative frame around the entire door
- Sew a small dark button or bead on the right side as a handle
❄️ Roof Edge Snow/Icing Trim – Make 2
With white yarn, create dimensional scalloped trim.
Ch 32 (or length to match your roof edge)
Row 1: Starting in 3rd ch from hook:
(2 dc in next ch, hdc in next ch, sc in next ch, sl st in next ch) repeat across.
This creates a wavy, scalloped edge that looks like dripping icing.
FO, leave long tail. Sew along the bottom edge of each roof panel, allowing scallops to hang over slightly.
❄️ Roof Decorative Pattern (White)
Create horizontal wavy/garland lines across the roof panels as shown in the photo.
Method 1: Surface Crochet Waves
With white yarn, join at one edge of roof panel:
- Work surface slip stitch in a wavy pattern across the width
- sl st in 2 sts, working slightly loose; sl st in 2 sts working slightly tight to create wave effect
- Repeat across the entire width
- FO and repeat on a new row 3-4 rows up
Create 5-6 wavy lines per roof panel, evenly spaced from bottom to peak.
Method 2: Embroidered Garland
Using white yarn and embroidery needle:
- Work a line of chain stitches or running stitches in a gentle wave/scallop pattern
- Make small loops or swoops every 2-3 stitches
- This creates a decorative garland effect
Work 5-6 horizontal decorative lines on each roof panel.
❄️ Roof Peak Trim (White)
Create a white line along the ridge where the two roof panels meet:
- Join white yarn at one end of the peak
- Work surface slip stitch along the entire ridge
- Work 2-3 passes for a thick, visible line
- This creates the “spine” of white icing at the roof peak
❄️ Chimney Decoration (White)
Add white icing details to the chimney:
Using white yarn:
- Work 3-4 horizontal lines around the chimney (surface slip stitch or chain embroidery)
- Space them evenly from bottom to top
- Add a scalloped trim around the top opening using the same technique as roof edge trim (small scallops)
❄️ Wall Structural Lines (White)
Add architectural icing lines on the walls:
Vertical lines:
- Between each window frame on the front panel
- At each corner where walls meet
- These should run from the foundation up toward the roof line
Horizontal line:
- Work a horizontal line across the front panel just below the row of windows (around row 9)
- This divides the window section from the door section
- Extend across the full width
Method: Use surface slip stitch or chain embroidery to create these structural lines. Make them thick and visible by working multiple passes.
❄️ Foundation/Base Trim (White)
Work decorative scalloped trim around the entire base:
With white yarn, join at bottom corner with sl st:
(3 dc in next st, sl st in next 2 sts) repeat around entire bottom perimeter.
This creates the snowy foundation edge visible in the photo.
❄️ Additional Decorative Details
Corner accents:
- Add small French knots or dots in white at strategic points (corners, between windows, etc.)
Extra icing swirls:
- Add small decorative swirls or curlicues in empty wall spaces
- Use chain stitch embroidery to create these details
Texture variation:
- Work some details with doubled white yarn for extra dimension
- Layer embroidery passes for a truly “piped icing” effect
🎄 Final Checklist
Before your house is complete, verify:
✅ All 5 white window frames are sewn in place with rounded/arched tops
✅ All 5 brown circles are centered inside the white frames
✅ Each window has visible white icing border and cross-pane details
✅ Door is at bottom center with thick white outline and arch detail
✅ Chimney is positioned on right side of roof
✅ White scalloped trim along both roof bottom edges
✅ 5-6 horizontal decorative lines on each roof panel
✅ White line along roof peak ridge
✅ Vertical and horizontal structural lines on walls
✅ Scalloped trim around entire base
✅ All ends woven in securely
✅ Cardboard inserted in all panels for structure
🎁 Tips for Perfect Results
- Cardboard is essential – This makes the difference between a floppy craft and a standing structure
- Window frames FIRST – Always sew white frames to walls before adding brown circles inside
- Thick icing lines – Work 2-3 passes on all white details for authentic piped-icing dimension
- Pin everything – Use straight pins to position all elements before permanent sewing
- Steam block panels – Do this before assembly for crisp, flat edges
- Reference the photo constantly – Keep it visible while working on white details
- Take your time – The white icing details are what make this special; rushing shows
- Even spacing – Measure or count stitches to ensure windows are evenly spaced
- Test tension – Practice surface crochet on a swatch first to get consistent tension
- Good lighting – Work on white details in bright light so you can see clearly
🏠 Your Gingerbread House is Complete!
Congratulations on finishing this absolutely charming amigurumi gingerbread house! You’ve created something truly special that captures the magic and warmth of the holiday season.
This house showcases your crochet skills beautifully – from the precisely constructed architectural elements to the delicate white icing details that bring it to life. The combination of warm gingerbread brown and crisp white creates that classic holiday aesthetic that everyone loves.
The dimensional icing work, especially the window frames with their arched tops and brown circle panes, gives this piece an authentic gingerbread cookie house feel. The wavy roof patterns, scalloped edges, and structural lines all work together to create visual interest and charm.
Whether you display this on your holiday mantel, use it as a dining table centerpiece, gift it to someone special, or add it to your collection of handmade treasures, this gingerbread house will bring smiles and festive cheer year after year.
You’ve invested time, skill, and creativity into every stitch, and it shows in the finished piece. The careful attention to detail in the white icing work elevates this from a simple craft to a true work of handmade art.
May your gingerbread house fill your home with warmth, joy, and the cozy magic of the holidays! Display it proudly and enjoy the compliments that are sure to come your way! 🎄✨
Happy crocheting, and may your holiday season be filled with creativity, love, and handmade happiness! ❄️🍪🏠💕