Swing into your next crochet adventure with the Amigurumi Gibbon, a playful and poseable primate that’s full of character! 🐒🧶 With its long, lanky limbs, expressive face, and cuddly body, this charming gibbon is perfect for hanging around your craft space or gifting to a fellow animal lover. Whether perched on a shelf, wrapped around a bedpost, or peeking out from a jungle-themed display, this little acrobat brings a burst of wild fun to your handmade collection.
Ideal for crocheters who enjoy quirky designs and creative shaping, this pattern invites you to explore flexible limbs, soft textures, and adorable details. Customize your gibbon with different fur tones, add a tiny banana or leafy accessory, or stitch up a whole troop for extra jungle joy. The Amigurumi Gibbon is a delightful way to stitch up playfulness, personality, and a sprinkle of handmade adventure—one loop at a time! 🧵🌿

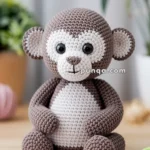
🐵 Amigurumi Gibbon Monkey Crochet Pattern
Bring home this sweet little monkey with its expressive eyes, soft curved smile, and perfectly shaped arms that are just the right length for cuddles. With simple color changes and a cute seated pose, it’s a delightful project for any crochet lover!
✨ Skill Level
Intermediate – includes shaping, color changes, and neat embroidery work.
📏 Finished Size
Approximately 22 cm (8.5 inches) tall using DK-weight yarn and a 2.5 mm hook.
🧶 Materials
-
Yarn (DK weight cotton or velvet):
-
Medium Brown – main body, limbs, tail
-
White or Cream – face patch, inner ears, belly
-
Small amount of Black – mouth embroidery
-
Small amount of Dark Brown – nose
-
-
Hook: 2.5–3.0 mm
-
Safety Eyes: 10–12 mm black
-
Stuffing: Polyester fiberfill
-
Yarn Needle for sewing parts and embroidery
-
Stitch Marker
🧵 Abbreviations (US Terms)
MR – Magic Ring
sc – Single Crochet
inc – Increase (2 sc in one stitch)
dec – Decrease (sc2tog)
ch – Chain
sl st – Slip Stitch
FO – Fasten Off
🧠 Head (Brown)
R1: MR, 6 sc (6)
R2: inc in each st (12)
R3: (sc, inc) × 6 (18)
R4: (2 sc, inc) × 6 (24)
R5: (3 sc, inc) × 6 (30)
R6: (4 sc, inc) × 6 (36)
R7: (5 sc, inc) × 6 (42)
R8–14: sc around (42)
R15: (5 sc, dec) × 6 (36)
R16: (4 sc, dec) × 6 (30)
👉 Place safety eyes between R10–11, spaced about 7–8 sts apart.
R17: (3 sc, dec) × 6 (24)
Stuff firmly.
R18: (2 sc, dec) × 6 (18)
R19: (sc, dec) × 6 (12)
R20: dec × 6 (6)
FO, close hole, weave in end.
😊 Face Patch (White/Cream)
R1: MR, 6 sc (6)
R2: inc in each st (12)
R3: (sc, inc) × 6 (18)
R4: (2 sc, inc) × 6 (24)
R5: (3 sc, inc) × 6 (30)
FO leaving long tail.
Sew centered low on the face between eyes.
With dark brown, embroider a small round nose at top of patch.
With black, stitch a wide curved smile below the nose.
👂 Ears (Make 2)
Outer (Brown):
R1: MR, 6 sc (6)
R2: inc in each st (12)
R3: (sc, inc) × 6 (18)
FO, leave tail.
Inner (White/Cream):
R1: MR, 6 sc (6)
R2: inc in each st (12)
FO.
Sew cream circle onto brown ear piece.
Flatten slightly and attach to each side of the head aligned with eye level (around R10).
🧸 Body (Brown)
R1: MR, 6 sc (6)
R2: inc in each st (12)
R3: (sc, inc) × 6 (18)
R4: (2 sc, inc) × 6 (24)
R5: (3 sc, inc) × 6 (30)
R6–12: sc around (30)
R13: (3 sc, dec) × 6 (24)
R14: (2 sc, dec) × 6 (18)
Stuff firmly.
R15: (sc, dec) × 6 (12)
FO, leaving long tail for sewing.
Attach head to body securely.
🤍 Belly Patch (White/Cream)
R1: MR, 6 sc (6)
R2: inc in each st (12)
R3: (sc, inc) × 6 (18)
R4: (2 sc, inc) × 6 (24)
Flatten slightly into oval shape and sew centered to front of body.
💪 Arms (Make 2)
R1: MR, 6 sc (6)
R2: (sc, inc) × 3 (9)
R3–20: sc around (9)
👉 Optional: switch to white for last 2 rounds for hand tips.
Stuff lightly from palm to midsection only to allow flexibility.
FO, leaving long tail.
Sew to sides of body at shoulder level, angled slightly forward.
🦵 Legs (Make 2)
R1: MR, 6 sc (6)
R2: inc in each st (12)
R3: (sc, inc) × 6 (18)
R4–6: sc around (18)
R7: (1 sc, dec) × 6 (12)
R8–10: sc around (12)
👉 Optional: switch to white for last round for feet.
Stuff firmly and sew to bottom of body so monkey can sit steadily.
🐒 Tail (Brown)
ch 22
R1: sc in 2nd ch from hook and across (21)
FO, curve naturally and sew to back of body.
🎨 Assembly & Finishing Touches
-
Sew head firmly to the top of the body, slightly tilted forward.
-
Attach arms symmetrically so they rest on knees in sitting pose.
-
Shape the face by gently tightening the thread around the muzzle area for definition.
-
Add blush under eyes using pink thread or soft pastel (optional).
-
Ensure all limbs are symmetrical and monkey can sit upright.
🌟 Outro
Congratulations – your adorable Amigurumi Monkey is complete! 🐵💛
With its gentle expression, curved smile, and contrasting white face and belly, this sweet little companion captures the soft and friendly charm of the photo perfectly.
Display it on a desk, gift it to a loved one, or create a whole troop of monkeys in different shades of brown and cream. Wherever it sits, this happy little gibbon-style friend will bring warmth and a smile to everyone who sees it.