Step into a world of whimsy with the Amigurumi Garden Gnome, a delightful crochet companion ready to bring charm to your home or garden nook! 🧙♂️🌿 With his pointy hat, bushy beard, and cheerful little nose, this gnome is bursting with personality and rustic flair. Whether perched among potted plants or sitting proudly on a shelf, he’s the perfect blend of folklore and handmade magic.
This pattern is a joy to customize—play with earthy tones, add embroidered flowers, or even stitch up a tiny shovel or mushroom buddy to complete the scene. Whether you’re crafting a single gnome or a whole merry crew, each one adds a touch of enchantment to your space. The Garden Gnome is more than just a project—it’s a celebration of cozy creativity and the joy of stitching up something truly special. 🧶✨
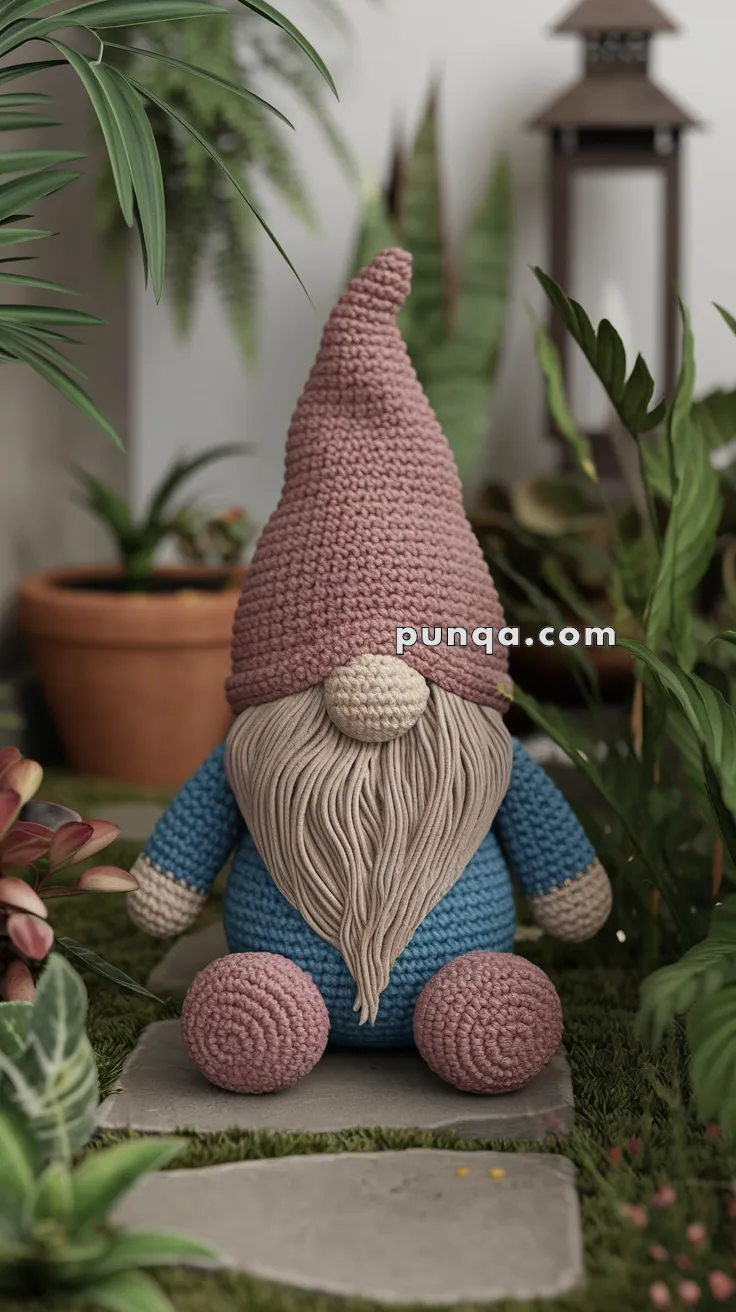
🍄 Amigurumi Garden Gnome Crochet Pattern
Bring some charm into your garden or home décor with this adorable crochet garden gnome! With his tall pink hat, flowing beard, and round shoes, he’s a delightful project that’s as fun to make as it is to display.
✨ Skill Level
Intermediate – involves shaping, color changes, and assembly.
📏 Finished Size
Approx. 28–30 cm (11–12 inches) tall, depending on yarn and hook size.
🧶 Materials
- Worsted weight yarn in:
- Pink/mauve (hat, shoes)
- Blue (body, sleeves)
- Beige (nose, hands)
- Taupe or light brown (beard)
- 3.5 mm crochet hook
- Fiberfill stuffing
- Yarn needle
- Scissors
- Stitch markers
🔤 Abbreviations (US terms)
- MR – Magic Ring
- sc – Single crochet
- inc – Increase (2 sc in one stitch)
- dec – Decrease (sc two stitches together)
- FO – Fasten off
- BLO – Back loop only
🧩 Pattern Instructions
Hat (Pink, tall & bendy)
- MR 6 (6)
- inc x6 (12)
- (sc, inc) x6 (18)
- sc around (18)
- (2 sc, inc) x6 (24)
- sc around (24)
- (3 sc, inc) x6 (30)
- sc around (30)
- (4 sc, inc) x6 (36)
10–14. sc around (36) - (5 sc, inc) x6 (42)
16–20. sc around (42) - (6 sc, inc) x6 (48)
22–28. sc around (48) - (7 sc, inc) x6 (54)
30–40. sc around (54)
41–50. sc around without stuffing tip (this makes the hat tall and floppy).
FO, leave long tail for sewing.
👉 Do not overstuff the tip — let it bend naturally to one side like in the photo.
Nose (Beige)
- MR 6 (6)
- inc x6 (12)
- (sc, inc) x6 (18)
4–5. sc around (18) - (sc, dec) x6 (12)
Stuff, FO, leave tail for sewing.
Body (Blue)
- MR 6 (6)
- inc x6 (12)
- (sc, inc) x6 (18)
- (2 sc, inc) x6 (24)
- (3 sc, inc) x6 (30)
- (4 sc, inc) x6 (36)
- (5 sc, inc) x6 (42)
8–20. sc around (42) - (5 sc, dec) x6 (36)
22–26. sc around (36) - (4 sc, dec) x6 (30)
28–32. sc around (30) - (3 sc, dec) x6 (24)
34–36. sc around (24)
Stuff firmly, FO.
Arms (Make 2 – Beige & Blue)
Hand (Beige):
- MR 6 (6)
- inc x6 (12)
3–5. sc around (12)
Switch to blue (sleeve):
6–12. sc around (12)
FO, stuff lightly.
Feet (Make 2 – Pink spherical shoes)
- MR 6 (6)
- inc x6 (12)
- (sc, inc) x6 (18)
- (2 sc, inc) x6 (24)
5–8. sc around (24) - (sc, dec) x8 (16)
- dec x8 (8)
Stuff firmly, FO.
👉 These feet are round balls just like in the photo.
Beard (Taupe)
- Cut 35–40 strands of yarn, each ~22 cm long.
- Fold strands in half and attach under the nose using a latch-hook method.
- Trim into a pointed shape so it flows neatly.
- Optional: steam lightly to smooth the yarn.
🧵 Assembly
- Sew beard to the body first, attaching strands densely under the nose line.
- Attach the nose centered above beard.
- Place and sew the tall hat over the nose, letting the brim cover the top edge of nose slightly. Tilt the hat to one side for natural look.
- Sew arms on sides of the body.
- Sew round feet at the base.
- Adjust beard shape with scissors if needed.
🌿 Outro
Your crochet garden gnome is complete! With his tall floppy hat, soft flowing beard, and round shoes, he’s the perfect little guardian for plants, shelves, or seasonal décor. This charming gnome adds a cozy handmade touch wherever he’s placed.