Level up your crochet game with this Amigurumi Gaming Controller pattern! Whether you’re crafting for gamers, adding a playful touch to your collection, or simply love making unique amigurumi designs, this free pattern lets you stitch up a miniature gaming controller full of charm. With its classic button layout, ergonomic shape, and nostalgic appeal, this crochet gaming controller captures the essence of fun and entertainment in every stitch. Perfect for gifting to fellow gaming enthusiasts, decorating a cozy gaming setup, or simply celebrating the joy of crochet, this amigurumi gaming controller is ready to bring pixel-perfect charm to your handmade collection! 🎮✨
Designed for customization, this pattern allows you to experiment with different color schemes, embroidered details, or even tiny accessories like a cord or a glowing effect for extra personality. Craft a classic black controller, create a vibrant retro-inspired version, or even stitch up a full set of gaming accessories for a fun display! Whether gifted as a thoughtful handmade keepsake, displayed as a quirky accent, or made simply for the joy of crafting, this Amigurumi Gaming Controller is a creative and exciting project—perfect for bringing the thrill of gaming to every stitch! 🧶🎮
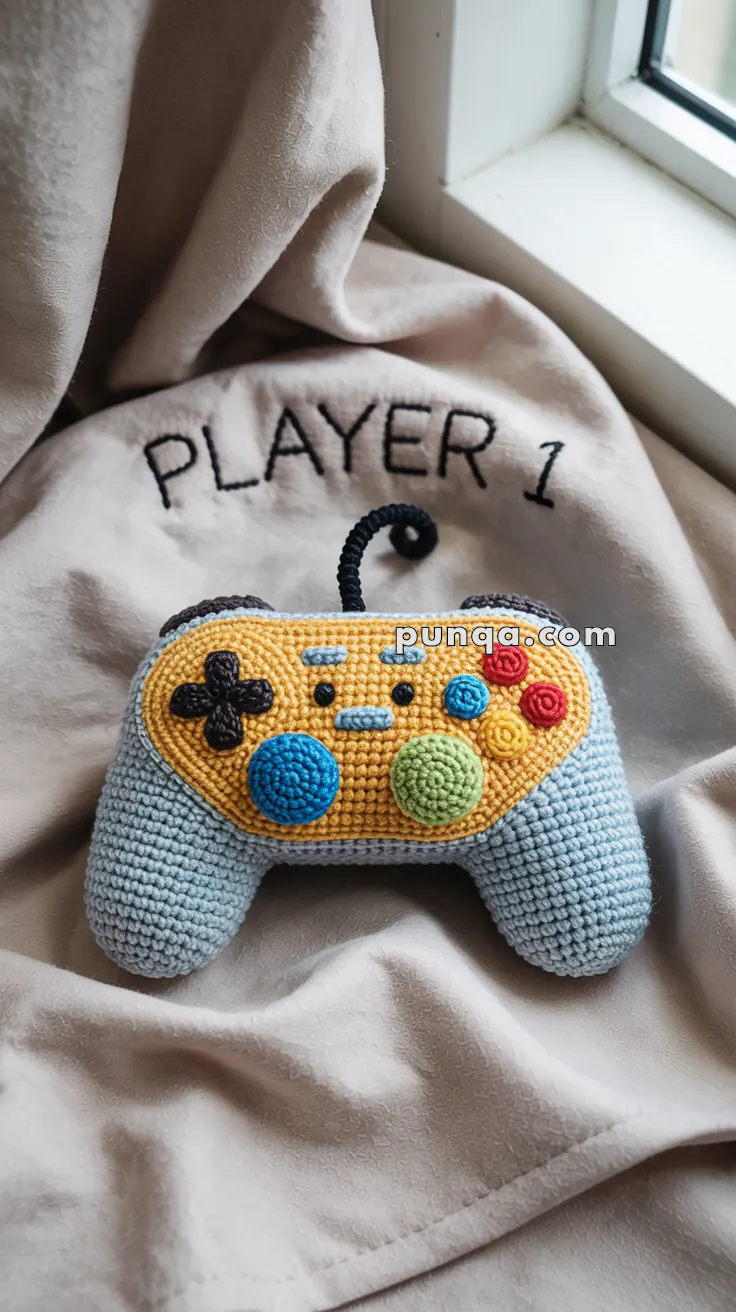
🎮 Amigurumi Gaming Controller Crochet Pattern
Level up your crochet with this playful Amigurumi Gaming Controller! Featuring colorful buttons, a D-pad, and an expressive pixel face, this soft and squishy gamepad is perfect for gamers, kids, or anyone who loves quirky handmade gifts. Whether as nursery decor or a gamer-themed plushie, this controller is always “Player 1” ready!
✨ Skill Level
Intermediate — shaping, color changes, appliqué, and light sculpting.
📏 Finished Size
Approx. 16–17 cm (6.5–6.75 inches) wide
Grip to grip, using DK yarn and a 3.0 mm hook
🧶 Materials
DK / light worsted yarn:
- Light Blue — controller body
- Mustard Yellow — faceplate
- Black — D-pad, eyes, cable
- Grey — start/select bars
- Red, Blue, Green, Yellow — buttons
Tools:
- 3.0 mm hook
- Fiberfill
- Yarn needle
- Stitch marker
- Scissors
🧵 Abbreviations (US)
MR – magic ring
sc – single crochet
inc – increase
dec – decrease
sl st – slip stitch
ch – chain
FO – fasten off
🕹 Controller Body (Worked in One Piece)
Start in light blue
MR 6
inc x6 (12)
(1 sc, inc) x6 (18)
(2 sc, inc) x6 (24)
(3 sc, inc) x6 (30)
(4 sc, inc) x6 (36)
(5 sc, inc) x6 (42)
(6 sc, inc) x6 (48)
Rounds 9–12: sc around (48)
🎨 Faceplate Integration
Switch to mustard yellow for front panel only.
Round 13:
Sc 16 (back stays blue), switch to yellow → sc 16 (front), switch to blue → sc 16
Rounds 14–20:
Repeat color placement so yellow stays centered on front.
This creates a smooth inset faceplate that is part of the body — not sewn.
🎮 Grip Shaping
Round 21:
(6 sc, dec) x6 (42)
Round 22:
(5 sc, dec) x6 (36)
Round 23:
(4 sc, dec) x6 (30)
Round 24:
(3 sc, dec) x6 (24)
Begin stuffing firmly — especially the grips.
Round 25:
(2 sc, dec) x6 (18)
Round 26:
(1 sc, dec) x6 (12)
Round 27:
dec x6 (6)
FO and close.
Shape grips gently with hands.
➕ D-Pad (Black – Rounded Cross)
Make 4 identical arms:
MR 6
Round 2: inc x6 (12)
Round 3: sc around (12)
FO
Sew arms together into a rounded cross.
Attach to left side of faceplate.
🔘 Large Domed Pads (Blue & Green – Make 2)
MR 6
inc x6 (12)
(1 sc, inc) x6 (18)
Rounds 4–5: sc around (18)
FO
Lightly stuff for dome shape.
Sew centered at bottom of faceplate.
🔴 Small Buttons (Red, Yellow, Red – Make 3)
MR 6
inc x6 (12)
Round 3: sc around (12)
FO
Do not stuff.
Sew clustered top right.
👁 Pixel Face
Eyes (Black – Make 2)
MR 4
FO, flatten and sew
Mouth
Surface stitch short straight line
Start / Select Bars (Grey – Make 2)
Ch 5
sl st across
FO
Sew horizontally above eyes.
🔌 Cable
Black yarn
Ch 16
sc in 2nd ch and across
FO
Twist gently into curl and sew into top center.
🪡 Finishing
- Shape grips with fingers
- Ensure faceplate is smooth and flat
- Adjust button symmetry
- Secure all ends
🌟 Final Thoughts
Your plush controller is now Player One ready! With its chunky grips, smooth faceplate, domed buttons, and pixel-cute expression, this soft gamepad looks straight out of a cozy gamer’s dream setup.
Perfect for nurseries, gamer desks, or gift baskets, this handmade controller brings retro charm and modern softness together in one irresistible plush.
Game on — and happy crocheting! 🎮🧶✨