Turn your sniffles into giggles with this Amigurumi Funny Face Tissue Box Cover crochet pattern! This delightfully silly design transforms an ordinary tissue box into a cheerful character with big eyes, a goofy grin, and a whole lot of personality. Whether you’re brightening up a bathroom, adding a playful touch to your craft room, or just love making people smile, this pattern is a fun and quirky way to bring joy to everyday moments. 🤧😄🧶
Designed for maximum whimsy, this pattern invites you to mix and match colors, experiment with facial expressions, and add fun extras like eyebrows, glasses, or even a mustache. Make one for each room or gift them to friends who could use a laugh. Whether you’re a beginner looking for a lighthearted project or a seasoned crocheter in the mood for something unexpected, this Amigurumi Funny Face Tissue Box Cover is a joyful and satisfying make—perfect for bringing a touch of handmade humor to every stitch! 💖🎨✨
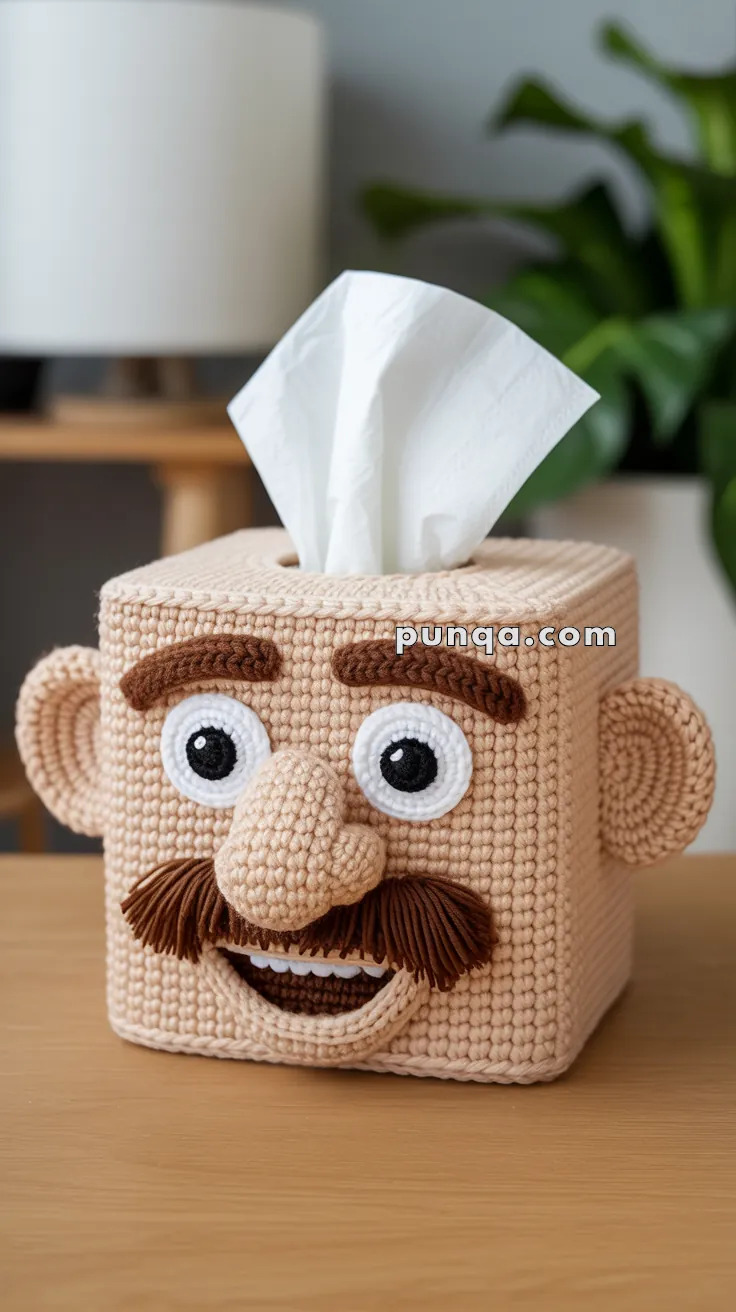
👃 Amigurumi Funny Face Tissue Box Cover Crochet Pattern
Turn your tissues into a hilarious conversation piece with this funny face tissue box holder! Complete with dimensional ears, a thick fluffy mustache, big expressive eyes, arched eyebrows, and a bulbous nose.
✨ Skill Level
Intermediate – Involves cube construction, dimensional facial features, and assembly.
📏 Finished Size
Fits a standard cube tissue box (approx. 4.75 × 4.75 × 5 in / 12 × 12 × 13 cm). Adjustable.
🧶 Materials
- Yarn (worsted weight cotton or acrylic):
- Beige/tan: 200-250 yards (main cube, nose, ears)
- Dark brown: 40-50 yards (eyebrows, mustache)
- White: 30-40 yards (eyes, teeth)
- Black: 15-20 yards (eye pupils)
- 3.5 mm crochet hook
- Tapestry needle
- Scissors
- Fiberfill stuffing (for nose, eyebrows, mustache)
- Cardboard or plastic canvas (optional for structure)
- Standard cube tissue box
- Fabric glue or hot glue (optional)
🧵 Abbreviations (US Terms)
- MR – Magic Ring
- sc – Single Crochet
- hdc – Half Double Crochet
- dc – Double Crochet
- inc – Increase (2 sc in same st)
- dec – Decrease (sc2tog)
- sl st – Slip Stitch
- ch – Chain
- st(s) – Stitch(es)
- FO – Fasten Off
- BLO – Back Loops Only
- FLO – Front Loops Only
🧱 TISSUE BOX COVER (Cube Construction)
Method: Top Panel + 4 Side Panels
TOP PANEL (with tissue hole)
With beige yarn:
Round 1: MR, 6 sc (6)
Round 2: inc x6 (12)
Round 3: (1 sc, inc) x6 (18)
Round 4: (2 sc, inc) x6 (24)
Round 5: (3 sc, inc) x6 (30)
Round 6: (4 sc, inc) x6 (36)
Round 7: (5 sc, inc) x6 (42)
Round 8: (6 sc, inc) x6 (48)
Round 9: (7 sc, inc) x6 (54)
Round 10: (8 sc, inc) x6 (60)
Round 11: (9 sc, inc) x6 (66)
Round 12: (10 sc, inc) x6 (72)
Square should measure approximately 4.75″ × 4.75″. Work in continuous rounds, shaping into a square as you go.
Creating the tissue hole (center opening):
Round 13: Sc 28, ch 16, skip next 16 sts, sc 28 (to complete round)
Round 14: Sc 28, sc 16 across the chain, sc 28 (72)
Round 15: Sc around (72)
FO, leaving long tail. Shape into square and block if needed.
SIDE PANELS (Make 4)
With beige yarn:
Ch 21
Row 1: Sc in 2nd ch from hook and across (20 sc), ch 1, turn
Rows 2-20: Sc across (20), ch 1, turn
Row 21: Sc across (20)
FO, leave long tail for sewing.
Each panel should measure approximately 4.75″ × 5″
ASSEMBLY OF CUBE:
- Lay top panel flat with tissue hole facing up
- Sew one edge of each side panel to each of the 4 edges of top panel
- Sew side panels together at corners to form cube shape
- Leave bottom OPEN or create a flap for easy tissue box insertion
👁️ EYES (Make 2)
White Base:
Round 1: MR, 6 sc (6)
Round 2: inc x6 (12)
Round 3: (1 sc, inc) x6 (18)
Round 4: (2 sc, inc) x6 (24)
FO, weave in ends. Do not stuff. Flatten into circle.
Black Pupils (Make 2):
Round 1: MR, 6 sc (6)
Round 2: inc x6 (12)
Round 3: (1 sc, inc) x6 (18)
FO, leaving long tail. Flatten into circle.
White Highlights (Make 2):
Round 1: MR, 4 sc (4)
FO, leaving tail.
Assembly:
- Center and sew black pupil to white base
- Sew tiny white highlight to upper-left of black pupil for shine
- Position eyes on face: centered horizontally, in upper-middle area of front panel
- Space eyes about 2-2.5″ apart (center to center)
🟫 EYEBROWS (Make 2)
These are dimensional, stuffed, curved pieces
With dark brown yarn:
Ch 13
Row 1: Sc in 2nd ch from hook and across (12 sc), ch 1, turn
Row 2: Sc across (12), ch 1, turn
Row 3: Sc across (12), ch 1, turn
Row 4: Sc across (12)
FO, leaving long tail.
Shaping:
- Fold piece lengthwise
- Whipstitch long edges together, leaving ends open
- Lightly stuff to create dimensional, raised eyebrow
- Curve into arched/angled shape (higher on inner edge, lower on outer edge)
- Sew above each eye with outer edge angled downward toward ears, creating an expressive arch
👃 NOSE
Bulbous and prominent
With beige yarn:
Round 1: MR, 6 sc (6)
Round 2: inc x6 (12)
Round 3: (1 sc, inc) x6 (18)
Round 4: (2 sc, inc) x6 (24)
Rounds 5-8: Sc around (24) for 4 rounds
Stuff firmly to create bulbous shape.
Round 9: (2 sc, dec) x6 (18)
Continue stuffing.
Round 10: (1 sc, dec) x6 (12)
Round 11: dec x6 (6)
FO, leaving long tail. Close opening. Sew securely between and slightly below eyes, centered on face.
🧔 MUSTACHE
Dimensional, fluffy, structured pieces (not fringe)
Each Mustache Half (Make 2):
With dark brown yarn:
Ch 16
Row 1: Working in back bumps of chain: sl st in 2nd ch from hook, sc 2, hdc 3, dc 3, (2 dc in next st) x3, dc 3 to end
DO NOT TURN. Continue working along opposite side of foundation chain:
Row 2: Working in remaining loops: dc 3, (2 dc in next st) x3, dc 3, hdc 3, sc 2, sl st
This creates a ruffled, leaf-shaped piece.
FO, leaving long tail.
Assembly:
- Position both pieces below nose, pointing outward
- Overlap slightly at center under nose
- Sew inner edges together first, then sew to face
- Fluff and shape outward/upward for dimensional mustache look
- Each side should curve slightly upward at tips
👄 MOUTH with TEETH
Mouth Opening (Brown):
With dark brown yarn:
Ch 15
Row 1: Sc in 2nd ch from hook and across (14 sc), ch 1, turn
Row 2: Sc across (14), ch 1, turn
Row 3: Sc across (14)
FO, leaving long tail.
Teeth (White):
With white yarn:
Ch 11
Row 1: Sc in 2nd ch from hook and across (10 sc), ch 1, turn
Row 2: Sc across (10), ch 1, turn
Row 3: Sc across (10)
FO, leaving long tail.
Assembly:
- Position brown mouth piece below mustache as wide smile (curve it into smile shape)
- Sew along curved line to create smiling mouth
- Position white teeth piece at top edge of mouth opening
- Sew teeth so they peek out from under mustache slightly, visible when looking straight at face
👂 EARS (Make 2)
With beige yarn:
Round 1: MR, 6 sc (6)
Round 2: inc x6 (12)
Round 3: (1 sc, inc) x6 (18)
Round 4: (2 sc, inc) x6 (24)
Rounds 5-6: Sc around (24) for 2 rounds
Round 7: (2 sc, dec) x6 (18)
Round 8: Sc around (18)
Stuff lightly.
Round 9: (1 sc, dec) x6 (12)
Round 10: dec x6 (6)
FO, leaving long tail. Flatten opening and close. Shape into slightly cupped ear form. Sew to sides of box at middle height, angled slightly forward.
📦 FINAL ASSEMBLY
Positioning Guide:
- Eyes: Position first – they anchor everything else
- Centered horizontally on front panel
- Approximately 1.5-2″ from top edge
- 2-2.5″ apart (center to center)
- Nose: Between and slightly below eye centers, protruding outward
- Eyebrows: Above eyes, creating arched expression
- Inner edge higher, outer edge lower
- About 0.5″ above top of eyes
- Mustache: Below nose
- Center pieces overlap under nose
- Extend outward 1-1.5″ on each side
- Tips curve slightly upward
- Mouth/Teeth: Below mustache
- Centered between mustache and bottom of visible face area
- Curve into smile shape
- Width approximately 2.5-3″
- Ears: On side panels
- Middle height of cube
- Slightly forward-facing angle
Sewing Order:
- Pin or mark eye positions first
- Sew eyes securely
- Attach nose (use extra stitches for security due to weight)
- Sew eyebrows with desired arch
- Attach both mustache pieces, shaping as you sew
- Sew mouth in curved smile
- Add teeth overlapping mouth edge
- Attach ears last
Inserting Tissue Box:
- Turn cover upside down (tissue hole at bottom)
- Slide standard cube tissue box inside through open bottom
- Turn right-side up
- Pull first tissue through top hole
- Adjust facial features if needed
💡 Tips for Best Results
- Block your panels before assembly for crisp, even edges
- Stuff nose firmly for prominent, bulbous appearance
- Shape eyebrows while sewing – pin in arched position first
- Fluff mustache after attaching – separate the stitches slightly for texture
- Use strong thread or doubled yarn for attaching heavier pieces (nose, ears)
- Position features slightly lower than you think – face should appear centered, not top-heavy
- Test fit tissue box before final assembly to ensure proper sizing
- Add fabric glue to backs of pieces before sewing for extra security (optional)
🎨 Customization Ideas
- Add rosy cheeks with pink yarn French knots or embroidered circles
- Create different expressions by changing eyebrow angles (angry, surprised, sad)
- Make a full family with different facial features
- Add accessories: tiny crocheted hat, bow tie, or glasses
- Try different color combinations: gray for elderly gentleman, red for Santa, etc.
- Embroider laugh lines or freckles for extra character
- Make seasonal versions: add leaves for autumn, snowflakes for winter
🔧 Troubleshooting
- Tissue hole too small: Unravel rounds 13-15 and increase skip count to 18-20 stitches
- Sides don’t match: Check stitch count in panels; adjust rows if needed
- Nose droops: Add more stuffing or use pipe cleaner inside for structure
- Mustache lies flat: Use smaller hook for tighter stitches or add light wire for shaping
- Box doesn’t fit: Measure your specific tissue box and adjust panel dimensions accordingly
This funny-faced tissue box will make every sneeze a smile! 😄🎭
Enjoy your quirky, conversation-starting creation!