Welcome to the spooky and iconic world of amigurumi! 🔪✨ Today, I’m excited to share my free crochet pattern for an Amigurumi Freddy Krueger—a chilling and playful creation perfect for horror fans, Halloween enthusiasts, or anyone who enjoys crafting detailed and eerie plush designs! 🧶 Whether you love stitching up legendary characters, experimenting with textured details, or simply want to add a mischievous Freddy Krueger to your handmade lineup, this pattern will guide you through crafting a beautifully sculpted plush with his signature striped sweater, fedora, and clawed glove! 😈
This design embraces deep reds, dark greens, and intricate shaping to bring a haunting yet whimsical presence to your crochet projects! 🧶✨ I’ve carefully outlined each step to ensure your Amigurumi Freddy Krueger turns out just right—ready to creep into your collection or become a treasured handmade gift! 🎁 So grab your hooks, pick out eerie hues, and let’s stitch up a delightfully spooky Freddy Krueger! 🔪
🔪 Amigurumi Freddy Krueger Crochet Pattern
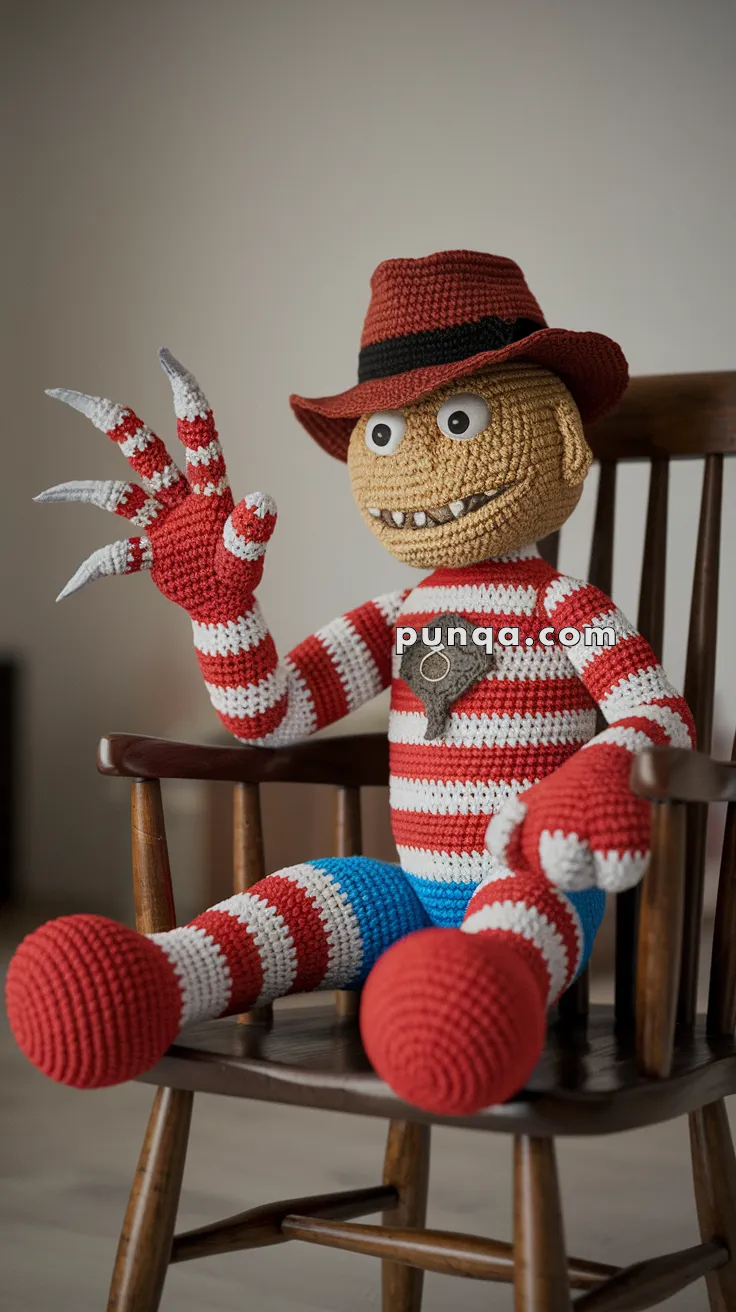
Turn your nightmares into yarn with this whimsical yet creepy Amigurumi Freddy Krueger doll! Featuring his iconic red-and-white striped sweater, brown hat, sharp glove claws, and chilling grin, this crochet horror icon is both fun and frightfully fabulous. Perfect for Halloween decor or horror movie fans. 🎃🧶
✨ Skill Level
Intermediate to Advanced
Includes shaping, color changes, finger construction, wired claws, facial sculpting, and structured hat.
📏 Finished Size
Approximately 30–35 cm (12–14 inches) tall using worsted weight yarn and a 3.5 mm hook.
🧶 Materials
Worsted weight yarn:
-
Beige – head, ears, neck
-
Red – sweater stripes, glove base
-
White – sweater stripes
-
Blue – pants
-
Dark red – hat crown
-
Black – hat band
-
Grey/silver – claws
-
Brown (optional) – teeth shading
Other Supplies
-
3.5 mm crochet hook
-
12 mm safety eyes
-
Black embroidery thread
-
White embroidery thread (teeth)
-
Polyester stuffing
-
Tapestry needle
-
Stitch markers
-
Thin craft wire (for claw fingers & poseable arm)
-
Small amount of cardboard (optional hat structure)
🧵 Abbreviations (US Terms)
MR – magic ring
sc – single crochet
inc – increase
dec – invisible decrease
sl st – slip stitch
ch – chain
FO – fasten off
BLO – back loop only
🧠 Head (Tall Cylindrical Shape)
With beige yarn:
R1: 6 sc in MR (6)
R2: inc ×6 (12)
R3: (1 sc, inc) ×6 (18)
R4: (2 sc, inc) ×6 (24)
R5: (3 sc, inc) ×6 (30)
R6: (4 sc, inc) ×6 (36)
R7–22: sc around (36)
(This creates the tall cylindrical head shape.)
Insert safety eyes between R13–14, spaced 10–11 stitches apart.
Lightly flatten the face area while stuffing to maintain straight sides.
R23: (4 sc, dec) ×6 (30)
R24: (3 sc, dec) ×6 (24)
R25: (2 sc, dec) ×6 (18)
Stuff firmly.
R26: (1 sc, dec) ×6 (12)
R27: dec ×6 (6)
FO and close.
👂 Ears (Make 2)
R1: 6 sc in MR (6)
R2: (1 sc, inc) ×3 (9)
R3: sc around (9)
FO, flatten slightly and sew to sides of head aligned with lower eye edge.
😀 Mouth & Teeth (Embroidered)
Embroider a wide curved grin approximately 2 rounds below eyes.
Add vertical white embroidered stitches for individual teeth.
Outline lightly with black thread for definition.
🧣 Neck (Defined Narrow Join)
The neck is a separate narrow tube to match the visible indentation between head and sweater.
With beige:
R1: 6 sc in MR (6)
R2: (1 sc, inc) ×3 (9)
R3–6: sc around (9)
Lightly stuff.
Sew neck centered to bottom of head.
Body will be attached under neck for proper proportions.
👕 Body (5 White Stripes Total)
Body is worked from neck downward.
Attach red yarn to neck base:
R1: 9 inc evenly around neck (18)
R2: (2 sc, inc) ×6 (24)
Now begin stripe pattern — 5 white stripes total on torso.
Each stripe section = 2 rounds.
Stripe order:
-
R3–4: Red
-
R5–6: White (Stripe 1)
-
R7–8: Red
-
R9–10: White (Stripe 2)
-
R11–12: Red
-
R13–14: White (Stripe 3)
-
R15–16: Red
-
R17–18: White (Stripe 4)
-
R19–20: Red
-
R21–22: White (Stripe 5)
R23–24: Red
Switch to blue for pants:
R25–30: Blue (6 rounds)
Begin shaping:
R31: (2 sc, dec) ×6 (18)
R32: (1 sc, dec) ×6 (12)
Stuff firmly.
FO leaving long tail.
🦵 Legs (3 White Stripes Each)
Make 2.
Shoe (Red)
R1: 6 sc in MR (6)
R2: inc ×6 (12)
R3: (1 sc, inc) ×6 (18)
R4–8: sc around (18)
Leg Stripes
Each leg has 3 white stripes total.
Stripe pattern (2 rounds per stripe):
-
R9–10: White (Stripe 1)
-
R11–12: Red
-
R13–14: White (Stripe 2)
-
R15–16: Red
-
R17–18: White (Stripe 3)
Stuff firmly.
FO and sew to base of blue pants.
💪 Arms (5 White Stripes Each)
Make 2.
R1: 6 sc in MR (6)
R2: (1 sc, inc) ×3 (9)
R3: (2 sc, inc) ×3 (12)
Stripe sequence (2 rounds each):
-
Red
-
White (1)
-
Red
-
White (2)
-
Red
-
White (3)
-
Red
-
White (4)
-
Red
-
White (5)
Total: 5 white stripes per arm.
Stuff lightly.
🖐️ Poseable Claw Glove Hand
Base Hand (Red)
R1: 6 sc in MR (6)
R2: (1 sc, inc) ×3 (9)
R3–4: sc around (9)
Now divide for fingers.
Finger Construction (Wire Inserted)
Each finger worked separately.
Index & Middle Fingers (2 White Stripes Each)
With red:
R1: 5 sc in MR (5)
R2–3: sc around (5) – Red
R4–5: White (Stripe 1)
R6–7: Red
R8–9: White (Stripe 2)
Insert thin wire inside.
FO leaving tail to sew.
Ring, Pinky, Thumb (1 White Stripe Each)
R1: 5 sc in MR (5)
R2–3: Red
R4–5: White (Stripe 1)
R6–7: Red
Insert wire.
FO.
Sew all fingers to glove base.
Claws (Grey)
For each claw:
Ch 7
Sc back along chain
Sl st at base
Slightly curve before sewing.
Attach to fingertip ends over wire.
👖 Pants Section
Blue body portion remains smooth without stripes.
Stuff firmly and shape seated position.
👒 Hat (Structured Fedora)
Crown (Dark Red)
R1: 6 sc in MR
R2: inc ×6 (12)
R3: (1 sc, inc) ×6 (18)
R4: (2 sc, inc) ×6 (24)
R5–10: sc around (24)
Black Band
R11–12: Black sc around (24)
Brim
Switch to dark red:
R13 (BLO): (2 sc, inc) around (32)
R14: sc around (32)
R15: slight increases evenly to 36
R16: sl st around
Lightly steam and shape brim downward.
Sew to head at slight tilt.
🧷 Assembly
-
Sew neck to body
-
Attach head securely
-
Sew arms at shoulder height
-
Attach legs angled forward for seated pose
-
Position hat slightly tilted
-
Bend claw fingers into curved threatening pose
🩸 Finishing Details
-
Add subtle surface slip stitches in darker beige for facial texture
-
Outline eyes lightly with black embroidery
-
Shape cheeks with gentle stuffing compression
-
Pose claw glove dramatically
🎃 Final Result
You now have a fully poseable horror-inspired striped doll featuring:
-
5 white stripes on torso and arms
-
3 white stripes on each leg
-
Correct stripe placement on claw fingers
-
Structured neck definition
-
Wired articulated glove
A striking collectible piece perfect for display and dramatic posing.
This amigurumi Freddy Krueger is just the right mix of spooky and silly, making him the ultimate horror icon for handmade collectors! 🔪🧶💤