✨ Skill Level
Intermediate — shaping, color changes, and garment-style assembly.
📏 Finished Size
Approx. 23–25 cm (9–10 in) tall
(using DK yarn and a 2.5–3.0 mm hook)
🧶 Materials
DK yarn:
-
Green 💚 — head, ears, hands
-
Dark navy 🖤 — hair & jacket
-
Purple 💜 — pants
-
Brown 🤎 — boots
-
Light gray 🤍 — bolts & cuffs
-
White — forehead stitch
Other:
🧵 Abbreviations (US Terms)
MR — magic ring
sc — single crochet
inc — increase
dec — decrease (sc2tog)
sl st — slip stitch
ch — chain
FO — fasten off
BLO — back loop only
🧠 Head (Green)
The head is wide with straight sides and a flat top.
R1: MR, 6 sc (6)
R2: inc ×6 (12)
R3: (sc, inc) ×6 (18)
R4: (2 sc, inc) ×6 (24)
R5: (3 sc, inc) ×6 (30)
R6: (4 sc, inc) ×6 (36)
R7: (5 sc, inc) ×6 (42)
R8–16: sc around (42)
Insert eyes between R11–12, 8–9 sts apart.
R17: (5 sc, dec) ×6 (36)
R18: (4 sc, dec) ×6 (30)
R19: (3 sc, dec) ×6 (24)
Stuff firmly and shape into a square block.
R20: (2 sc, dec) ×6 (18)
R21: (sc, dec) ×6 (12)
R22: dec ×6 (6)
FO and close.
Embroider a small curved smile.
🦱 Hair Cap (Dark Navy)
The hair sits flat and creates a jagged fringe.
R1–7: Repeat head R1–7 (42 sts)
R8–9: sc around (42)
R10 (fringe):
(sl st, sc, hdc, sc) repeat around
FO and sew to the top of the head.
Embroider a white horizontal stitch across the forehead.
👂 Ears (Make 2 – Green)
R1: MR, 6 sc
R2: (sc, inc) ×3 (9)
R3–4: sc around (9)
FO. Flatten slightly and sew at eye level.
⚙️ Neck Bolts (Make 2 – Gray)
R1: MR, 6 sc
R2–4: sc around (6)
Lightly stuff and sew to both sides of the neck.
👖 Body (Pants → Jacket)
Pants (Purple)
R1: MR, 6 sc
R2: inc ×6 (12)
R3: (sc, inc) ×6 (18)
R4: (2 sc, inc) ×6 (24)
R5: (3 sc, inc) ×6 (30)
R6–10: sc around (30)
Jacket (Switch to Navy)
R11–18: sc around (30)
Stuff firmly.
R19: (3 sc, dec) ×6 (24)
R20: (2 sc, dec) ×6 (18)
FO leaving tail for sewing head.
💪 Arms (Make 2)
Hand (Green)
R1: MR, 6 sc
R2: (sc, inc) ×3 (9)
R3–5: sc around (9)
Sleeve (Navy)
R6–12: sc around (9)
Lightly stuff and FO.
Sew to upper body angled slightly downward.
👞 Legs & Boots (Make 2)
Boot (Brown)
R1: MR, 6 sc
R2: inc ×6 (12)
R3: (sc, inc) ×6 (18)
R4–6: sc around (18)
Pants (Purple)
R7–12: sc around (18)
Stuff firmly and FO.
Sew evenly to bottom of body.
🧦 Rolled Cuffs (Gray – Make 2)
Ch 12, join with sl st.
R1: sc around
FO.
Slide onto pant legs and sew in place.
🧥 Jacket Front Panels (Make 2 – Navy)
Ch 12
Rows 1–6: sc across
FO.
Sew to front of body to form an open jacket.
🎀 Assembly
-
Sew head securely to body
-
Attach arms at shoulder height
-
Attach legs evenly spaced
-
Sew ears and bolts symmetrically
-
Adjust stuffing so doll stands upright
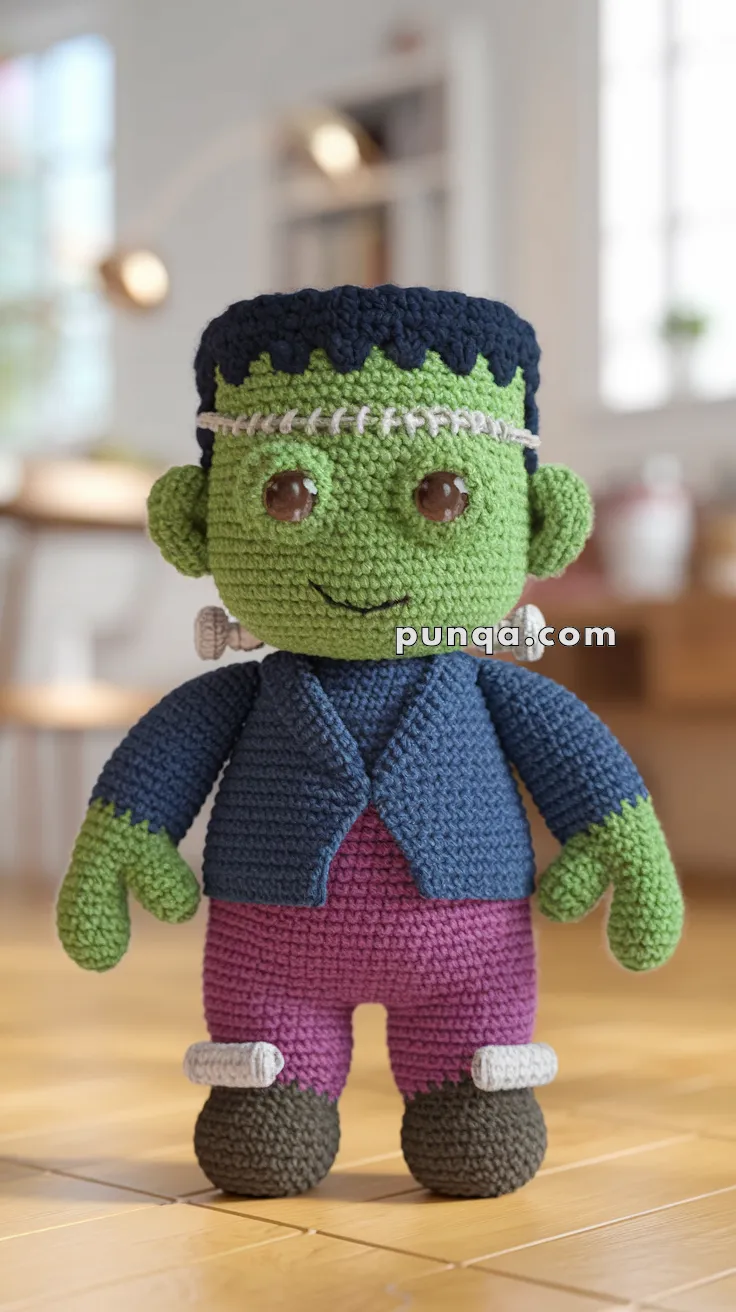
🌟 Finished Doll
Your Frankenstein doll should now have a square green head, flat jagged hairline, short blue jacket, purple pants with cuffs, and chunky brown boots, with a gentle friendly expression and balanced proportions. The sturdy shaping lets the doll stand steadily while keeping a soft, cuddly look. 🧟♂️✨