Add a touch of woodland charm to your fridge with this Amigurumi Fox Fridge Magnet crochet pattern! Inspired by the sly and playful nature of foxes, this adorable design captures their pointed ears, fluffy tail, and bright, curious expression in every stitch. Whether you’re crafting for animal lovers, adding a whimsical accent to your kitchen, or simply enjoy making miniature amigurumi designs, this pattern lets you stitch up a lovable fox bursting with personality! Perfect for holding notes, photos, or simply brightening up your space, this crochet fox magnet is both cute and functional. 🦊✨
Designed for customization, this pattern allows you to experiment with different shades of orange, embroidered details, or even tiny accessories like a miniature scarf or acorn for extra charm. Craft a classic fox magnet with natural tones, create a pastel version for a dreamy aesthetic, or even stitch up a full set of forest-inspired amigurumi for a delightful display! Whether gifted as a quirky keepsake, displayed as a charming accent, or made simply for the joy of crafting, this Amigurumi Fox Fridge Magnet is a fun and creative project—perfect for bringing a touch of handmade woodland magic to every stitch! 🧶💖✨
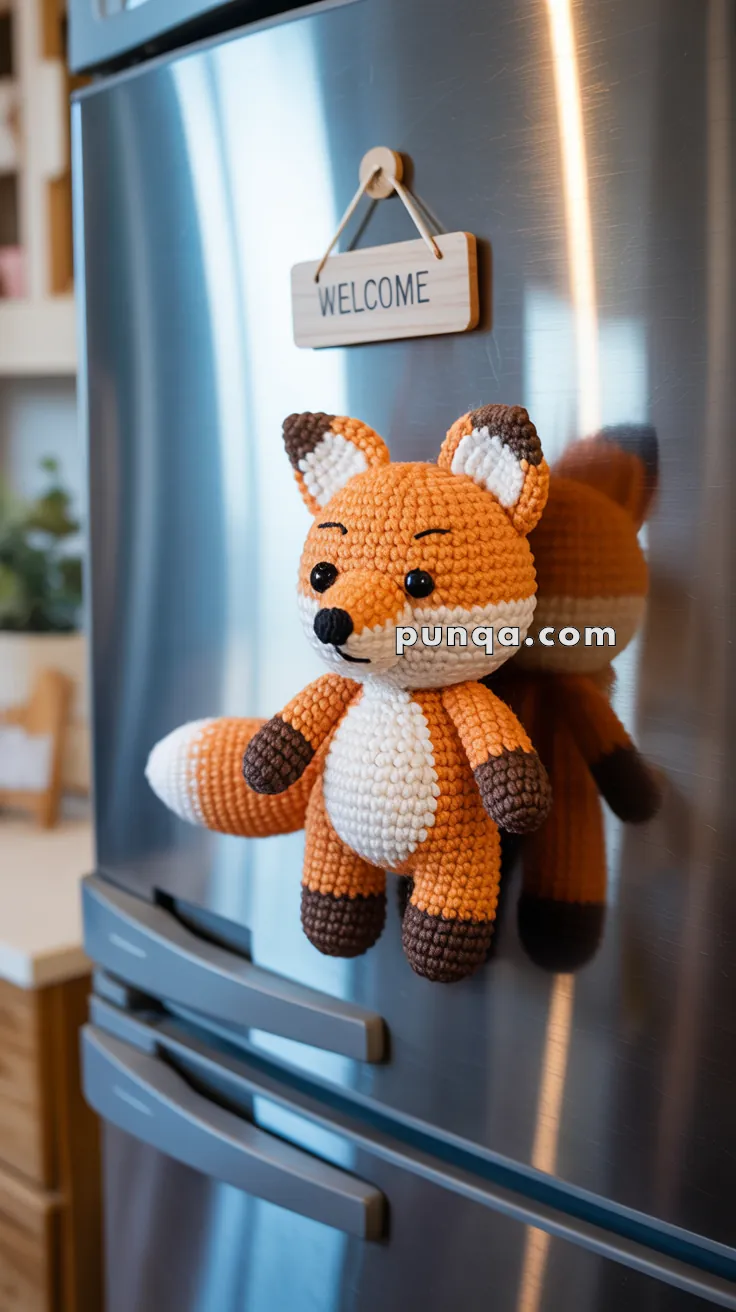
🦊 Amigurumi Fox Fridge Magnet – Free Crochet Pattern
Brighten up your fridge with this cuddly little fox! With vibrant colorwork and magnetic paws, it’s the perfect mix of woodland whimsy and functional charm.
✨ Skill Level:
Intermediate – Requires color changing, limb shaping, and magnet insertion.
📏 Finished Size
Approx. 6–8 inches (15–20 cm) tall using DK yarn and 2.5 mm hook
🧶 Materials
- DK weight yarn in:
- Orange (main body)
- White (belly, snout, tail tip, ear inside)
- Brown (paws, ear tips)
- Black (eyebrows, nose embroidery)
- Crochet hook (2.5–3.0 mm)
- 8 mm safety eyes
- Fiberfill stuffing
- Stitch marker
- Yarn needle
- Magnets (flat neodymium preferred)
- Optional: hot glue to secure magnets inside limbs
🧵 Abbreviations (US Terms)
- MR – Magic Ring
- sc – Single Crochet
- inc – Increase (2 sc in one stitch)
- dec – Decrease (sc 2 together)
- BLO – Back Loop Only
- ch – Chain
- sl st – Slip Stitch
- FO – Fasten Off
- xN – Repeat contents N times
🔸 Legs → Body (worked in one piece from feet up)
Start with brown yarn. Make 2 legs.
Leg (Make 2):
R1. MR, 6 sc
R2. inc x6 → (12)
R3–5. sc around (12)
Change to orange yarn.
R6–9. sc around (12)
Finish first leg, break yarn.
Do not break yarn on second leg — continue to join:
R10 (joining round):
Ch 2, sc around first leg (12), sc in 2 chs, sc around second leg (12), sc in 2 chs → (28)
Now you’re working the body:
R11–18. sc around (28)
R19. (5 sc, dec) x4 → (24)
R20. (4 sc, dec) x4 → (20)
Start stuffing and insert magnet in belly if desired.
R21. (3 sc, dec) x4 → (16)
🔸 Head
Continue from body (or FO and attach later):
R22. inc in each st → (32)
R23. (3 sc, inc) x8 → (40)
R24–30. sc around (40)
Insert safety eyes between R26–27, about 6–7 stitches apart.
Embroider small black eyebrows and a nose tip using black yarn.
R31. (3 sc, dec) x8 → (32)
R32. (2 sc, dec) x8 → (24)
R33. (1 sc, dec) x8 → (16)
R34. dec x8 → (8)
FO, close hole, weave in end.
🔸 Arms (Make 2)
Start with brown:
R1. MR, 6 sc
R2. inc x6 → (12)
R3–4. sc around (12)
Change to orange:
R5–9. sc around (12)
Insert magnet inside before stuffing and closing.
R10. dec x6 → (6)
FO, leave long tail to sew to body.
🔸 Tail
Start with white yarn:
R1. MR, 6 sc
R2. inc x6 → (12)
Change to orange:
R3. (1 sc, inc) x6 → (18)
R4–8. sc around (18)
R9. (1 sc, dec) x6 → (12)
R10. sc around (12)
Stuff, FO, sew to lower back.
🔸 Ears (Make 2)
Inner ear (white):
R1. MR, 4 sc
R2. inc x4 → (8)
R3. (1 sc, inc) x4 → (12)
FO.
Outer ear (orange + tip):
With brown:
R1. MR, 4 sc
R2. inc x4 → (8)
Change to orange:
R3. (1 sc, inc) x4 → (12)
FO. Sew to head.
Sew inner ear (white triangle) on top of orange ear.
🔸 Snout
With white yarn:
R1. MR, 6 sc
R2. (1 sc, inc) x3 → (9)
R3. sc around (9)
FO, sew under eyes. Embroider black nose tip on the front.
🔸 Belly Patch
With white yarn:
Ch 6, turn
R1. sc in 2nd ch, 4 sc → (5)
R2–6. sc across
FO, shape as oval and sew to front center of body.
🧲 Magnet Notes
- Use flat disc neodymium magnets (about 10–15mm wide)
- Insert magnets into arms, feet, and optionally belly before final stuffing
- Use a drop of hot glue to secure them if needed
- Make sure the polarity matches for all limbs before sealing
🎉 Final Touches
- Add a tiny “WELCOME” sign like in the photo
- Embroider smile or whiskers
- Use blush for cheeks if desired
- Pose arms/legs toward the fridge door for maximum magnet contact
Now your adorable fox will happily cling to your fridge or any magnetic surface—adding woodland warmth and cuteness! 🦊🧲