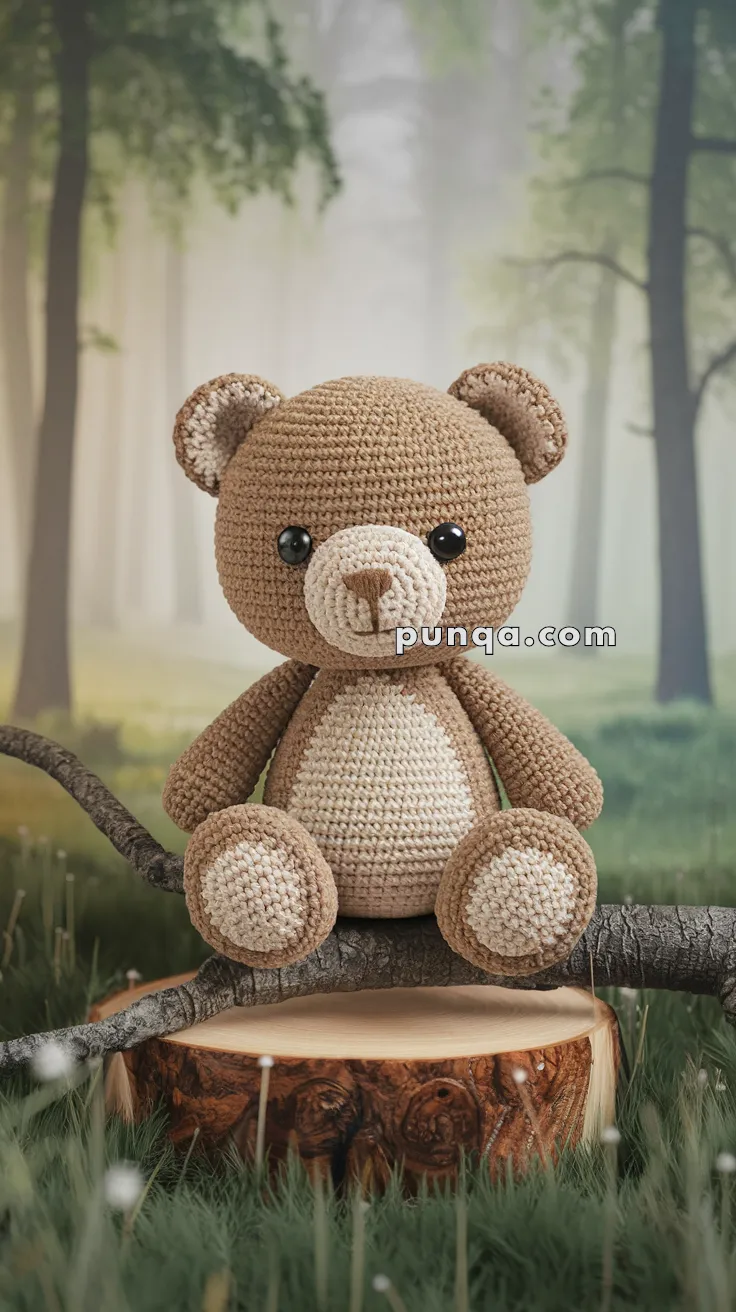
Soft, cuddly, and full of woodland charm—this Amigurumi Forest Teddy Bear crochet pattern brings the magic of the forest to life in yarn form! With its gentle expression, cozy fur, and tiny embroidered details, this adorable bear is perfect for nature-inspired collections, heartfelt gifts, or simply adding a touch of warmth to your amigurumi lineup.
Designed for intermediate crocheters, this pattern allows for customization in fur texture, ear shape, and even tiny accessories like a scarf or a miniature satchel to enhance its woodland personality. Choose classic brown hues for a traditional teddy bear look or experiment with earthy tones for a rustic, forest-inspired aesthetic! Whether perched on a shelf, gifted to a fellow crochet enthusiast, or displayed as part of a woodland scene, this charming teddy bear is sure to bring smiles. Grab your hook, select your favorite yarn, and let’s bring this cozy forest friend to life! 🐻✨🧶
🧸 Forest Teddy Bear Crochet Pattern
There’s something timeless about a classic teddy bear. This forest teddy features a big round head, oval belly patch, floppy ears, and wide paw pads that make him extra cuddly. Whether for a nursery, a gift, or your own shelf of handmade treasures, this teddy is sure to become a favorite.
✨ Skill Level
Beginner–Intermediate (basic shaping, simple color changes, sewing parts).
📏 Finished Size
Approximately 9–10 inches (23–25 cm) tall when using DK yarn and a 2.5–3 mm hook.
🧶 Materials
-
Yarn (DK or Worsted weight)
-
Light Brown (main body)
-
Beige (snout, tummy patch, paw pads, ear centers)
-
Darker Brown/Cocoa (nose detail)
-
-
Crochet hook: 2.5–3.0 mm
-
10 mm safety eyes
-
Tapestry needle
-
Stitch marker
-
Polyfill stuffing
🧵 Abbreviations (US Terms)
-
MR – Magic Ring
-
sc – Single Crochet
-
inc – Increase (2 sc in same stitch)
-
dec – Decrease (sc2tog)
-
sl st – Slip Stitch
-
ch – Chain
-
FO – Fasten Off
-
BLO – Back Loop Only
🐻 Head (Light Brown)
-
MR, 6 sc (6)
-
inc ×6 (12)
-
(sc, inc) ×6 (18)
-
(2 sc, inc) ×6 (24)
-
(3 sc, inc) ×6 (30)
-
(4 sc, inc) ×6 (36)
7–15. sc around (36) ← keep rounds for bigger head -
(4 sc, dec) ×6 (30)
-
(3 sc, dec) ×6 (24)
-
(2 sc, dec) ×6 (18)
👉 Insert 10 mm safety eyes between R10–11, spaced 10–11 stitches apart. -
(sc, dec) ×6 (12)
-
dec ×6 (6)
FO, stuff firmly, close.
🐻 Snout (Beige)
-
MR, 6 sc (6)
-
inc ×6 (12)
-
(sc, inc) ×6 (18)
-
(2 sc, inc) ×6 (24)
5–6. sc around (24)
7–8. sc around (24) ← extra rounds for puffier snout
FO, stuff lightly, sew to lower face.
👉 Embroider a triangular nose with cocoa yarn and a short vertical line down.
🐻 Ears (Make 2)
Outer Ear – Light Brown
-
MR, 6 sc (6)
-
inc ×6 (12)
-
(sc, inc) ×6 (18)
4–5. sc around (18)
FO.
Inner Ear – Beige
Repeat Rnds 1–3 (18 sts). FO.
Sew beige inner onto brown outer. Slightly fold and attach to head at eye level, angled outward.
🐻 Body (Light Brown)
-
MR, 6 sc (6)
-
inc ×6 (12)
-
(sc, inc) ×6 (18)
-
(2 sc, inc) ×6 (24)
-
(3 sc, inc) ×6 (30)
-
(4 sc, inc) ×6 (36)
7–14. sc around (36) -
(4 sc, dec) ×6 (30)
-
(3 sc, dec) ×6 (24)
-
(2 sc, dec) ×6 (18)
-
(sc, dec) ×6 (12)
-
dec ×6 (6)
FO, stuff firmly, close.
🐾 Arms (Make 2 – Light Brown)
-
MR, 6 sc (6)
-
inc ×6 (12)
3–14. sc around (12) ← longer, thinner arms -
(sc, dec) ×4 (8)
FO, stuff lightly, sew to sides of body.
🐾 Legs (Make 2 – Start Beige for Paw Pads, then Light Brown)
-
MR, 6 sc (6)
-
inc ×6 (12)
-
(sc, inc) ×6 (18)
-
(2 sc, inc) ×6 (24)
5–9. sc around (24) ← keep flat sole look -
Switch to Light Brown, sc around (24)
-
(2 sc, dec) ×6 (18)
-
(sc, dec) ×6 (12)
-
dec ×6 (6)
FO, stuff firmly, sew slightly forward so teddy can sit.
🐾 Belly Patch (Beige)
-
MR, 6 sc (6)
-
inc ×6 (12)
-
(sc, inc) ×6 (18)
-
(2 sc, inc) ×6 (24)
-
(3 sc, inc) ×6 (30)
-
(4 sc, inc) ×6 (36)
7–8. sc around (36) ← creates oval patch
FO, sew centered on body.
🧵 Assembly
-
Sew head to body securely.
-
Attach arms to sides, just below neck join.
-
Sew legs to bottom, angled so teddy can sit upright.
-
Attach ears at eye level, angled outward.
-
Sew snout onto face, then embroider nose and mouth.
-
Attach belly patch neatly to center.
🌲 Final Touch
Your Forest Teddy Bear is now complete — with a big round head, oval tummy patch, floppy ears, and wide paw pads, just like a storybook friend. Perfect for woodland-themed nurseries, gifts, or simply as your next cozy crochet companion.