Take flight with the Amigurumi Flying Goose, a whimsical crochet creation that’s full of charm and gentle motion! 🪶🧶 With its outstretched wings, soft curves, and sweet little beak, this airborne friend brings a sense of freedom and serenity to your handmade collection. Whether you imagine it soaring through a nursery mobile, perched on a shelf, or gliding across a seasonal display, this goose is ready to add a touch of sky-bound magic to your space.
This pattern is perfect for those who love soft textures and expressive shapes—customize your goose with pastel hues, embroidered eyes, or even a tiny scarf for extra personality. It’s a lovely project for gifting, decorating, or simply celebrating the beauty of nature through stitches. Whether you’re crafting a solo flyer or a whole migrating flock, the Flying Goose is sure to lift your spirits—one loop at a time! 🧵💙
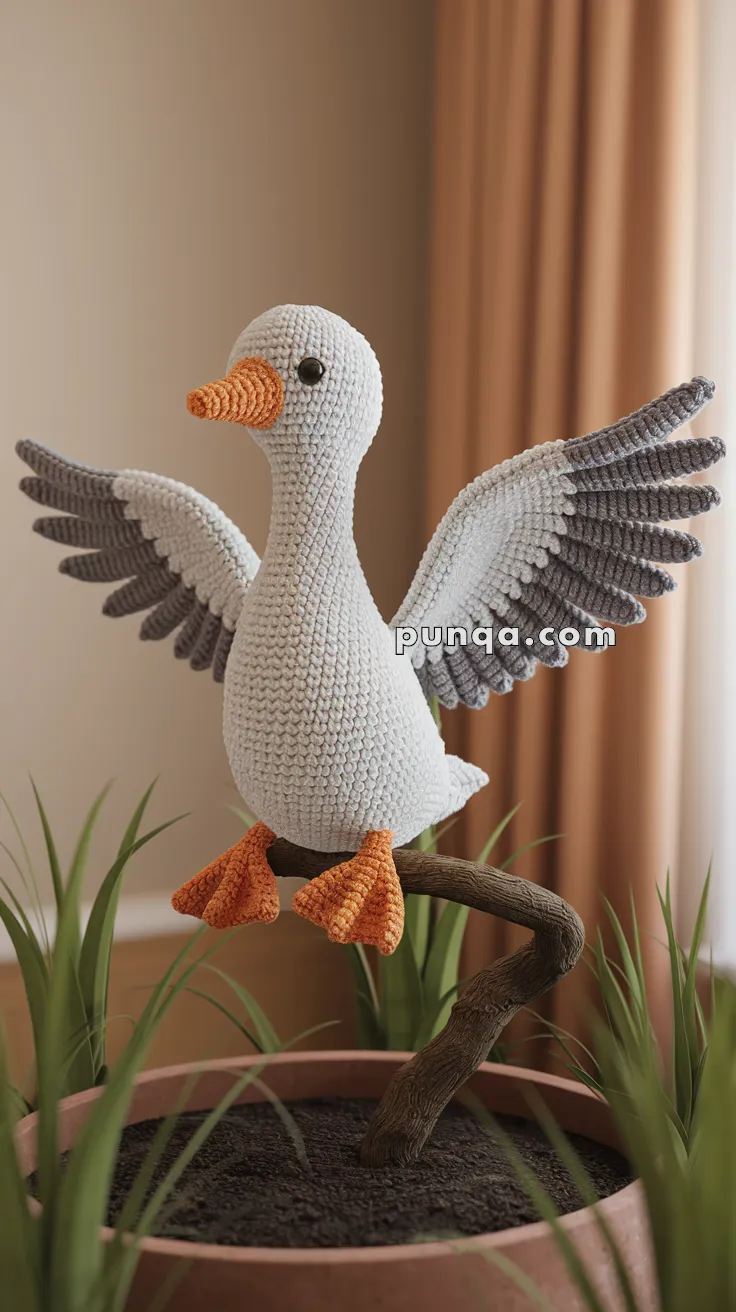
🪿 Amigurumi Flying Goose Crochet Pattern
Create an elegant, sculpted flying goose with fully extended wings, a long curved neck, layered grey feathers, and bright orange webbed feet perched gracefully on a branch. This design captures movement and realism, making it a beautiful décor piece for woodland, farmhouse, or nursery themes.
✨ Skill Level
Advanced – includes shaping, internal wiring, and layered feather work.
📏 Finished Size
Wingspan: 30–32 cm (12–12.5 in)
Height: 32–34 cm (12.5–13.5 in)
🧶 Yarn Amounts
Velvet or chenille DK-weight yarn:
- White – 120 g
- Light grey – 40 g
- Medium grey – 35 g
- Dark grey – 25 g
- Burnt orange – 25 g
🧵 Materials
- 3.5 mm crochet hook
- 12 mm safety eyes
- Fiberfill
- Floral wire:
- Neck: 45 cm
- Each wing: 50–55 cm
- Each leg: 20 cm
- Floral tape or yarn for wrapping wire
- Yarn needle
- Stitch markers
- Optional branch (real or crocheted)
🔁 Abbreviations (US)
MR – magic ring
sc – single crochet
inc – increase
dec – decrease
sl st – slip stitch
ch – chain
FO – fasten off
🕊️ Head
White yarn.
- MR 6
- inc ×6 → 12
- (sc, inc) ×6 → 18
- (2 sc, inc) ×6 → 24
- (3 sc, inc) ×6 → 30
6–10) sc 30 - (3 sc, dec) ×6 → 24
- (2 sc, dec) ×6 → 18
- (sc, dec) ×6 → 12
Stuff firmly, leaving opening for neck.
Eyes
Attach 12 mm eyes between rounds 6–7, spaced 4 stitches apart.
🕊️ Long Curved Neck
White yarn.
- Attach yarn at the bottom of the head.
2–46) sc (10)
Insert 45 cm wrapped floral wire.
Stuff lightly.
Shape into a gentle, elegant S-curve.
FO.
🧡 Beak
Burnt orange yarn.
- MR 6
- sc 6
- inc ×3, sc 3 → 9
4–6) sc 9 - (sc, dec) ×3 → 6
Stuff lightly, flatten slightly.
Sew to head with a slight downward angle.
⚪ Body
White yarn. Shaped as a long oval.
- MR 6
- inc ×6 → 12
- (sc, inc) ×6 → 18
- (2 sc, inc) ×6 → 24
- (3 sc, inc) ×6 → 30
- (4 sc, inc) ×6 → 36
7–18) sc 36 - (4 sc, dec) ×6 → 30
20–25) sc 30 - (3 sc, dec) ×6 → 24
- (2 sc, dec) ×6 → 18
- (sc, dec) ×6 → 12
- dec ×6 → 6
FO and close.
Stuff firmly while preserving the long, narrow shape.
🪺 Tail
White yarn.
- MR 6
- inc ×6 → 12
- sc 12
- (2 sc, inc) ×4 → 16
- sc 16
Flatten and sew straight outward.
🦶 Legs ×2
Burnt orange yarn. Short and slightly tapered.
- MR 6
- inc ×6 → 12
3–4) sc 12 - (sc, dec) ×4 → 8
6–11) sc 8
Insert 20 cm wire.
Stuff lightly, FO.
🧡 Webbed Feet ×2
Burnt orange yarn.
Ch 7
Row 1: sc across → 6
Row 2: sc 6
Toes
Toe 1: ch 4, 2 dc in same st, sl st back
Toe 2: ch 4, 2 dc in next st, sl st back
Toe 3: ch 4, 2 dc in next st, sl st back
Attach with toes fully spread.
🪽 Wing Bases ×2
White yarn.
- MR 6
- inc ×6 → 12
- (sc, inc) ×6 → 18
- (2 sc, inc) ×6 → 24
- (3 sc, inc) ×6 → 30
- (4 sc, inc) ×6 → 36
Wing Triangle Shaping
Rows 7–35:
- Work in back-and-forth rows.
- Increase 1 stitch every row on the same side.
This forms a long, sweeping wing shape.
Insert 50–55 cm wire around the perimeter and secure the edge with sc.
🪶 Wing Feathers
10 feathers per wing.
Per wing:
- 6 light grey
- 3 medium grey
- 1 dark grey (outermost feather)
Feather Pattern
Ch 17
Row 1: sc, hdc, dc ×12, hdc, sc
FO.
Feather Assembly
- Lay wing base flat.
- Start at lowest edge.
- Overlap feathers by 40%.
- Fan them outward like a real wing.
- Place darkest feather at outermost edge for natural gradient.
- Curve the finished wing upward using the internal wire.
🧵 Assembly
Attach the neck
Sew deeply into the top of the body so the join is smooth.
Attach the beak
Slight downward angle.
Attach legs
Sew legs under the body, close together.
Attach feet
Feet should sit angled downward and wide.
Tail
Sew pointing straight out, not up.
Wings
Attach high on the body.
Bend into a wide upward arc.
Feathers should fan beautifully.
Final shaping
- Curve neck into its S-position.
- Shape wings wide and tall.
- Tidy feather orientation.
- Press body into its long oval form.
🌿 Display Suggestion
Mount the goose on a curved natural branch using the leg wires for stability.
Position wings lifted and neck leaning forward for a dynamic flying posture.
✨ Your Elegant Crochet Goose Is Complete
With its long curved neck, sweeping grey wings, bright webbed feet, and soft white body, this flying goose adds a graceful and artistic touch to any room.