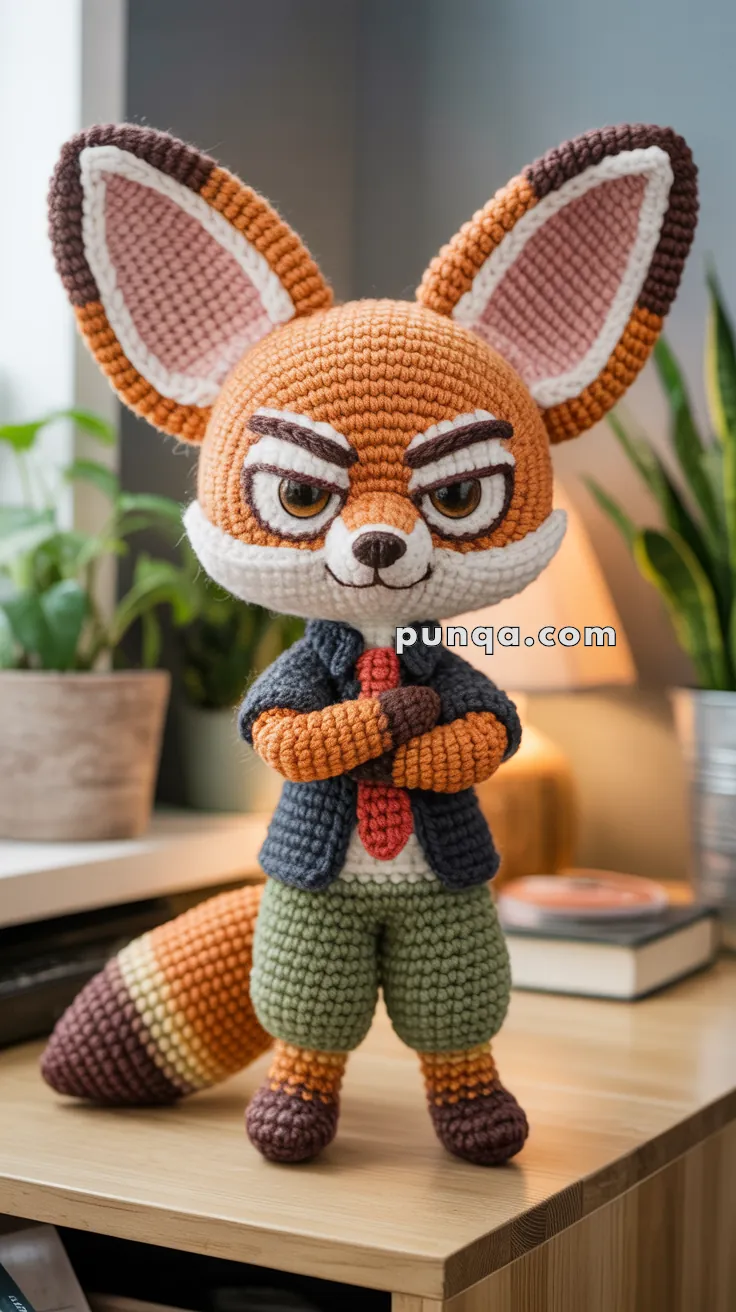
Stitch up a bundle of desert charm with this Amigurumi Finnick the Fennec Fox crochet pattern! With his oversized ears, mischievous grin, and snuggly shape, Finnick is the perfect plush companion for woodland scenes, storytime adventures, or just a cozy spot on your shelf. Whether you’re crafting for a fox-loving friend, adding to your animal collection, or simply indulging in a playful project, this little trickster is sure to bring a smile with every stitch. 🧶🦊🌵
Designed for personality and fun, this pattern invites you to explore soft yarns, expressive features, and sweet extras like a bushy tail, tiny paws, or even a mini scarf for flair. Customize Finnick’s colors to reflect your favorite fox palette or add accessories that show off his sly style. Whether perched in a handmade forest, nestled in a gift basket, or starring in a whimsical display, this Finnick the Fennec Fox Amigurumi is a joyful and satisfying project—perfect for stitching up a little handmade mischief, one loop at a time! 💖✨🌙
🦊 Amigurumi Finnick the Fennec Fox – Free Crochet Pattern
This mischievous and clever little fox has lots of attitude—and now he can have a place on your shelf! With his oversized ears, smug grin, folded arms, and outfit inspired by Zootopia, this is a fun project for intermediate crocheters.
🧶 Skill Level
Advanced / Intermediate+
Includes multiple color changes, shaping, embroidery, arm positioning, and detailed assembly.
📏 Finished Size
Approx. 25–28 cm (10–11″) tall using DK yarn and a 2.5 mm hook.
🧺 Materials
- DK yarn in the following colors:
- Orange (main fur)
- White (face and belly)
- Brown (hands, tail tip, feet)
- Yellow (tail band)
- Pink (inner ear)
- Black (nose, eyebrows)
- Olive green (pants)
- Red (tie)
- Navy blue (jacket)
- 2.5 mm crochet hook
- Black embroidery floss
- 14–16 mm safety eyes or embroidered felt eyes
- Stuffing
- Stitch marker
- Yarn needle, scissors
- Optional: pipe cleaner or floral wire for tail shaping
🧵 Abbreviations (US)
- MR – Magic Ring
- sc – single crochet
- inc – increase
- dec – decrease
- BLO – back loop only
- FLO – front loop only
- sl st – slip stitch
- ch – chain
- st – stitch
🐾 Pattern Sections
🧠 Head
Start with orange:
- MR, 6 sc [6]
- inc x6 [12]
- (sc, inc) x6 [18]
- (2 sc, inc) x6 [24]
- (3 sc, inc) x6 [30]
- (4 sc, inc) x6 [36]
- (5 sc, inc) x6 [42]
8–14. sc around [42]
Color Change to White:
15–18. sc around [42] (white muzzle area)
19. (5 sc, dec) x6 [36]
20. (4 sc, dec) x6 [30]
21. (3 sc, dec) x6 [24]
22. (2 sc, dec) x6 [18]
23. (sc, dec) x6 [12]
24. dec x6 [6]
FO and close. Stuff firmly.
🪡 Snout Shaping Tip:
Stuff snout section lightly to keep it slightly protruding. Use tight stitches to give the muzzle that round, flat-tipped look. After closing the head, embroider the black nose over the color change area. Use a triangle base and add downward curve with white floss to define the mouth line.
👂 Ears (Make 2)
Inner part – pink:
- MR, 6 sc
- (sc, inc) x3 [9]
- (2 sc, inc) x3 [12]
- (3 sc, inc) x3 [15]
- (4 sc, inc) x3 [18]
6–9. sc around [18]
FO.
Outer part – orange, then dark brown:
Repeat as for pink, but do NOT fasten off. After round 9, switch to dark brown and sc one more round [18]. Place pink inside orange/brown, crochet together around through both layers to close ear flat.
Shape slightly by pinching bottom corners and stitching inward.
👁️ Facial Details
- Use felt or embroidered safety eyes positioned just above white color change.
- Embroider thick black brows with yarn or floss.
- Shape cheeks slightly using horizontal tension stitches from inner head to outer.
🧥 Body (Start from Belly Up)
Start with white:
- MR, 6 sc
- inc x6 [12]
- (sc, inc) x6 [18]
- (2 sc, inc) x6 [24]
- (3 sc, inc) x6 [30]
6–8. sc around [30]
Switch to navy blue (jacket):
9–16. sc around [30]
17. (3 sc, dec) x6 [24]
18. sc around [24]
19. (2 sc, dec) x6 [18]
20. sc around [18]
FO. Stuff well.
🦊 Legs (Make 2)
Start with dark brown (feet):
- MR, 6 sc
- inc x6 [12]
3–4. sc around [12]
Switch to orange:
5–6. sc around [12]
Switch to olive green (pants):
7–14. sc around [12]
FO and stuff. Stitch both legs to the body base, spaced evenly.
🦺 Arms (Make 2 – “Crossed” Pose)
Important Note: These arms will be sewn in a bent L-shape, then stitched together across the chest.
With brown (hands):
- MR, 6 sc
- inc x6 [12]
- sc around [12]
Switch to orange:
4–5. sc around [12]
Switch to navy:
6–12. sc around [12]
Do NOT stuff fully – leave upper part slightly soft to fold.
Assembly for Crossed Arms:
- Fold each arm at the middle and pinch together into an L-shape.
- Whipstitch the wrists and hands together across the chest area in an “X” shape.
- Use pins to position before final stitching.
👔 Tie
With red:
- ch 7
- Starting from 2nd ch: sc in each (6)
- sc across 2 more rows
FO. Roll one end into a point and sew just beneath crossed arms.
👕 Jacket Collar (Optional)
With navy:
- ch enough to wrap around neck + front
- sc 2 rows
- Shape into a V and stitch like a collar above tie.
🦊 Tail
Start with dark brown:
- MR, 6 sc
- inc x6 [12]
- (sc, inc) x6 [18]
- sc around [18]
Switch to yellow:
5–6. sc around [18]
Switch to orange:
7–12. sc around [18] - (sc, dec) x6 [12]
FO. Stuff lightly.
Sew to back lower body, angled for stability.
🧷 Final Assembly Order
- Stitch ears to head sides, angled upward.
- Embroider nose, brows, and mouth details.
- Attach head to top of body securely.
- Sew legs to bottom base.
- Shape arms and attach in front of chest in folded pose.
- Stitch on tie and optional collar.
- Attach tail to the back.
🎉 You’re Done!
You’ve just completed your very own Finnick the Fennec Fox! His smug expression, oversized ears, and crossed arms give him loads of attitude—just like in Zootopia. Perfect for display, fandom gifts, or animation-themed collections!
