Bring the charm of the countryside to your crochet collection with this Amigurumi Farm Animals Set pattern! Whether you’re crafting for little animal lovers, creating a cozy barnyard display, or simply enjoy stitching up adorable creatures, this free pattern lets you crochet a delightful assortment of farm friends. From the playful pig and gentle cow to the cheerful duckling and fluffy sheep, each amigurumi animal captures the warmth and whimsy of life on the farm. Perfect for nursery decor, storytelling, or gifting to a fellow crochet enthusiast, this collection is a heartwarming celebration of rural life—stitched with love!
Designed for customization, this pattern allows you to personalize each animal with different colors, expressive features, or tiny accessories like a hay bale, barn backdrop, or even miniature scarves for extra charm. Experiment with playful poses, create a full farmyard scene, or even stitch up a farmer to complete the set! Whether displayed as a cute rustic accent, given as a thoughtful handmade gift, or crafted purely for the joy of crochet, this Amigurumi Farm Animals Set is a delightful and creative project—one stitch at a time! 🐮🐷🐥🧶✨
🐮 Amigurumi Farm Animals Crochet Pattern Set
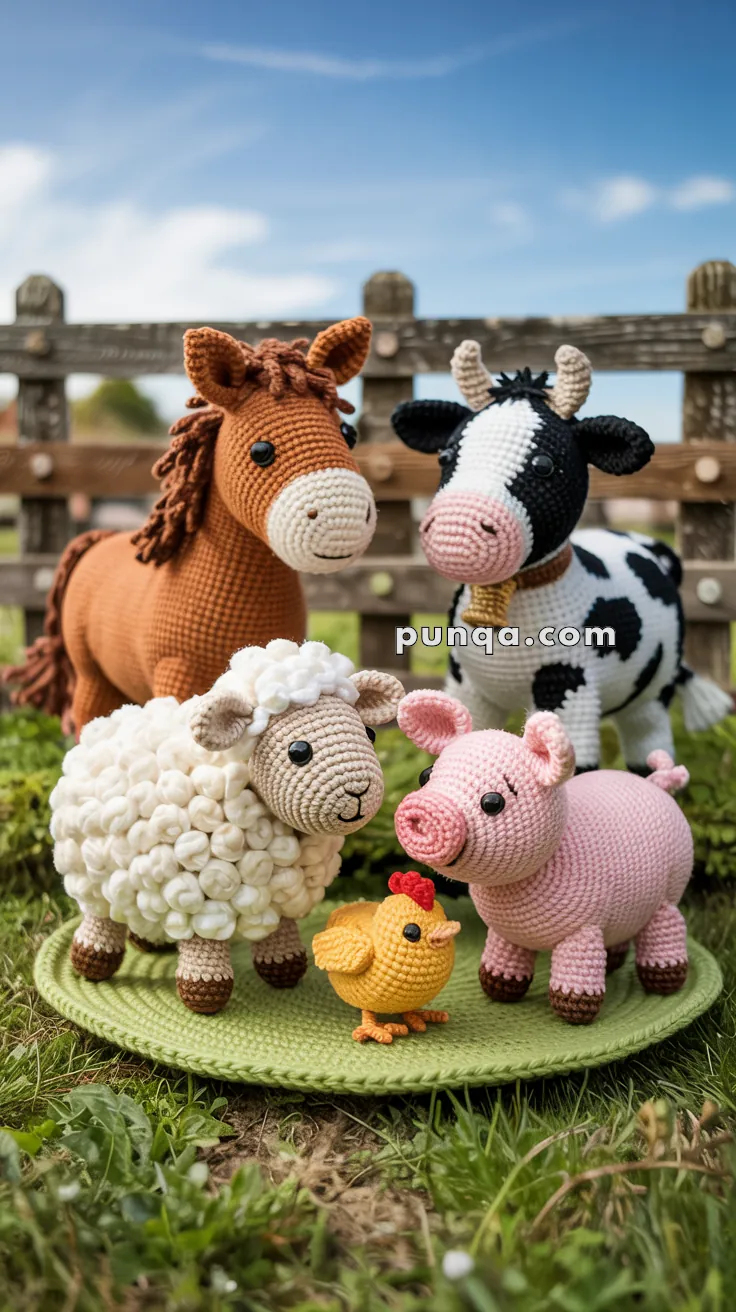
Create your own adorable barnyard family with this complete crochet pattern collection! This set includes a horse, cow, sheep, pig, chick, and a grassy base mat — all designed with soft, rounded proportions and lifelike details. Perfect for nursery decor, storytelling toys, or handmade gifts that will bring smiles to everyone. 🐴🐄🐑🐖🐥🌾
Skill Level
Intermediate – includes shaping, muzzle construction, bobble textures, and multi-part assembly.
Finished Sizes
Horse: approx. 20 cm tall
Cow: approx. 18 cm tall
Sheep: approx. 15 cm tall
Pig: approx. 14 cm long
Chick: approx. 8 cm tall
Base mat: approx. 25 cm diameter
Materials and Yarn Amounts
Use DK or light worsted yarn and a 3.0 mm hook.
Brown yarn – 50 g for horse body, mane, and tail
Beige yarn – 25 g for horse muzzle and sheep face
White yarn – 60 g for sheep wool and cow body
Black yarn – 20 g for cow spots and ears
Cream yarn – 15 g for cow muzzle and horns
Pink yarn – 40 g for pig body
Dark pink yarn – 10 g for pig snout
Yellow yarn – 20 g for chick body
Orange yarn – 10 g for chick beak and feet
Red yarn – 5 g for chick comb
Green yarn – 40 g for base mat
Dark brown yarn – 20 g for hooves
Polyfill stuffing
6–8 mm safety eyes
Yarn needle
Stitch marker
Abbreviations (US Terms)
MR – magic ring
sc – single crochet
inc – increase
dec – decrease
sl st – slip stitch
ch – chain
bo – bobble stitch
FO – fasten off
🐴 Horse Pattern
Head (Brown with Beige Muzzle)
Muzzle (Beige)
R1 MR 6 (6)
R2 inc x6 (12)
R3 (sc, inc) x6 (18)
R4–R6 sc around (18)
Stuff firmly.
Head (Brown)
R7 change to brown, (2 sc, inc) x6 (24)
R8 (3 sc, inc) x6 (30)
R9–R14 sc around (30)
Insert eyes between R10–R11.
R15 (3 sc, dec) x6 (24)
R16 (2 sc, dec) x6 (18)
Stuff firmly.
FO leaving long tail.
Body
R1 MR 6
R2 inc x6 (12)
R3 (sc, inc) x6 (18)
R4 (2 sc, inc) x6 (24)
R5 (3 sc, inc) x6 (30)
R6–R16 sc around (30)
R17 (3 sc, dec) x6 (24)
R18 (2 sc, dec) x6 (18)
R19 (sc, dec) x6 (12)
Stuff firmly.
FO.
Legs (Make 4)
Dark brown hoof:
R1 MR 6
R2 inc x6 (12)
R3–R4 sc around
Switch to brown:
R5–R10 sc around
Stuff lightly and FO.
Ears (Make 2)
R1 MR 4
R2 (sc, inc) x2 (6)
R3–R5 sc around
Flatten and sew.
Mane and Tail
Attach 12–15 strands of brown yarn along neck and rump.
Trim evenly.
🐄 Cow Pattern
Head (White)
R1 MR 6
R2 inc x6 (12)
R3 (sc, inc) x6 (18)
R4 (2 sc, inc) x6 (24)
R5 (3 sc, inc) x6 (30)
R6–R10 sc around
Insert eyes between R7–R8.
R11 (3 sc, dec) x6 (24)
R12 (2 sc, dec) x6 (18)
Stuff firmly.
FO.
Muzzle (Pink)
R1 MR 6
R2 inc x6 (12)
R3 (sc, inc) x6 (18)
R4–R5 sc around
Stuff lightly and sew centered on face.
Embroider nostrils.
Body
R1 MR 6
R2 inc x6 (12)
R3 (sc, inc) x6 (18)
R4 (2 sc, inc) x6 (24)
R5 (3 sc, inc) x6 (30)
R6–R15 sc around
R16 (3 sc, dec) x6 (24)
R17 (2 sc, dec) x6 (18)
R18 (sc, dec) x6 (12)
Stuff firmly.
FO.
Horns
R1 MR 4
R2–R4 sc around
Stuff lightly and sew.
Legs
Black hoof:
R1 MR 6
R2 inc x6 (12)
R3–R4 sc around
Switch to white:
R5–R9 sc around
Stuff lightly and FO.
🐑 Sheep Pattern
Head (Beige)
R1 MR 6
R2 inc x6 (12)
R3 (sc, inc) x6 (18)
R4 (2 sc, inc) x6 (24)
R5–R9 sc around
Insert eyes between R6–R7.
R10 (2 sc, dec) x6 (18)
R11 (sc, dec) x6 (12)
Stuff firmly and FO.
Body (White, Bobble Texture)
R1 MR 6
R2 inc x6 (12)
R3 (sc, inc) x6 (18)
R4 (2 sc, inc) x6 (24)
R5 (3 sc, inc) x6 (30)
R6 (4 sc, inc) x6 (36)
R7–R12 alternate bo and sc around
R13 (4 sc, dec) x6 (30)
R14 (3 sc, dec) x6 (24)
R15 (2 sc, dec) x6 (18)
Stuff firmly and FO.
Legs
Dark brown hoof:
R1 MR 6
R2 inc x6 (12)
R3 sc around
Switch to beige:
R4–R7 sc around
FO.
🐖 Pig Pattern
Head
R1 MR 6
R2 inc x6 (12)
R3 (sc, inc) x6 (18)
R4 (2 sc, inc) x6 (24)
R5–R9 sc around
Insert eyes between R6–R7.
R10 (2 sc, dec) x6 (18)
R11 (sc, dec) x6 (12)
Stuff firmly and FO.
Snout
R1 MR 6
R2 inc x6 (12)
R3 sc around
Stuff lightly and sew.
Body
R1 MR 6
R2 inc x6 (12)
R3 (sc, inc) x6 (18)
R4 (2 sc, inc) x6 (24)
R5 (3 sc, inc) x6 (30)
R6–R10 sc around
Stuff firmly and FO.
Legs
R1 MR 6
R2 inc x6 (12)
R3–R6 sc around
FO.
🐥 Chick Pattern
Head and Body (One Piece)
R1 MR 6
R2 inc x6 (12)
R3 (sc, inc) x6 (18)
R4 (2 sc, inc) x6 (24)
R5–R11 sc around
Insert eyes between R6–R7.
R12 (2 sc, dec) x6 (18)
R13 (sc, dec) x6 (12)
Stuff firmly and FO.
Beak
Ch 3
sc across
Sew folded into triangle.
Wings
R1 MR 6
R2 (sc, inc) x3 (9)
R3–R4 sc around
FO and sew.
🌿 Base Mat
R1 MR 6
R2 inc x6 (12)
R3 (sc, inc) x6 (18)
Continue increasing evenly each round until 25 cm diameter.
FO.
Assembly (All Animals)
- Sew heads to bodies centered and slightly forward.
- Attach legs evenly so animals stand balanced.
- Attach ears, horns, snouts, and tails.
- Shape faces gently while stuffing.
Final Result
You now have a complete handcrafted farm animal family with realistic shaping, expressive faces, and stable standing bodies. This set makes a beautiful nursery decoration, gift, or heirloom crochet collection.


Muito obrigada por compartilhar conosco seu coração e gigantesco Deus abençoe ilumine proteja sua vida dando-lhe tudo que precisas pra ser feliz junto de sua família