Flutter into the world of enchantment with this Amigurumi Fairy crochet pattern! 🧚✨ With delicate wings, a flowing dress, and a touch of magic, this design brings the charm of fairytales to life in yarn form. Whether you’re crafting for a fantasy-themed décor piece, a whimsical gift, or simply love character-inspired amigurumi, this FREE pattern is a delightful addition to your collection.
Designed for intermediate crocheters, this pattern allows for customization in wing shapes, dress details, and even tiny accessories like a miniature wand or flower crown to enhance its ethereal beauty. Choose soft pastels for a dreamy fairy look or experiment with bold hues for a unique twist! Whether displayed as part of a mystical setup or gifted to a fellow crochet enthusiast, this amigurumi fairy is sure to sprinkle a little magic. Grab your hook, select your favorite yarn, and let’s bring this enchanting creature to life—one stitch at a time! 🧶✨
🧚 Amigurumi Fairy Crochet Pattern
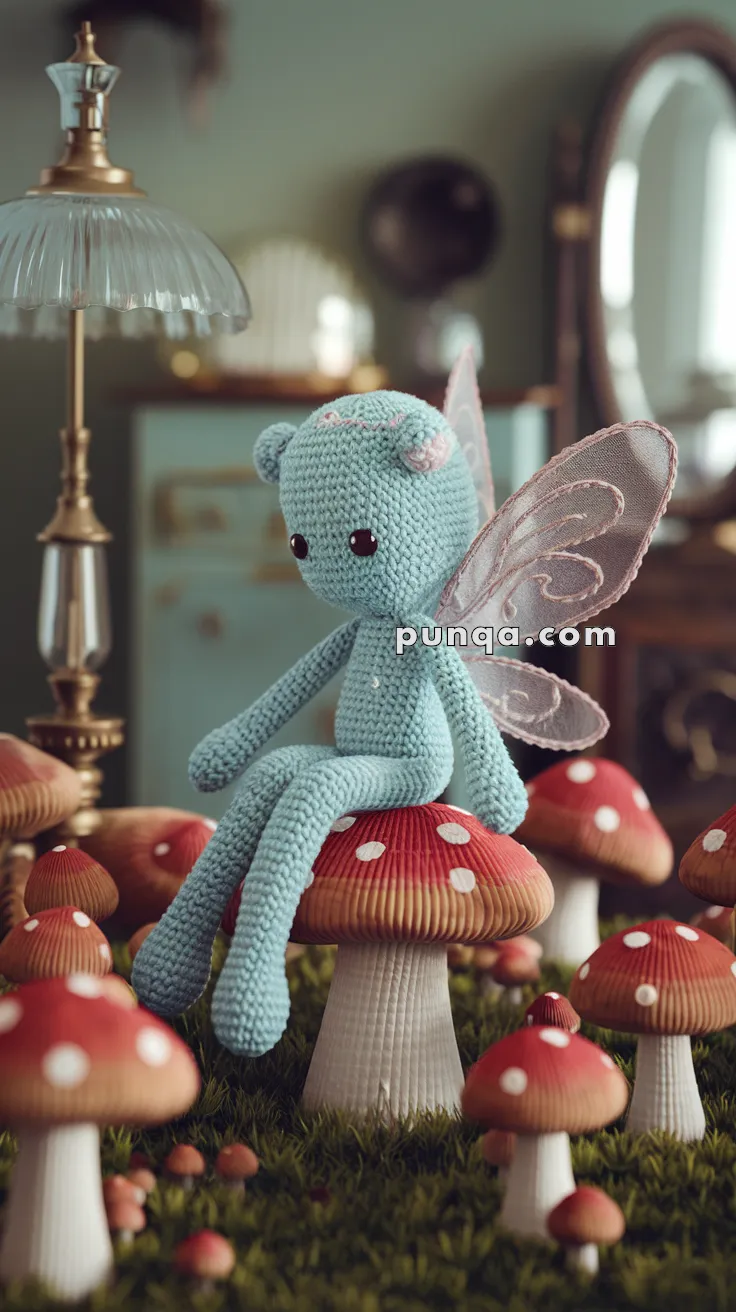
This adorable fairy sits sweetly on a toadstool, surrounded by forest magic. With elongated limbs and sheer wired wings, this amigurumi is both cuddly and ethereal.
🧶 Skill Level
Intermediate – Includes limb shaping and wire-frame wings
📏 Finished Size
Approx. 25–28 cm (10–11″) tall when seated, using DK yarn and a 2.5–3 mm hook
✂️ Materials Needed
-
Yarn:
-
Light blue or mint (body)
-
Pink (inner ears and blush)
-
White (embroidery)
-
-
Crochet hook: 2.5–3 mm
-
Safety eyes (8 mm or 10 mm)
-
Fiberfill stuffing
-
Yarn needle
-
Tulle or sheer organza for wings
-
Thin jewelry wire or pipe cleaners (for wing structure)
-
Hot glue or strong craft glue
🧵 Abbreviations (US terms)
sc – single crochet
inc – increase (2 sc in next st)
dec – decrease (sc 2 together)
sl st – slip stitch
ch – chain
st – stitch
MR – magic ring
FO – fasten off
🐻 Head
Use main body color (blue):
-
MR, 6 sc
-
inc x6 (12)
-
(sc, inc) x6 (18)
-
(2 sc, inc) x6 (24)
-
(3 sc, inc) x6 (30)
-
(4 sc, inc) x6 (36)
7–14. sc around (36) -
(4 sc, dec) x6 (30)
-
(3 sc, dec) x6 (24)
-
(2 sc, dec) x6 (18)
-
(sc, dec) x6 (12)
-
dec x6 (6)
FO, weave shut
Add safety eyes between rounds 10–11, 6–7 sts apart. Embroider blush and eye highlights.
🧏♀️ Ears (x2)
-
MR, 6 sc
-
inc x6 (12)
-
sc around (12)
FO, sew to head
Add inner ear with pink yarn or felt circle
🧍♀️ Body
-
MR, 6 sc
-
inc x6 (12)
-
(sc, inc) x6 (18)
-
(2 sc, inc) x6 (24)
5–11. sc around (24) -
(2 sc, dec) x6 (18)
-
(sc, dec) x6 (12)
14–17. sc around (12)
Stuff, FO. Sew to head
🦵 Legs (x2)
-
MR, 6 sc
-
inc x6 (12)
3–24. sc around (12)
Stuff lightly, flatten ends and sew to bottom of body (legs should dangle naturally)
💪 Arms (x2)
-
MR, 6 sc
-
(sc, inc) x3 (9)
3–18. sc around (9)
Stuff lightly
FO, sew to sides of body
🪽 Wings (x2)
Use sheer fabric and thin wire:
-
Cut two wing shapes (approx. 10–12 cm long)
-
Trace edge with wire and stitch or hot glue to reinforce
-
Add simple swirl embroidery with thread or fabric paint
-
Glue or stitch securely to the back of the bear
✨ Finishing Touches
-
Embroider tiny eyebrows and sparkles with white thread
-
Add a flower crown or ribbon if desired
-
Lightly blush cheeks with pink yarn or fabric marker
-
Pose seated on a faux mushroom or display stand
Your magical Amigurumi Fairy is complete and ready to enchant the forest! 🧚♀️🍄