Step into a world of magic and whimsy with this Amigurumi Fairy Cottage crochet pattern! Whether you’re enchanted by storybook landscapes or simply love crafting intricate designs, this free pattern lets you stitch up a charming little home fit for the tiniest fairy folk. With its cozy shape, delicate floral accents, and a touch of woodland wonder, this fairy cottage is a dreamy addition to any handmade collection. Perfect for whimsical decor, enchanted playsets, or thoughtful gifts, this crochet creation captures the magic of imagination in every stitch.
Designed for endless creativity, this pattern allows you to experiment with soft pastels, earthy tones, or vibrant colors to bring your fairy cottage to life. Add embroidered windows for extra charm, craft tiny mushrooms or vines for a whimsical touch, or even stitch up a miniature door that opens to reveal fairy secrets! Whether perched on a shelf, gifted to a fantasy-loving friend, or crafted as part of a magical scene, this amigurumi fairy cottage is a delightful project that transports you to a world of enchantment—one stitch at a time! 🏡✨🧶
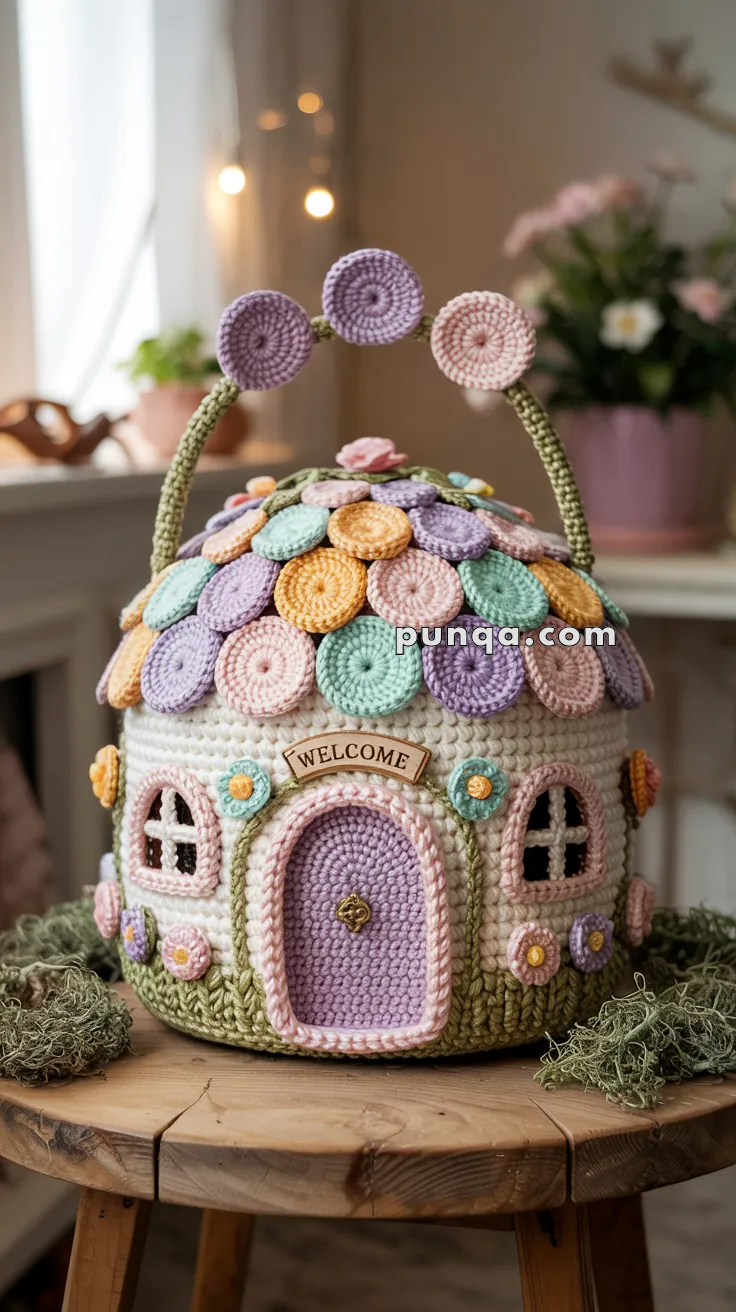
🏡 Amigurumi Fairy Cottage Crochet Pattern
Step into a whimsical world with this charming crochet fairy cottage! With pastel shingles, arched windows, a rounded door, and blooming floral details, this soft sculpture is filled with warmth and handmade magic. Perfect as a gift, nursery decor, or centerpiece for any fairy-tale collection. ✨
✨ Skill Level
Advanced – involves shaping, colorwork, appliqués, and structured assembly.
📏 Finished Size
Approx. 10–12 in (25–30 cm) tall using worsted weight yarn and a 4.0 mm hook.
🧶 Materials
Yarn (Worsted Weight):
- Off-white – 60 g (walls)
- Sage green – 40 g (base and roof trim)
- Lilac – 20 g (door and roof shingles)
- Peach – 15 g (shingles and flowers)
- Butter yellow – 15 g (shingles and flower centers)
- Mint – 15 g (shingles)
- Rose pink – 15 g (shingles and window trims)
- Lavender – 10 g (roof accents)
- Pink – 15 g (door trim and windows)
Other Materials:
- Crochet hook: 4.0 mm
- Tapestry needle
- Stitch marker
- Fiberfill stuffing
- Embroidery thread (brown or black for window crossbars)
- Cardboard or plastic canvas for structure
- Small decorative charm or bead for doorknob (optional)
- “Welcome” sign or plaque (optional)
🧵 Abbreviations (US Terms)
MR – Magic Ring
sc – Single Crochet
inc – Increase (2 sc in same stitch)
dec – Decrease (sc two together)
sl st – Slip Stitch
ch – Chain
hdc – Half Double Crochet
dc – Double Crochet
BLO – Back Loop Only
FO – Fasten Off
🪴 Cottage Base & Walls
Base (Sage Green):
MR, 6 sc
(inc) ×6 (12)
(1 sc, inc) ×6 (18)
(2 sc, inc) ×6 (24)
(3 sc, inc) ×6 (30)
(4 sc, inc) ×6 (36)
(5 sc, inc) ×6 (42)
(6 sc, inc) ×6 (48)
(7 sc, inc) ×6 (54)
(8 sc, inc) ×6 (60)
R11–R14: BLO sc around (60) to create a visible ridge and slightly raised textured base.
Switch to off-white for walls.
Walls (Off-White):
R15–R30: sc around (60).
Stuff gradually as you go or insert a plastic canvas cylinder inside for firmness.
FO, leaving a long tail for attaching the roof.
🚪 Door (Lilac & Pink)
Door Panel (Lilac):
Ch 10.
R1: sc in 2nd ch and across (9).
R2–R8: sc across (9).
R9: inc, 7 sc, inc (11).
R10: inc, 9 sc, inc (13).
R11: inc, 11 sc, inc (15).
FO and shape the top into a gentle arch.
Door Trim (Pink):
Attach yarn to edge of the door and sc evenly around for a thick frame.
Repeat 1–2 more rounds for visible border thickness.
FO and sew to the center front of the cottage.
Add a bead or charm as the doorknob.
🪟 Windows (Pink)
Round Windows (Front & Back):
MR, 6 sc
(inc) ×6 (12)
(1 sc, inc) ×6 (18)
sc around (18)
FO.
Sew one window above the door and another on the back.
Arched Side Windows (Make 2):
Ch 8.
R1: sc in 2nd ch and across (7).
R2–R5: sc across (7).
R6: inc, 5 sc, inc (9).
R7: inc, 7 sc, inc (11).
R8: sc evenly around the edge.
FO.
With brown embroidery thread, stitch a vertical and horizontal cross to create four equal panes.
Sew one on each side of the cottage, approximately level with the top of the door.
🌸 Roof Shingles (Make 30–35)
Use pastel colors (mint, lilac, rose, yellow, lavender, peach).
MR, 6 sc
(inc) ×6 (12)
(1 sc, inc) ×6 (18)
sc around (18)
FO.
Flatten each shingle completely and sew in neat overlapping horizontal rows starting from the wall edge upward. Slightly offset each row for a natural layered effect.
🌿 Roof Handle
With sage green:
Ch 45, sc in each ch.
R2–R4: Turn, sc across (to thicken).
FO.
Attach both ends securely to the roof edge.
Roof Discs (Make 5 in assorted colors):
MR, 6 sc
(inc) ×6 (12)
(1 sc, inc) ×6 (18)
FO.
Sew 4–5 discs evenly along the handle arch, including one centered at the peak and one near each side connection.
🌼 Roof Flower
Make a small layered rose for the top:
Ch 26.
(sc, hdc, dc, hdc, sc) in each chain across.
Roll into a spiral and sew together.
Attach to the center top of roof.
💐 Decorative Flowers & Vines
Make 5–7 tiny flowers in assorted colors:
Ch 2, 2 dc, ch 2, sl st in same stitch.
Repeat 4–5 times for 5-petal flowers.
Sew beside the door and near windows.
Use green yarn to chain vines or stitch leaf shapes for added charm.
Optional: Add a small “Welcome” plaque above the door — crochet a simple banner shape (Ch 12, sc 2 rows) or use a ready-made tag.
🧱 Assembly
- Attach windows and door before sewing roof.
- Sew shingles in organized rows around the top edge.
- Attach roof handle and decorative discs.
- Secure roof flower and optional plaque.
- Evenly stuff the cottage body for firmness.
- For structure, line the inner wall and base with cardboard or plastic canvas.
- Shape carefully by hand to form a perfect upright cylinder.
🌟 Finishing Touches
- Distribute shingle colors randomly but evenly for a natural, fairytale look.
- Ensure door and windows align symmetrically.
- Add moss, lace, or more appliqués for extra texture.
- For a firm display, place on a flat surface or felt base.
This fairy cottage combines detailed texture, soft pastels, and clever shaping for a magical handmade piece. It’s sturdy enough for display yet whimsical enough to spark any imagination — a cozy little home where fairies might truly live. 🧚♀️✨