Oh, the joy of crafting little bits of magic with just a hook and some yarn! 🌟 Let me take you into the colorful and whimsical world of amigurumi, where the possibilities are as vast as your imagination. If you’ve ever wanted to capture the essence of the elements—earth, water, fire, and air—into something tangible, then you’re in for a delightful journey. Amigurumi, the Japanese art of knitting or crocheting small stuffed yarn creatures, allows us to bring these elemental forces to life in the cutest way possible. Each piece is more than just a toy; it’s a representation of nature’s beauty, intricately crafted with love and a dash of personality.
The process is as enchanting as the final product. Picture yourself choosing the perfect colors that symbolize each element—like earthy browns and greens for earth 🌿, or vibrant reds and oranges for fire 🔥. Then, it’s about finding or creating a pattern that speaks to you. With each stitch, you’re weaving a story, letting your imagination run wild. There’s a meditative rhythm to it, as you watch your creation take shape in your hands. Before you know it, you have a collection of adorable beings that capture the spirit of the elements, each one unique and infused with your personal touch. Who knew that a bit of yarn and some creativity could conjure such magic? 🧶✨
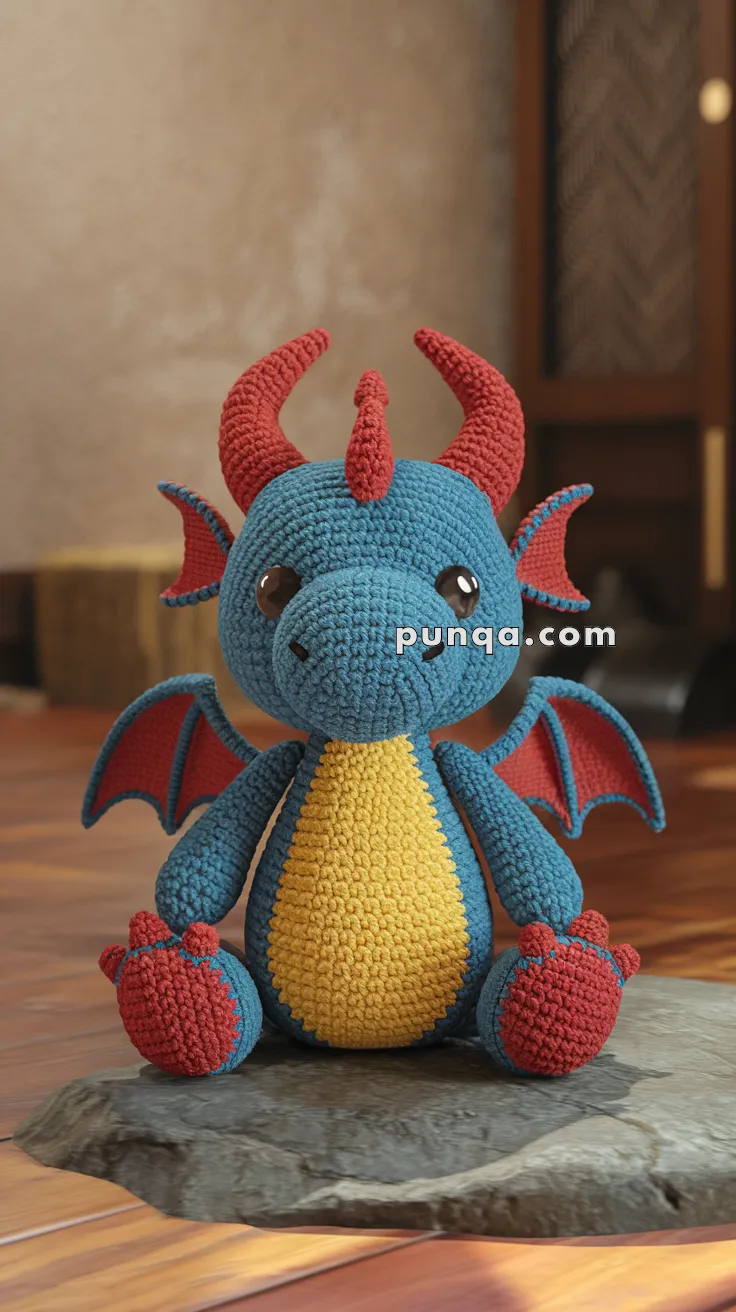
🐉 Amigurumi Elemental Dragon Pattern
This adorable baby dragon features a large rounded head, short snout, curved red horns, tiny side ear fins, wide bat-style wings, a plump teardrop-shaped body with a bold yellow belly, and oversized feet with defined red toes. The proportions are carefully balanced to create a sweet, seated dragon with a slightly forward-leaning posture and a full rounded belly.
✨ Skill Level
Intermediate – includes shaping, structured increases and decreases, color panel work, sculpted limbs, and detailed assembly.
📏 Finished Size
Approximately 28–32 cm (11–12.5 inches) tall
Using worsted weight yarn and a 3.25–3.5 mm hook.
🧶 Yarn Requirements (Worsted Weight)
Teal Blue (head, body, arms, legs outer, wing frame): 180–200 g
Golden Yellow (belly panel): 60–70 g
Red (horns, crest, wing membranes, toes, ear fins): 70–80 g
Small amount black yarn for facial embroidery
Polyester fiberfill: 250–300 g
🧵 Materials
3.5 mm crochet hook
14–16 mm brown safety eyes
Fiberfill stuffing
Tapestry needle
Stitch markers
🔤 Abbreviations (US Terms)
MR – magic ring
sc – single crochet
inc – increase (2 sc in one stitch)
dec – invisible decrease
sl st – slip stitch
ch – chain
FO – fasten off
Work in continuous rounds unless stated otherwise.
🐲 Head
With teal yarn.
R1: MR 6 sc (6)
R2: inc x6 (12)
R3: (1 sc, inc) x6 (18)
R4: (2 sc, inc) x6 (24)
R5: (3 sc, inc) x6 (30)
R6: (4 sc, inc) x6 (36)
R7: (5 sc, inc) x6 (42)
R8: (6 sc, inc) x6 (48)
R9–17: sc around (48)
Insert safety eyes between R12–13, spaced approximately 12 stitches apart.
R18: (6 sc, dec) x6 (42)
R19: (5 sc, dec) x6 (36)
R20: (4 sc, dec) x6 (30)
R21: (3 sc, dec) x6 (24)
Stuff firmly, shaping cheeks evenly.
R22: (2 sc, dec) x6 (18)
R23: (1 sc, dec) x6 (12)
R24: dec x6 (6)
FO and close.
Embroider small nostrils and a subtle curved mouth.
🐉 Body (Teardrop Shape)
The body widens at the base and gradually tapers toward the neck to create a seated, rounded silhouette.
With teal yarn:
R1: MR 6 sc (6)
R2: inc x6 (12)
R3: (1 sc, inc) x6 (18)
R4: (2 sc, inc) x6 (24)
R5: (3 sc, inc) x6 (30)
R6: (4 sc, inc) x6 (36)
R7–14: sc around (36)
R15: (4 sc, dec) x6 (30)
R16: (3 sc, dec) x6 (24)
R17: (2 sc, dec) x6 (18)
R18: (1 sc, dec) x6 (12)
Stuff very firmly, shaping the lower half into a stable rounded base.
FO leaving long tail for sewing head.
🟡 Belly Panel
With golden yellow yarn.
Ch 11
Round 1:
Sc in 2nd ch, sc 8, 3 sc in last stitch.
Working along opposite side: sc 8, 2 sc in last stitch (22)
Round 2:
(2 sc, inc) around (approx. 30)
Round 3–7:
sc around (30)
FO and sew centered on the body from lower belly up toward the neck taper.
🦵 Legs (Make 2)
Start with red (toe base).
R1: MR 6 sc (6)
R2: inc x6 (12)
R3: (1 sc, inc) x6 (18)
R4: (2 sc, inc) x6 (24)
R5–6: sc around (24)
Switch to teal.
R7–12: sc around (24)
Stuff firmly. Slightly flatten the top before sewing.
Attach to the lower front of the body so the dragon sits steadily.
🔴 Toes (Make 6 Total)
With red yarn:
R1: MR 5 sc (5)
R2: (1 sc, inc) x2, sc (7)
FO.
Sew three toes to the front of each foot.
💪 Arms (Make 2)
With teal yarn:
R1: MR 6 sc (6)
R2: (1 sc, inc) x3 (9)
R3–13: sc around (9)
Stuff lightly at the lower portion only.
FO and attach slightly angled inward near the upper belly.
🔺 Horns (Make 2)
With red yarn:
R1: MR 4 sc (4)
R2: (1 sc, inc) x2 (6)
R3: (2 sc, inc) x2 (8)
R4–10: sc around (8)
Stuff lightly and shape into a gentle curve before attaching to the top of the head.
🔺 Center Crest
With red yarn:
R1: MR 5 sc (5)
R2: (1 sc, inc) x2, sc (7)
R3–7: sc around (7)
Lightly stuff and sew centered between the horns.
👂 Side Ear Fins (Make 2)
With teal:
Ch 7
Sl st in 2nd ch, sc, hdc, dc, hdc, sc across.
Attach red yarn and surface stitch along the inner curve to create the membrane effect.
Sew slightly below horn level on each side.
🦇 Wings (Make 2)
Wing Base (Teal)
R1: MR 6 sc (6)
R2: inc x6 (12)
R3: (1 sc, inc) x6 (18)
R4: (2 sc, inc) x6 (24)
FO.
Wing Membrane (Red)
Attach red along one side and work:
(sc, hdc, dc, hdc, sc) repeated 4 times to form scalloped curves.
FO and sew to upper back angled outward.
🧵 Assembly & Finishing
Attach head securely to the tapered neck opening.
Sew belly panel centered.
Attach legs slightly forward for a stable seated posture.
Position arms just above the belly curve.
Sew wings high on the back.
Attach horns with a slight outward tilt and place the crest centered between them.
Shape carefully while stuffing to maintain the rounded belly and balanced proportions.
🌟 Final Thoughts
Your baby dragon is now complete — full of personality, charm, and magical character. With its oversized head, bright belly, curved horns, and soft bat wings, it’s the perfect balance of fierce and adorable.
Take your time with the shaping and placement details; those thoughtful finishing touches are what bring this little dragon to life. Whether displayed proudly on a shelf, gifted to someone special, or added to your fantasy collection, this handmade companion is sure to spark smiles and imagination.
Happy crocheting 🧶✨