Oh, the joy of creating something beautiful and meaningful with my own hands! 🌸 Crafting an amigurumi Easter lily bouquet truly fills my heart with happiness. There’s something magical about transforming a simple strand of yarn into a stunning floral arrangement that brings smiles and delight. Amigurumi, the Japanese art of crocheting small stuffed yarn creatures or objects, offers a delightful escape into a world of creativity and color. The Easter lily, with its trumpet-shaped blooms and elegant symbolism of purity and rebirth, makes it a perfect project for the spring season, capturing the essence of renewal and celebration.
The process of creating an amigurumi Easter lily bouquet is both engaging and rewarding. 🌷 I start by choosing a palette of vibrant yarn colors, which immediately sets the tone for the entire project. Next, I gather my trusty crochet hook, stitch markers, and a cup of tea to keep my spirits high. 😊 As I work through each petal and leaf, the repetitive rhythm of crocheting becomes almost meditative, allowing me to focus on each stitch while letting life’s worries melt away. Little by little, the bouquet comes to life, each flower showcasing my personal flair and attention to detail. Whether it’s adorning my home or becoming a heartfelt gift for someone special, these handcrafted Easter lilies offer a beautiful reminder of the warmth and joy that handmade crafts can bring.
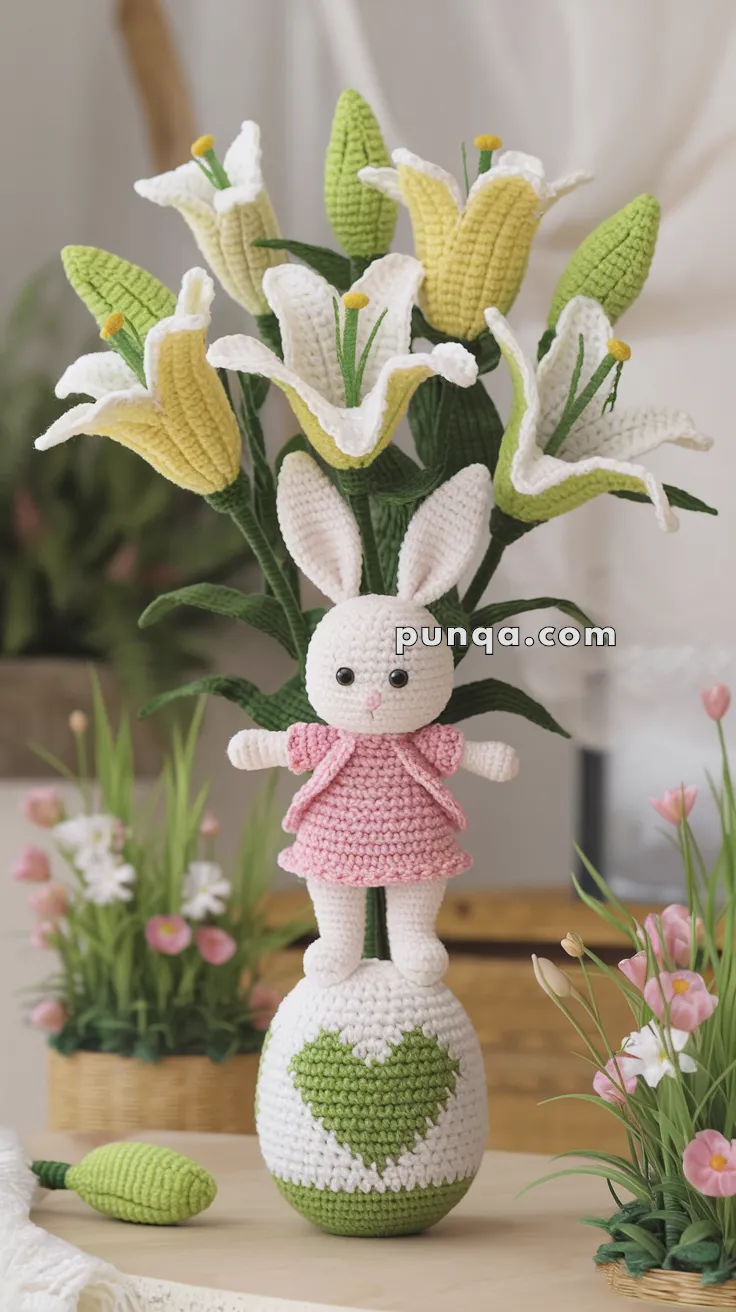
🐰 Amigurumi Easter Lily Bouquet with Bunny & Egg Crochet Pattern
Celebrate the joy of spring with this charming crochet scene featuring a bouquet of blooming Easter lilies, an adorable bunny in a pink dress, and a heart-decorated Easter egg! This delightful combination makes a perfect handmade decoration or gift to welcome the Easter season with warmth and cuteness.
✨ Skill Level
Intermediate – Involves shaping, sewing, color changes, and floral construction.
📏 Finished Size
-
Bouquet: Approx. 30–35 cm (12–14 inches) tall
-
Bunny: Approx. 14–16 cm (5.5–6.5 inches) tall
-
Egg base: Approx. 10–12 cm (4–5 inches) tall
🧶 Materials
Yarn (Sport or DK weight):
-
White (Lily petals, bunny, egg body)
-
Yellow (Lily centers)
-
Green (Leaves, stems, egg bottom, heart)
-
Pink (Bunny dress)
-
Black (Eyes or embroidery)
-
Light pink (Bunny nose)
Other Supplies:
-
2.5–3 mm crochet hook
-
Stuffing (for bunny and egg)
-
Floral wire (for lily stems and leaves)
-
Stitch markers
-
Tapestry needle
-
Scissors
-
Safety eyes (optional, 8 mm)
-
Optional: floral tape for bouquet assembly
🧵 Abbreviations (US Terms)
-
MR – Magic Ring
-
sc – Single Crochet
-
inc – Increase
-
dec – Decrease
-
ch – Chain
-
sl st – Slip Stitch
-
FO – Fasten Off
-
BLO – Back Loop Only
🌼 Lily Flower (Make 3–5)
Petals (Make 6 per lily – White)
-
Ch 11
-
Starting in 2nd ch: sc 3, hdc 3, dc 3, 3 dc in last ch
-
Continue around: dc 3, hdc 3, sc 3
-
FO, shape and sew 6 petals in a circle
Stamen Cluster (Yellow)
-
Ch 5
-
Sl st back across
Make 3–5 stamens, bunch together and sew to petal center
Stem (Green)
-
MR, 6 sc
2–25. sc (6) – insert floral wire -
FO, attach to flower base
🍃 Leaves (Green – Make 3–5)
-
Ch 16
-
sc 4, hdc 4, dc 5, 3 dc in end
-
dc 5, hdc 4, sc 4
FO, optionally wire and stitch center vein
🌱 Lily Bud (Optional)
Make a small green base and white tapered top as in the flower instructions above, lightly stuffed and sewn shut.
🥚 Easter Egg Base with Heart
Egg (White and Green)
-
Start with green: MR, 6 sc
-
inc x6 (12)
-
(1 sc, inc) x6 (18)
-
(2 sc, inc) x6 (24)
-
(3 sc, inc) x6 (30)
6–10. sc (30), switch to white
11–20. sc (30)
Heart Pattern:
Use tapestry crochet technique or surface embroidery to form a green heart on the front center. You can stitch it afterward if easier.
-
(3 sc, dec) x6 (24)
-
(2 sc, dec) x6 (18)
-
(1 sc, dec) x6 (12)
-
dec x6 (6), FO
Stuff well before closing.
🐰 Bunny in Pink Dress
Head & Body (White)
-
MR, 6 sc
-
inc x6 (12)
-
(1 sc, inc) x6 (18)
-
(2 sc, inc) x6 (24)
5–10. sc (24) -
(2 sc, dec) x6 (18)
-
(1 sc, dec) x6 (12)
13–17. sc (12)
Stuff firmly and FO
Ears (Make 2 – White)
-
MR, 4 sc
-
(1 sc, inc) x2 (6)
3–10. sc (6)
Flatten and sew to top of head
Arms (Make 2 – White)
-
MR, 5 sc
2–6. sc (5)
Stuff lightly, sew to sides of body
Legs (Make 2 – White)
-
MR, 6 sc
2–7. sc (6)
Stuff and sew to bottom
Dress (Pink)
-
Ch to fit around body (~24), join to form ring
2–5. sc in rounds (bodice) -
inc in every st around (skirt ruffle)
7–9. sc
Add small sleeves by chaining 6, attach as cap sleeve. FO and sew in place.
✂️ Final Assembly
-
Attach bunny feet to the top of the Easter egg
-
Arrange and wrap lilies into a bouquet with leaves and optional buds
-
Position behind bunny or insert wire stems into egg for stability
-
Use hot glue if preferred for fixed display
💡 Customization Ideas
-
Add more flowers like tulips or daisies to expand the bouquet
-
Stitch a tiny bow or basket for the bunny
-
Use pastel yarns for a softer Easter palette
This sweet bunny and lily bouquet is a whimsical way to celebrate springtime joy and Easter traditions. It’s a handmade keepsake full of love and blooming cheer! 🌷🐇💚