Hey there! 🌈 I recently dove into the colorful world of amigurumi, and let me tell you, it’s an absolute blast! One of the most delightful projects I’ve come across is the striped amigurumi Easter egg. Picture this: a collection of vibrant, soft eggs that not only look adorable but also bring a sense of handcrafted charm to your Easter celebrations. The best part? These little treasures are incredibly fun to make and perfect for both beginners and seasoned crocheters alike. The process of creating these amigurumi eggs feels like a creative adventure, where each stripe and stitch adds a splash of personality and color to your Easter decor.
The journey begins with choosing a palette of cheerful yarns that scream spring and joy. 🌸 Once armed with your crochet hook and a little patience, crafting these eggs becomes as soothing as it is satisfying. The pattern involves a series of simple stitches that, when combined, create a delightful striped effect, making each egg unique in its own right. As I watch the stripes take shape, there’s an undeniable sense of accomplishment that comes with seeing a once-simple ball of yarn transform into something so delightful. It’s a hands-on craft that not only brings joy to those who make them but also to anyone lucky enough to receive one as a gift. 🥚💖
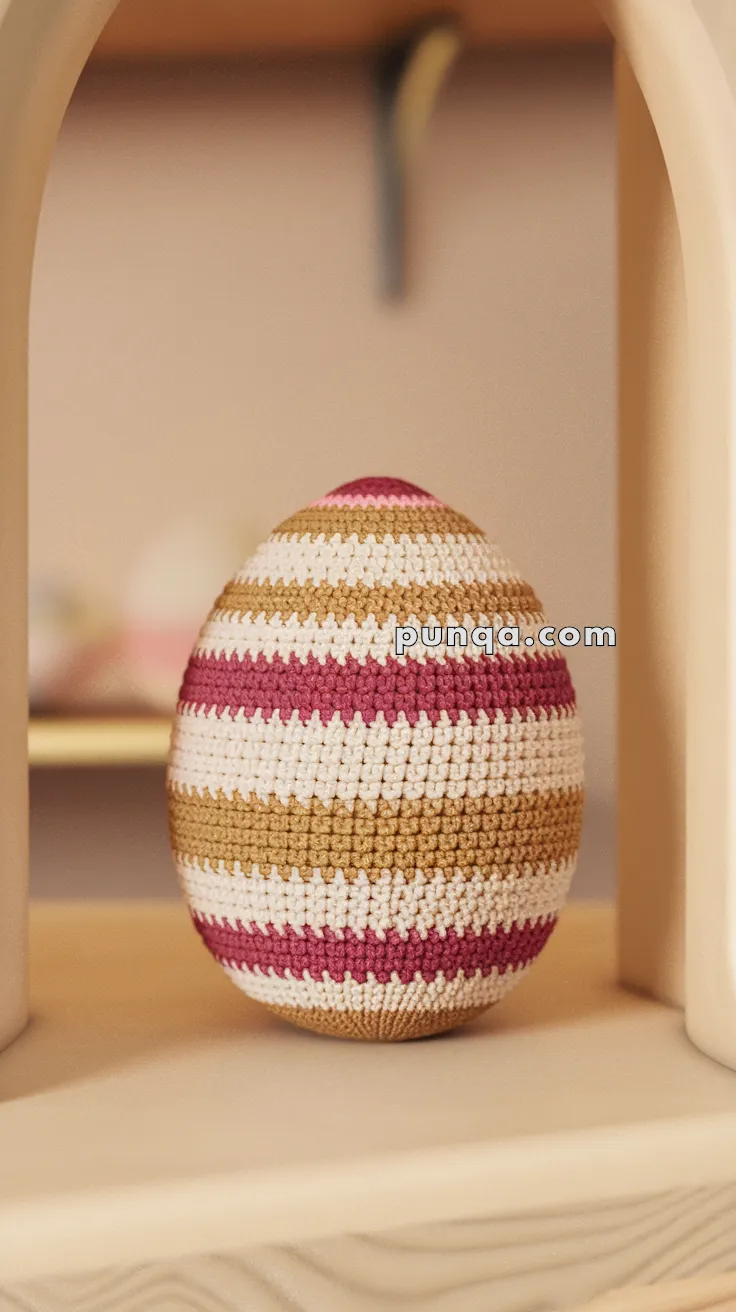
🐣 Amigurumi Easter Egg With Stripes Crochet Pattern
Add a handmade charm to your spring decor with this adorable striped amigurumi Easter egg! Featuring clean color changes and a plump oval shape, it’s perfect for baskets, gifts, or festive centerpieces. Customize the colors to match your holiday palette!
✨ Skill Level
Beginner to Intermediate – Basic shaping and color changes involved.
📏 Finished Size
Approx. 4–6 inches (10–15 cm) tall using DK or worsted weight yarn and a 2.5–3.5 mm hook.
🧶 Materials
-
Yarn (DK or Worsted weight):
-
Color A (White)
-
Color B (Dusty Rose or Burgundy)
-
Color C (Mustard or Gold)
-
-
Crochet hook: 2.5–3.5 mm
-
Tapestry needle
-
Stitch marker
-
Polyfill stuffing
🧵 Abbreviations (US Terms)
MR – Magic Ring
sc – Single Crochet
inc – Increase
dec – Decrease
sl st – Slip Stitch
FO – Fasten Off
🥚 Easter Egg Body (Work in continuous spiral)
Use the following color sequence (change every 3 rounds unless noted):
C, A, C, A, B, A, C, A, B, A, C, A, B, A
Start with Color C:
-
MR, 6 sc (6)
-
inc x6 (12)
-
(1 sc, inc) x6 (18)
-
(2 sc, inc) x6 (24)
-
(3 sc, inc) x6 (30)
-
(4 sc, inc) x6 (36)
-
(5 sc, inc) x6 (42)
8–18. sc around (42) – Change colors every 3 rounds
Start decreasing:
19. (5 sc, dec) x6 (36)
20. (4 sc, dec) x6 (30)
21. (3 sc, dec) x6 (24)
– Stuff firmly with polyfill
22. (2 sc, dec) x6 (18)
23. (1 sc, dec) x6 (12)
24. dec x6 (6)
FO, weave yarn tail through front loops and pull tight to close.
✂️ Finishing Touches
-
Gently shape the egg with your hands if needed.
-
Weave in all ends.
-
Optional: Add ribbon or embroidery details for a personalized Easter touch.
💡 Customization Ideas
-
Use pastel rainbow stripes for a spring palette
-
Make multiple eggs in different color combos for an Easter basket
-
Add a small loop to hang it as an ornament
This cheerful striped egg is a fun and quick make for Easter—or anytime you want to celebrate new beginnings with a splash of color! 🐰🌷