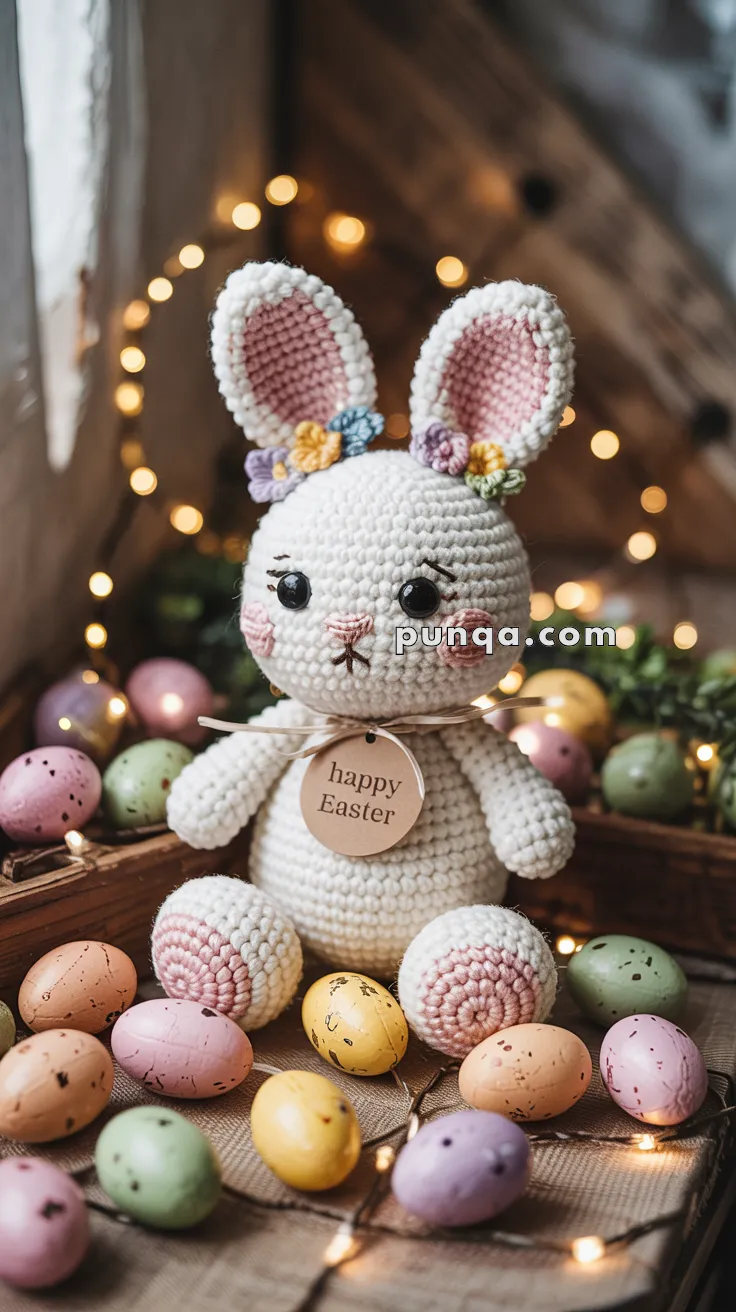
Welcome to the cheerful and festive world of amigurumi! 🐰✨ Today, I’m excited to share my free crochet pattern for an Easter Bunny—a sweet and cuddly creation perfect for springtime décor, holiday gifts, or anyone who loves crafting adorable plush animals! 🌿 Whether you enjoy stitching up seasonal designs, creating expressive and textured figures, or simply want to add a lovable Easter bunny to your handmade collection, this pattern will guide you through crafting a beautifully detailed plush friend with floppy ears, a tiny nose, and a touch of Easter magic! 💛
This design embraces soft textures, pastel tones, and playful details to bring a heartwarming touch to your crochet projects! 🧶🌷 I’ve carefully outlined each step to ensure your Amigurumi Easter Bunny turns out just right—ready to hop into your collection or become a treasured handmade gift! 🎁 So grab your hooks, pick out gentle pinks, soft blues, or classic whites, and let’s stitch up an irresistibly cute Easter bunny! ✨
🐰 Amigurumi Easter Bunny – Free Crochet Pattern
This sweet Amigurumi Easter Bunny is full of springtime charm, featuring blushing cheeks, a floral crown, and a soft round body. It’s the perfect handmade decoration for your Easter basket or a heartfelt spring gift! 🌸🥚
✨ Skill Level
Intermediate – Involves shaping, color changes, embroidery, and accessory assembly.
📏 Finished Size
Approx. 8–10 inches (20–25 cm) tall using worsted yarn and a 3.5 mm hook.
🧶 Materials
- Worsted weight yarn:
- White or cream (Main body)
- Pink (Ear and paw accents)
- Assorted colors (Mini flowers)
- 3.5 mm crochet hook
- Safety eyes (10–12 mm)
- Black embroidery thread (eyelashes & nose details)
- Pink blush yarn or cosmetic blush
- Ribbon + “Happy Easter” tag (optional)
- Fiberfill stuffing
- Tapestry needle, stitch marker
🧵 Abbreviations (US Terms)
MR – Magic Ring
sc – Single Crochet
inc – Increase
dec – Decrease
ch – Chain
sl st – Slip Stitch
FO – Fasten Off
BLO – Back Loop Only
🐰 Head
With white yarn:
- MR, 6 sc
- inc x6 (12)
- (1 sc, inc) x6 (18)
- (2 sc, inc) x6 (24)
- (3 sc, inc) x6 (30)
- (4 sc, inc) x6 (36)
- (5 sc, inc) x6 (42)
8–15. sc around (42)
Insert safety eyes between Rounds 11–12, ~7 stitches apart - (5 sc, dec) x6 (36)
- (4 sc, dec) x6 (30)
- (3 sc, dec) x6 (24)
- (2 sc, dec) x6 (18)
Stuff firmly - (1 sc, dec) x6 (12)
- dec x6 (6)
FO and close.
🐇 Body
With white yarn:
- MR, 6 sc
- inc x6 (12)
- (1 sc, inc) x6 (18)
- (2 sc, inc) x6 (24)
- (3 sc, inc) x6 (30)
- (4 sc, inc) x6 (36)
7–13. sc around (36) - (4 sc, dec) x6 (30)
- (3 sc, dec) x6 (24)
- (2 sc, dec) x6 (18)
Stuff firmly - (1 sc, dec) x6 (12)
- dec x6 (6)
FO and close. Sew to head.
🐾 Arms (Make 2)
With white yarn:
- MR, 6 sc
- inc x6 (12)
3–5. sc around (12) - (2 sc, dec) x3 (9)
7–12. sc around (9)
Stuff lightly
FO and sew to body.
🦶 Legs (Make 2)
Start with pink yarn:
- MR, 6 sc
- inc x6 (12)
- (1 sc, inc) x6 (18)
- Switch to white yarn, sc around (18)
5–7. sc around (18) - (1 sc, dec) x6 (12)
Stuff firmly - sc around (12)
FO and sew to bottom of body.
👂 Ears (Make 2)
Outer (White):
- MR, 6 sc
- (1 sc, inc) x3 (9)
- (2 sc, inc) x3 (12)
- (3 sc, inc) x3 (15)
5–9. sc around (15)
FO
Inner (Pink):
Repeat same as outer but stop at Round 7.
Sew pink inner to white ear, fold base slightly, and stitch to head top.
🌸 Mini Flowers (Make 5–6)
With pastel colors:
- MR, ch 2, 2 dc, ch 2, sl st in ring – repeat 5x
- Tighten and FO.
Sew to base of ears or crown area.
🧵 Embroidery Details
- Use black thread for eyelashes (3 small lines above each eye).
- Embroider small pink nose and whiskers in X shape.
- Add blush using pink yarn or soft blush makeup.
🏷 Optional Finishing
- Tie a bow around neck
- Add a round wooden “Happy Easter” tag (attach with thread or glue)
💐 Your adorable Easter Bunny is now ready to hop into a basket or brighten up your seasonal display! Perfect for spring decorating, gifting, or cuddling. 🐣🌼