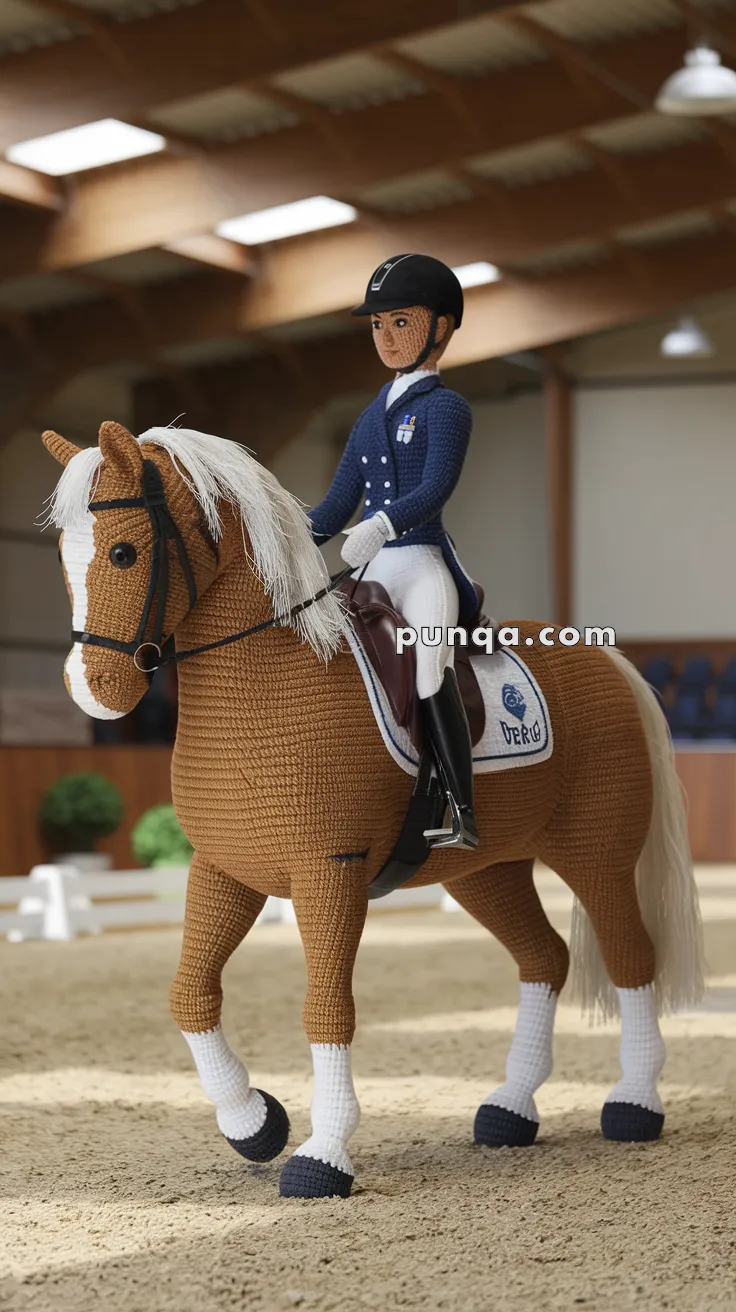
Welcome to the elegant and disciplined world of amigurumi! 🏇✨ Today, I’m excited to share my free crochet pattern for a Dressage Rider—a refined and graceful creation perfect for equestrian enthusiasts, horse lovers, or anyone who enjoys crafting expressive and detailed plush figures! 🌿 Whether you love stitching up poised riders, creating textured and lifelike designs, or simply want to add a sophisticated dressage figure to your handmade collection, this pattern will guide you through crafting a beautifully sculpted plush with a classic riding outfit, polished boots, and a majestic horse companion! 🐎
This design embraces rich tones, intricate shaping, and elegant details to bring a sense of movement and artistry to your crochet projects! 🧶🌾 I’ve carefully outlined each step to ensure your Amigurumi Dressage Rider turns out just right—ready to trot into your collection or become a treasured handmade gift! 🎁 So grab your hooks, pick out deep blacks, crisp whites, or warm browns, and let’s stitch up a stunning dressage rider! ✨

🏇🏻Amigurumi Dressage Rider & Horse Crochet Pattern
Bring the elegance of equestrian sport into your crochet collection with this dressage horse and rider amigurumi set. Designed with lifelike proportions and rich details, this pattern recreates the majesty of a horse in full tack and a rider in tailored dressage attire.
This is an advanced project, requiring shaping, wiring, and attention to detail, but the finished pair makes a stunning centerpiece or gift for horse lovers.
📏 Finished Size
- Horse: ~40 cm (16 in) tall at ears
- Rider: ~25 cm (10 in) seated
🧶 Skill Level
Advanced – requires shaping, color changes, wiring, detailed fingers, and accessories.
✨ Materials
- Worsted weight yarn:
- Horse: caramel, white, black, cream (mane/tail), brown (saddle)
- Rider: navy, white, beige (skin), black, brown (boots), silver/grey (stirrups & buckle)
- Crochet hook: 2.5–3.0 mm
- Safety eyes: 14 mm (horse), 10 mm (rider)
- Fiberfill stuffing (firm, especially for horse’s legs and body)
- Wooden dowels or strong craft wire (for horse’s legs, neck, and rider’s posture)
- Embroidery thread or black yarn for horse nostrils and rider’s buttons/crest
- Small bells or beads (optional for tack decoration)
- Tapestry needle
- Scissors
🧵 Abbreviations (US Terms)
MR = magic ring
sc = single crochet
inc = increase (2 sc in same stitch)
dec = decrease (sc 2 together)
ch = chain
sl st = slip stitch
BLO = back loop only
FLO = front loop only
🐴 Dressage Horse Pattern
Head (Caramel with White Nose)
- MR, 6 sc (6)
- inc x6 (12)
- (sc 1, inc) x6 (18)
- (sc 2, inc) x6 (24)
5–8. sc around (24) - (sc 3, inc) x6 (30)
10–14. sc around (30) - Switch to white, sc around (30)
- (sc 4, inc) x6 (36)
17–22. sc around (36) - Place 14 mm safety eyes between rounds 10–11, ~8 sts apart
- (sc 4, dec) x6 (30)
- (sc 3, dec) x6 (24)
- (sc 2, dec) x6 (18)
- (sc 1, dec) x6 (12)
- dec x6 (6) – FO, stuff firmly
Nostrils: With black yarn or embroidery thread, stitch two small nostrils on either side of the muzzle.
Ears (x2, Caramel – Long and Slim)
- MR, 4 sc (4)
- (sc 1, inc) x2 (6)
- (sc 2, inc) x2 (8)
4–8. sc around (8) – for tall, narrow ears
Flatten and sew to top of head.
Body (Caramel)
- MR, 6 sc (6)
- inc x6 (12)
- (sc 1, inc) x6 (18)
- (sc 2, inc) x6 (24)
- (sc 3, inc) x6 (30)
6–12. sc around (30) - (sc 4, inc) x6 (36)
14–24. sc around (36) - (sc 4, dec) x6 (30)
- (sc 3, dec) x6 (24)
- (sc 2, dec) x6 (18) – FO, stuff firmly
Legs (x4 – Black Hooves, White Socks, Caramel Legs)
Start with black (hooves):
- MR, 6 sc (6)
- inc x6 (12)
- (sc 1, inc) x6 (18)
4–6. sc around (18) - Switch to white, sc 8 rounds (for tall socks)
- Switch to caramel, sc until ~22–24 rounds total
Insert dowel or wire for support, stuff firmly, flatten hooves slightly. FO and sew securely.
Tail
Cut cream yarn strands, attach in bundles to back, knot securely, and brush out.
Mane & Forelock
Attach cream or white yarn strands along neck ridge. Add a shorter section at the forehead for a forelock. Brush lightly.
Tack
- Saddle pad: White rectangle, border in blue, embroider emblem or initials.
- Saddle: Brown oval with increases/decreases for shaping, attach with straps under belly.
- Reins: Black yarn chain, attach as bridle loop across muzzle and behind ears.
- Stirrups: With silver yarn, ch 8, join, sc around for 2 rows. Attach to saddle straps with a short chain so they hang down.
👩🦰 Dressage Rider Pattern
Head (Beige)
- MR, 6 sc (6)
- inc x6 (12)
- (sc 1, inc) x6 (18)
- (sc 2, inc) x6 (24)
5–10. sc around (24) - Insert 10 mm safety eyes between rounds 7–8, embroider small nose and mouth
12–14. sc around (24) - (sc 2, dec) x6 (18)
- (sc 1, dec) x6 (12) – FO, stuff firmly
Helmet (Black)
- MR, 6 sc (6)
- inc x6 (12)
- (sc 1, inc) x6 (18)
- (sc 2, inc) x6 (24)
5–9. sc around (24) - FLO sc around to form small brim
Body (Navy Jacket → White Breeches)
- MR, 6 sc (6)
- inc x6 (12)
- (sc 1, inc) x6 (18)
4–13. sc around in navy (longer jacket length) - Switch to white, sc 8 rounds for pants
Stuff firmly, FO
Arms (x2, with Fingers)
Start with beige (hands):
- MR, 6 sc (6)
- (sc 1, inc) x3 (9)
- sc 2 rounds (9)
- Split into 4 mini tubes (3 sc each) → crochet 2–3 rounds = fingers
- Rejoin into 9 sc, switch to navy (sleeves)
6–12. sc around (9) – FO
Legs (x2 – Breeches and Boots)
With white:
- MR, 6 sc (6)
- inc x6 (12)
3–8. sc around (12)
Switch to black (boots):
9–16. sc around (12) – taller boots
Flatten slightly for soles, FO
Jacket Details
- Embroider 3–4 silver buttons down front
- Add white collar in FLO sc
- Embroider a small crest on left chest
🧩 Assembly & Shaping
- Horse assembly: Sew head to body. Attach ears, mane, and forelock. Attach legs with dowels inside. Add tail and tack (saddle, reins, stirrups).
- Rider assembly: Sew arms and legs to body. Attach head and helmet. Add jacket details.
- Mounting rider: Insert wire through rider’s hips and legs, bend legs around horse’s body. Stitch inner thighs lightly to saddle.
- Hands & reins: Sew reins directly into rider’s fingers for secure hold.
- Stability: Add pellets or weighted pouch inside horse belly. Flatten hooves slightly while sewing. Rider posture is supported with hip/leg wiring.
With its tall horse, flowing mane, elegant tack, and a rider in full dressage attire, this amigurumi set is a masterpiece of crochet craftsmanship. Carefully shaped ears, extended socks, embroidered nostrils, and realistic accessories ensure a photo-accurate result. The finished pair makes an extraordinary handmade centerpiece, showcasing the artistry and grace of equestrian sport in yarn.


