✨ Skill Level
Intermediate
Includes shaping, BLO texture work, and careful assembly for symmetry.
📏 Finished Size
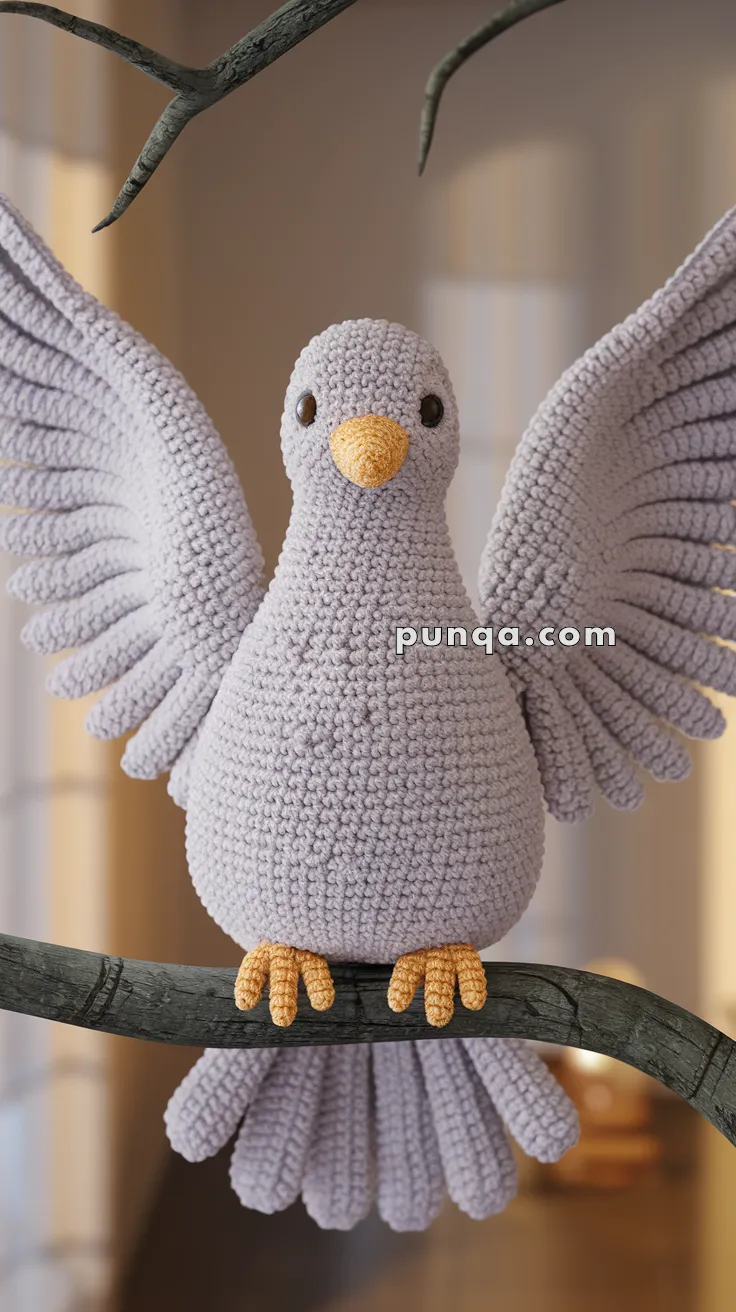
Approx. 23–25 cm (9–10 inches) tall with wings open, using worsted-weight yarn and a 3.5 mm hook.
🧶 Materials
-
Light grey yarn – body, wings, tail
-
Mustard or yellow yarn – beak, feet
-
3.5 mm crochet hook
-
10–12 mm safety eyes (brown or dark amber)
-
Polyester fiberfill
-
Tapestry needle
-
Stitch marker
Optional: thin floral wire for perching display
🧵 Abbreviations (US)
MR – magic ring
sc – single crochet
inc – increase
dec – decrease
BLO – back loop only
sl st – slip stitch
ch – chain
FO – fasten off
🪶 Head & Body (One Piece)
Worked from the top down in continuous rounds.
R1: MR 6 (6)
R2: inc ×6 (12)
R3: (sc, inc) ×6 (18)
R4: (2 sc, inc) ×6 (24)
R5–R8: sc around (24)
Insert safety eyes between R7–R8, 6 sts apart.
R9: (3 sc, inc) ×6 (30)
R10: (4 sc, inc) ×6 (36)
R11–R17: sc around (36)
Begin stuffing the head firmly, shaping slightly oval.
R18: (5 sc, inc) ×6 (42)
R19–R24: sc around (42)
This forms the full chest and belly. Stuff firmly but evenly.
R25: (5 sc, dec) ×6 (36)
R26: (4 sc, dec) ×6 (30)
R27: (3 sc, dec) ×6 (24)
Continue stuffing, tapering toward base.
R28: (2 sc, dec) ×6 (18)
R29: (sc, dec) ×6 (12)
R30: dec ×6 (6)
FO and close. Shape into a rounded pear form.
🧡 Beak
R1: MR 4 (4)
R2: (sc, inc) ×2 (6)
R3–R4: sc around (6)
Lightly stuff at base only.
Sew centered between eyes, angled slightly downward.
✋ Wings (Make 2)
Each wing is a single sculpted piece with built-in ridges.
Wing Base
R1: MR 6 (6)
R2: inc ×6 (12)
R3: (sc, inc) ×6 (18)
R4: (2 sc, inc) ×6 (24)
R5–R6: sc around (24)
Feather Ridges
From this point, work in rows, turning each row.
Row 1: BLO sc 24, ch 1, turn
Row 2: BLO sc 24, ch 1, turn
Row 3: BLO sc 22, dec, ch 1, turn
Row 4: BLO sc 20, dec, ch 1, turn
Row 5: BLO sc 18, dec, ch 1, turn
Row 6: BLO sc 16, dec, ch 1, turn
Row 7: BLO sc 14, dec, ch 1, turn
This creates the layered, ribbed feather look seen in the photo.
FO. Do not stuff.
Sew wings high on the sides of the body, just below the head, angled upward and outward.
🪶 Tail (Single Fan Piece)
R1: MR 6 (6)
R2: inc ×6 (12)
R3: (sc, inc) ×6 (18)
R4–R6: sc around (18)
Turn work and shape tail in rows:
Row 1: sc 18, ch 1, turn
Row 2: sc 18, ch 1, turn
Row 3: sc 16, dec, ch 1, turn
Row 4: sc 14, dec, ch 1, turn
FO. Flatten slightly and curve gently.
Sew to lower back so tail hangs down in a rounded fan.
🐾 Feet (Make 2)
Foot Base
R1: MR 5 (5)
R2–R4: sc around (5)
Do not stuff.
Toes (3 per Foot)
For each toe:
ch 4, sl st back along chain
Attach all three toes to the front edge only, forming a perching grip.
Sew feet to underside of body.
Optional: insert wire through foot and bend toes around a branch.
✂️ Finishing
-
Adjust wings so both sides mirror each other
-
Shape belly and chest with gentle hand sculpting
-
Ensure feet are aligned for balance
🌿 Final Thoughts
This amigurumi dove is designed to feel calm, grounded, and graceful. Its sculpted wings, rounded body, and soft fan tail give it a timeless presence that works beautifully as a decorative piece or symbolic gift. With careful stitching and thoughtful shaping, it becomes a serene handmade companion that feels just as peaceful as it looks.
Happy crocheting 🧶🕊️