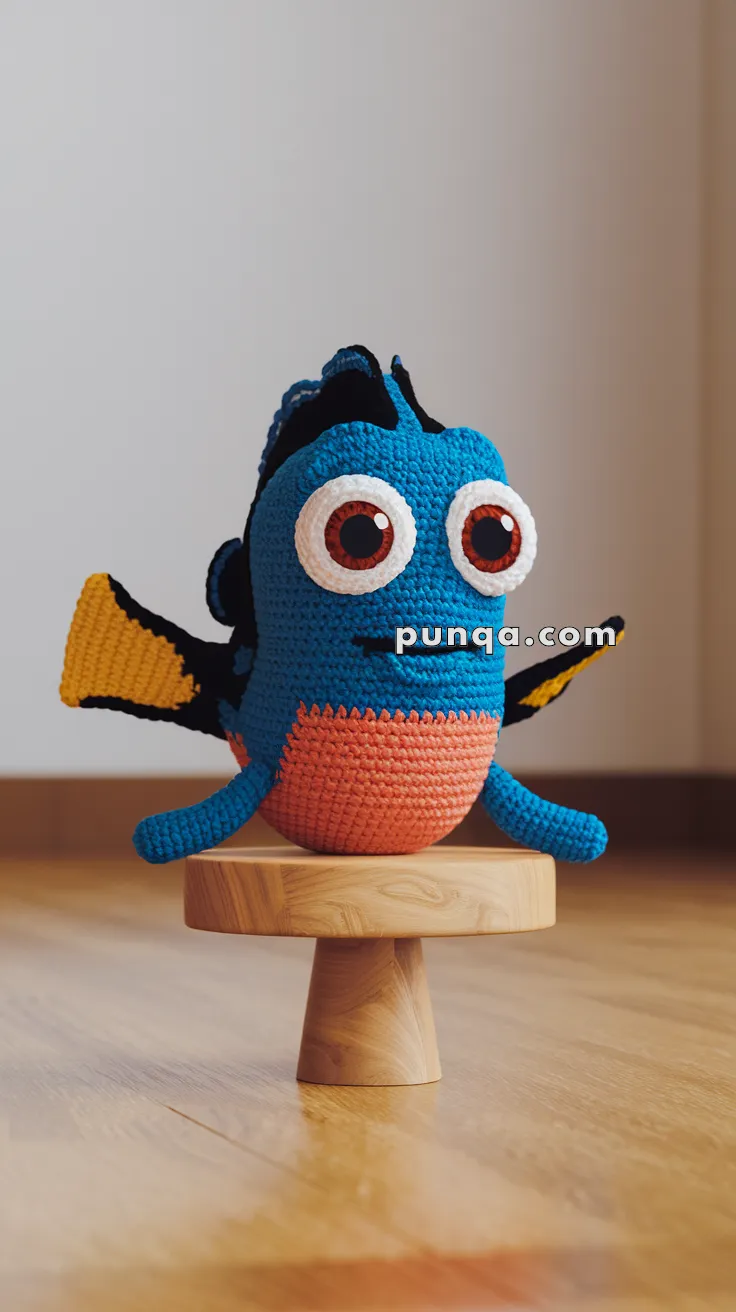
Welcome to the vibrant and whimsical world of amigurumi! 🐠✨ Today, I’m excited to share my free crochet pattern for Dory—a playful and adventurous little fish perfect for ocean lovers, character-inspired collections, or anyone who enjoys crafting expressive and colorful plush designs! 🌊 Whether you love stitching up beloved characters, creating detailed and textured figures, or simply want to add a cheerful Dory to your handmade lineup, this pattern will guide you through crafting a beautifully sculpted plush with bright blue hues, delicate fins, and that signature wide-eyed charm! 💙
This design embraces bold colors, flowing shapes, and intricate details to bring a joyful and animated touch to your crochet projects! 🧶🐟 I’ve carefully outlined each step to ensure your Amigurumi Dory turns out just right—ready to swim into your collection or become a treasured handmade gift! 🎁 So grab your hooks, pick out deep blues, sunny yellows, and soft blacks, and let’s stitch up an irresistibly cute Dory! ✨
🐠 Amigurumi Dory Crochet Pattern
Bring home your favorite forgetful blue tang with this adorable amigurumi Dory! 🐟 With her wide expressive eyes, bold colors, and floppy fins, this cheerful fish is the perfect gift for fans of ocean-themed characters. She’s a fun intermediate project for those looking to dive into character shaping and colorwork!
✨ Skill Level
Intermediate – Includes shaping, color changes, and separate fin attachments.
📏 Finished Size
Approx. 7–8 inches (18–20 cm) long using DK or worsted weight yarn and a 2.5–3 mm hook.
🧶 Materials
Yarn (DK or Worsted weight):
-
Blue (Main body)
-
Coral/Salmon (Belly)
-
Yellow (Side fins)
-
Black (Fins and dorsal details)
-
White (Eye whites)
-
Brown (Eye irises)
Hooks: 2.5–3 mm
10–12 mm safety eyes
Tapestry needle
Stuffing fiberfill
Stitch marker
Black embroidery thread (for mouth)
🧵 Abbreviations (US Terms)
MR – Magic Ring
sc – Single Crochet
inc – Increase (2 sc in same st)
dec – Decrease (sc 2 together)
sl st – Slip Stitch
ch – Chain
FO – Fasten Off
🐟 Body (Start with Coral for Belly)
-
MR, 6 sc [6]
-
inc x6 [12]
-
(sc, inc) x6 [18]
-
(2 sc, inc) x6 [24]
-
(3 sc, inc) x6 [30]
-
(4 sc, inc) x6 [36]
7–11. sc around [36]
Switch to Blue
12–20. sc around [36] -
(4 sc, dec) x6 [30]
-
(3 sc, dec) x6 [24]
-
(2 sc, dec) x6 [18]
– Stuff firmly with fiberfill -
(1 sc, dec) x6 [12]
-
dec x6 [6]
FO, close the hole and weave in the yarn tail.
👀 Eyes (Make 2 – White, then Brown, then Black)
White Sclera:
-
MR, 6 sc [6]
-
inc x6 [12]
FO, leave long tail for sewing.
Brown Iris:
-
MR, 6 sc [6]
FO, sew to center of white piece.
Pupil:
Use black yarn or a small round safety eye in the center. Attach to head between rounds 10–13, spaced approx. 6 stitches apart.
🖤 Top Fin (Black)
-
ch 13
-
sc in 2nd ch and across [12]
3–4. sc across [12]
FO, leave long tail. Pin and sew along top center ridge of the body.
💛 Side Fins (Make 2 – Yellow with Black edging)
Fin Shape (Yellow):
-
MR, 6 sc
-
(sc, inc) x3 [9]
-
(2 sc, inc) x3 [12]
-
sc in next 6, turn
-
dec, 2 sc, dec, sl st
FO Yellow
Edging (Black):
Attach black yarn, sc around the yellow fin. FO, leave tail for attaching to side of body.
💙 Tail Fin (Blue with Black Edge)
-
ch 10
-
sc in 2nd ch from hook and across [9]
3–5. sc across [9]
FO, fold flat to create triangle-ish fin and edge in black. Sew to the back of the body.
🧵 Small Side Fins (Blue – Under Body)
-
MR, 6 sc
2–5. sc around [6]
Flatten and FO. Sew on each side near the belly for floppy fins.
😄 Facial Features
-
Use black embroidery thread to stitch a small curved smile.
-
Add eyelid accents with a few stitches of blue yarn if desired.
✂️ Finishing Touches
-
Weave in all yarn tails.
-
Shape fins and eyes with gentle tugging or slight blocking.
-
For added durability, stitch around the base of each fin twice.
💡 Customization Tips
-
Add sparkle embroidery to the eyes for a dreamy look
-
Attach a loop on top to hang as nursery décor
-
Scale up using thicker yarn and a larger hook
Your cheerful little Dory is ready to swim off into adventure! 🌊🐟