Hey there! 😊 I’ve recently delved into the adorable world of amigurumi, and let me tell you, there’s something incredibly delightful about crocheting these little cuties. If you’re like me and have a soft spot for all things cute, then a donut amigurumi pattern is bound to win your heart. The possibilities are endless with the wide array of colors and embellishments you can add to these crochet treats – from chocolate frosting to colorful sprinkles. Not only do they make fantastic stress-relievers while you’re crafting them, but they also add a pop of joy to any room!
Now, let’s chat about the process. Starting with a simple pattern, all you need is some basic crochet skills, yarn in your favorite donut colors, a crochet hook, and a sprinkle of creativity ✨. The beauty of amigurumi is that they’re small and manageable, making the process less daunting for beginners. You begin with the classic circular shape, crocheting in the round as you build your donut. Adding details like icing and sprinkles is where the magic happens, transforming your yarn into something irresistibly charming. Watching your creation come to life stitch by stitch is incredibly satisfying, and before you know it, you’ll be hooked on making these sweet treats! 🍩
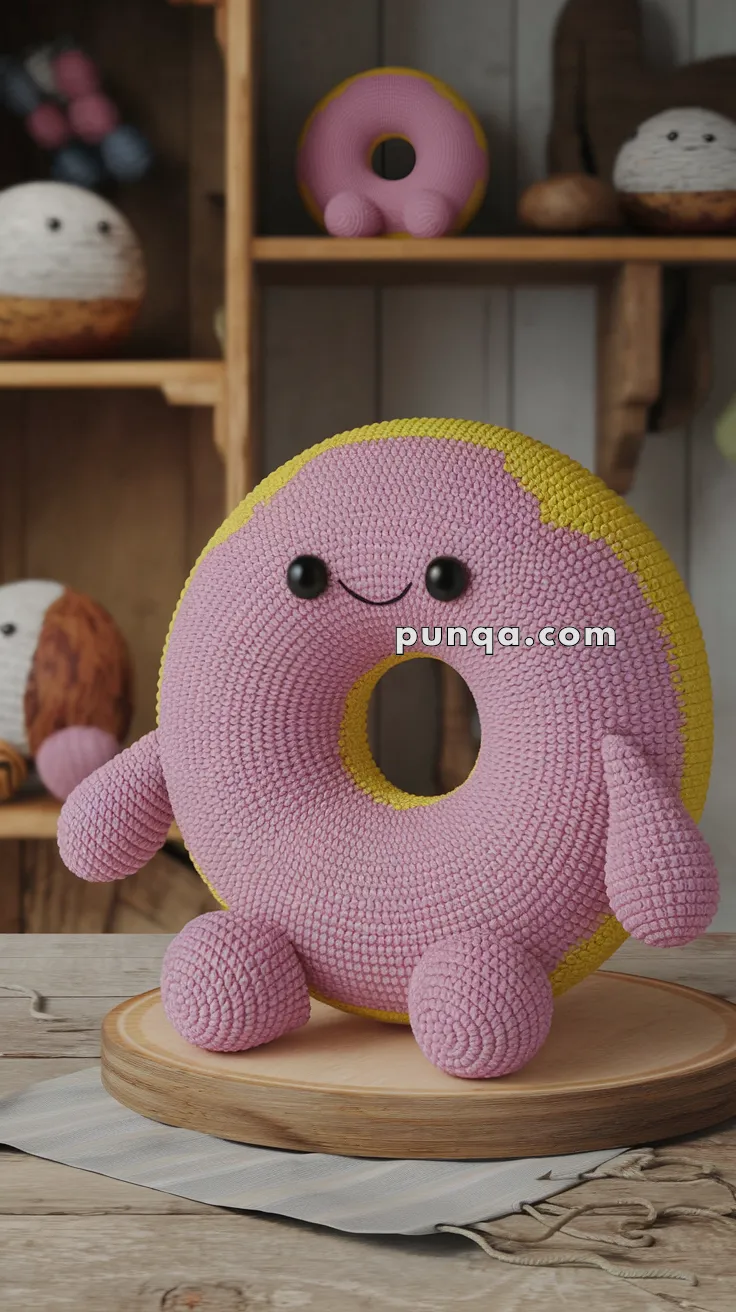
🍩 Amigurumi Donut – Free Crochet Pattern
✨ Skill Level
Beginner to Intermediate
📏 Finished Size
Approx. 20–25 cm (8–10 in) diameter with chunky or velvet yarn and 4 mm hook
✂️ Materials
-
Pink yarn (frosting)
-
Yellow yarn (donut base)
-
Matching yarn in both colors for sewing
-
Black embroidery thread (mouth)
-
10–12 mm safety eyes (2)
-
Fiberfill stuffing
-
Stitch marker
-
Yarn needle
-
Scissors
🧵 Abbreviations (US Terms)
-
MR – Magic Ring
-
sc – Single Crochet
-
inc – Increase
-
dec – Decrease
-
BLO – Back Loop Only
-
FLO – Front Loop Only
-
ch – Chain
-
sl st – Slip Stitch
-
FO – Fasten Off
🍩 Donut Ring (Make 2 Panels)
With yellow yarn:
-
MR, 6 sc
-
inc x6 (12)
-
(sc, inc) x6 (18)
-
(2 sc, inc) x6 (24)
-
(3 sc, inc) x6 (30)
-
(4 sc, inc) x6 (36)
-
(5 sc, inc) x6 (42)
-
(6 sc, inc) x6 (48)
-
(7 sc, inc) x6 (54)
-
(8 sc, inc) x6 (60)
11–13. sc around (60)
Do not fasten off 2nd piece. Place both donut rings back to back and continue crocheting around through both loops to join.
Stuff gradually as you go.
14–15. sc around both pieces (60)
FO and weave in ends.
🍓 Frosting (Top Surface)
With pink yarn:
-
Repeat Rounds 1–10 from above (end at 60 sts)
-
Use wave pattern: (3 sc, inc, 2 sc, dec, 4 sc) repeat around to mimic frosting edge
FO, leave long tail.
Sew frosting only to the top ring (use pink thread), lightly tacking it in place.
🧸 Arms (Make 2)
With pink yarn:
-
MR, 6 sc
-
inc x6 (12)
3–7. sc (12) -
(2 sc, dec) x3 (9)
Stuff lightly
9–12. sc (9)
FO, sew to sides of donut at frosting seam.
🦶 Legs (Make 2)
With pink yarn:
-
MR, 6 sc
-
inc x6 (12)
3–6. sc (12)
Stuff lightly -
(sc, dec) x4 (8)
-
sc around (8)
FO, sew to bottom of donut.
😊 Face
-
Insert safety eyes about 4 stitches apart on frosting
-
Use black thread to embroider a cute smile
-
Optional: Add felt cheeks or blush yarn
✅ Final Touch
Place the donut upright with arms and feet for a cheerful sitting plush. Add sprinkles or a hanging loop if you’d like to use it as decor!


