Welcome to the charming and playful world of amigurumi! 🐴✨ Today, I’m excited to share my free crochet pattern for an Amigurumi Donkey—a delightful and cuddly creation perfect for farm animal lovers, whimsical décor, or anyone who enjoys crafting expressive and adorable plush designs! 🧶 Whether you love stitching up lovable creatures, experimenting with textured details, or simply want to add a sweet donkey to your handmade lineup, this pattern will guide you through crafting a beautifully sculpted plush with floppy ears, a tufted mane, and a touch of rustic charm! 🌾
This design embraces soft grays, earthy browns, and intricate shaping to bring a heartwarming and cheerful presence to your crochet projects! 🧶✨ I’ve carefully outlined each step to ensure your Amigurumi Donkey turns out just right—ready to trot into your collection or become a treasured handmade gift! 🎁 So grab your hooks, pick out classic donkey hues, and let’s stitch up an adorable donkey! 🐴
🐴 Amigurumi Donkey Crochet Pattern
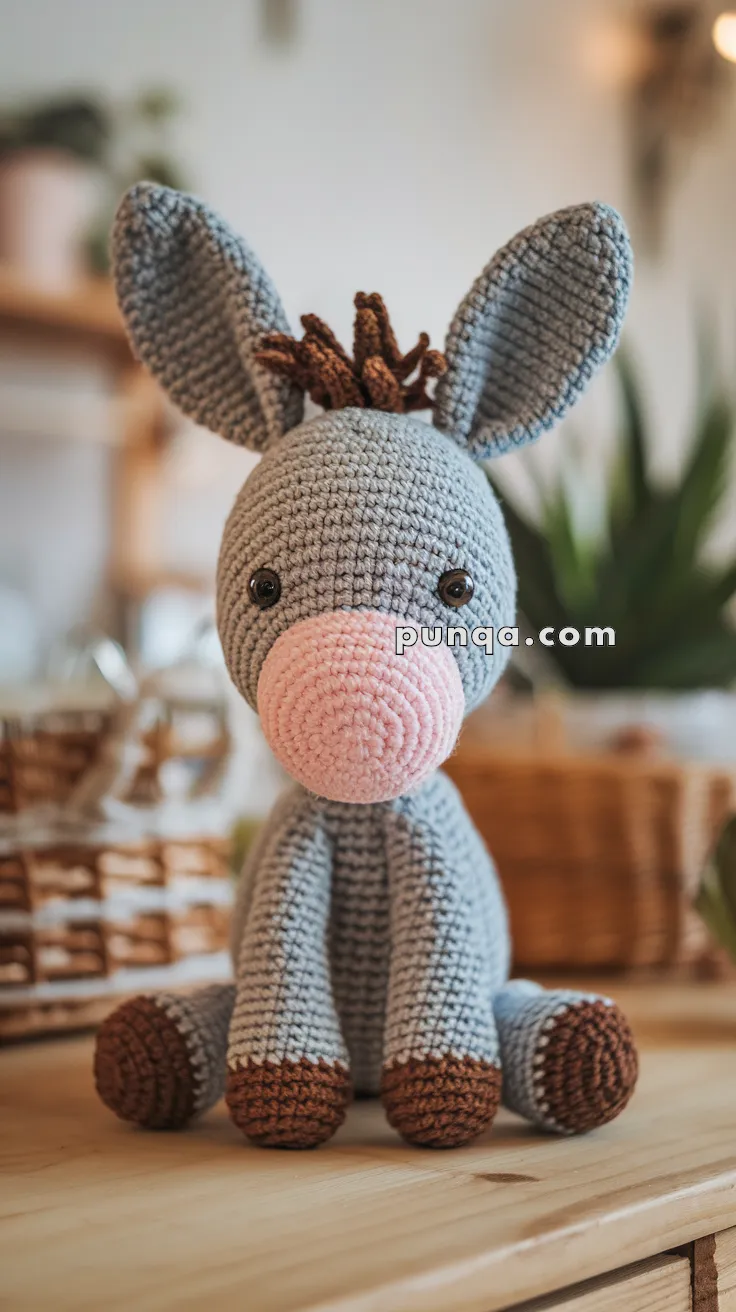
Say hello to this irresistibly cute amigurumi donkey! With a soft grey body, a pink snout, big floppy ears, and sturdy brown hooves, this little friend is perfect for animal lovers and a wonderful addition to your handmade toy collection. Great for cuddles, nursery decor, or gifting! 🧶💗
✨ Skill Level
Beginner to Intermediate – basic shaping, color changes, and simple sewing involved.
📏 Finished Size
Approximately 25–28 cm (10–11 in) tall when made with worsted weight yarn and a 3.0 mm hook.
🧶 Materials Needed
-
Yarn (Worsted/Aran, cotton or acrylic blend)
-
Light grey (main body)
-
Pink (snout)
-
Dark brown (hooves, mane tuft)
-
-
3.0 mm crochet hook
-
12 mm safety eyes
-
Stuffing (polyester fiberfill)
-
Yarn needle for sewing pieces together
-
Scissors
-
(Optional) Wire or felt strips for ears
🪡 Abbreviations (US Terms)
-
MR = Magic Ring
-
sc = single crochet
-
inc = increase (2 sc in one stitch)
-
dec = decrease (sc two stitches together)
-
ch = chain
-
sl st = slip stitch
-
FO = fasten off
🐴 Pattern Instructions
Head (Grey)
-
MR 6 (6)
-
inc ×6 (12)
-
(sc 1, inc) ×6 (18)
-
(sc 2, inc) ×6 (24)
-
(sc 3, inc) ×6 (30)
-
(sc 4, inc) ×6 (36)
-
(sc 5, inc) ×6 (42)
8–16. sc around (42) -
(sc 5, dec) ×6 (36)
-
(sc 4, dec) ×6 (30)
-
(sc 3, dec) ×6 (24)
Stuff firmly. FO.
Snout (Pink, Large and Round)
-
MR 8 (8)
-
inc ×8 (16)
-
(sc 1, inc) ×8 (24)
-
(sc 2, inc) ×8 (32)
5–8. sc around (32) -
(sc 2, dec) ×8 (24)
-
sc around (24)
Stuff firmly, sew onto lower half of head.
Ears (Make 2, Grey – Tall and Upright)
-
MR 6 (6)
-
(sc 1, inc) ×3 (9)
-
(sc 2, inc) ×3 (12)
-
(sc 3, inc) ×3 (15)
5–20. sc around (15)
Flatten, FO, and sew to top of head.
👉 Optional: Insert a thin wire or felt strip for support.
Body (Grey, Short and Round)
-
MR 6 (6)
-
inc ×6 (12)
-
(sc 1, inc) ×6 (18)
-
(sc 2, inc) ×6 (24)
-
(sc 3, inc) ×6 (30)
6–10. sc around (30) -
(sc 3, dec) ×6 (24)
-
(sc 2, dec) ×6 (18)
Stuff well. FO.
Arms (Make 2, Grey + Brown Hooves)
Start with brown:
-
MR 6 (6)
-
inc ×6 (12)
3–4. sc around (12)
Switch to grey:
5–12. sc around (12)
Stuff lightly. FO.
Legs (Make 2, Grey + Brown Hooves, Stubby)
Start with brown:
-
MR 6 (6)
-
inc ×6 (12)
-
(sc 1, inc) ×6 (18)
4–5. sc around (18)
Switch to grey:
6–12. sc around (18)
Stuff firmly. FO.
Mane Tuft (Brown, Spiky)
Make 6–8 short cords:
-
Ch 10, sl st back (9). FO.
Sew all strands tightly on top of head to create a tuft.
Tail (Grey with Brown Tip)
-
MR 6 (6)
2–8. sc around (6)
FO. Add a few brown yarn cords at the end for a tuft. Attach to back.
Eyes
-
Insert 12 mm safety eyes close to snout, evenly spaced.
-
Embroider a small white dot for highlight.
🧵 Assembly
-
Sew snout securely to lower front of head.
-
Attach safety eyes on both sides of snout.
-
Sew ears tall and upright.
-
Attach head to body.
-
Sew arms to the sides and legs to the bottom.
-
Add mane tuft and tail.
🎀 Finishing Touches
-
Position the legs wide apart so the donkey sits stably.
-
Use firm stuffing in the snout to keep its round, protruding shape.
-
Gently shape ears inward for a playful look.
🌟 Final Thoughts
Your amigurumi donkey is now complete! This amigurumi donkey is full of charm and character, perfect for gifting, storytelling, or just giving cuddles. Easy to customize and sure to bring a smile to every face! 🐴🧵💫