Creating amigurumi is like embarking on a delightful adventure where yarn, imagination, and a bit of patience come together to craft something truly magical. 🧶🐬 One of the most enchanting projects I’ve come across is the dolphin calf amigurumi. There’s something about the playful nature of dolphins that makes them so endearing, and capturing that spirit in a crocheted form is both challenging and rewarding. Picture a cute little dolphin calf with its innocent eyes and gentle curves, just waiting to be brought to life. Each stitch is a step closer to creating a charming companion who’s irresistibly squishable and huggable.
The process of making an amigurumi dolphin calf begins with selecting the perfect yarn—soft and durable, preferably in shades of ocean blue or soft gray. 🐬✨ I love how the texture of the yarn adds depth to the dolphin’s form, making it appear almost lifelike. Then, it’s all about diving into the pattern, following the instructions meticulously while still allowing room for a personal touch. Crocheting each section, from the playful fins to the gentle smile, feels like painting with yarn. The real joy comes as the separate pieces are stitched together, transforming into a lovable creature that seems to swim right off the hook.
🐬 Amigurumi Dolphin Calf Crochet Pattern
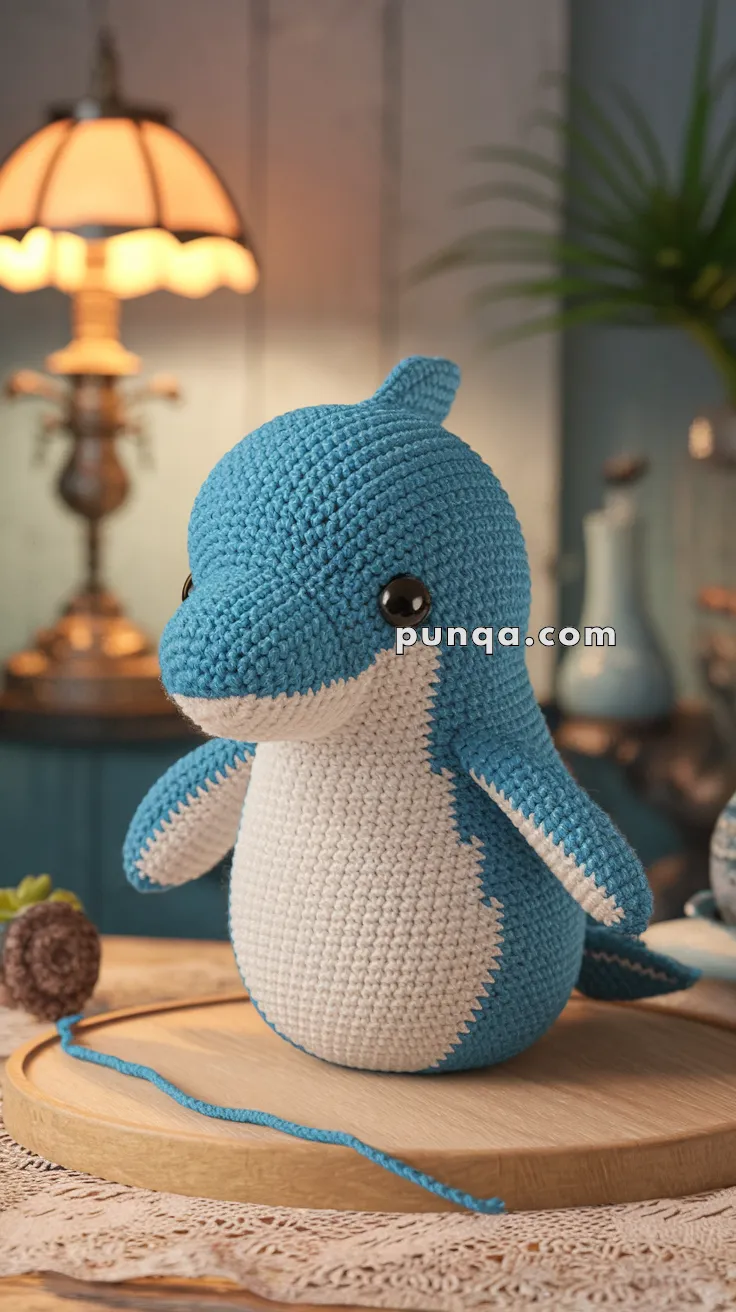
Dive into the world of amigurumi with this absolutely adorable dolphin calf! With its characteristic rounded belly, sweet little snout, and playful flippers, this cuddly sea creature is perfect for marine animal lovers, nursery decor, or as a heartwarming handmade gift.
🧶 Skill Level
Beginner–Intermediate
Perfect for crocheters who are comfortable with basic stitches and simple shaping!
📏 Finished Size
Approximately 7–9 inches (18–23 cm) tall when seated
🪡 Materials Needed
Yarn:
- DK or worsted weight yarn in:
- Blue or turquoise (main body color) – approximately 50g
- White or cream (belly and snout) – approximately 30g
Other Supplies:
- 2.5–3.5 mm crochet hook (size appropriate for your yarn)
- 10–12 mm black safety eyes
- Polyester fiberfill stuffing
- Stitch marker
- Tapestry needle
- Scissors
- Optional: pink blush or eyeshadow for cheeks
🧵 Abbreviations (US Terms)
- MR – magic ring
- sc – single crochet
- inc – increase (2 sc in same stitch)
- dec – invisible decrease
- ch – chain
- sl st – slip stitch
- FO – fasten off
- ( ) x# – repeat instructions in parentheses the number of times indicated
📝 Pattern Notes
- Work in continuous rounds unless otherwise stated
- Use a stitch marker to track the beginning of each round
- Stuff firmly as you go for better shaping
- All pieces are worked in spiral rounds (do not join)
- When switching colors, carry the non-working color inside the body if desired, or cut and rejoin
🐬 PATTERN
HEAD & BODY (worked in one piece, starting from top)
Start with BLUE yarn
R1: MR, 6 sc (6)
R2: inc x6 (12)
R3: (1 sc, inc) x6 (18)
R4: (2 sc, inc) x6 (24)
R5: (3 sc, inc) x6 (30)
R6–12: sc around (30) — 7 rounds total
R13: (4 sc, inc) x6 (36)
R14–16: sc around (36) — 3 rounds
👀 EYE PLACEMENT: Insert safety eyes between R10 and R11, approximately 7-8 stitches apart. Secure the backings now before continuing.
Switch to WHITE/CREAM yarn
R17–20: sc around (36) — 4 rounds with white for belly
Switch back to BLUE yarn
R21–24: sc around (36) — 4 rounds in blue
Begin stuffing firmly and continue as you go
R25: (4 sc, dec) x6 (30)
R26: (3 sc, dec) x6 (24)
R27: (2 sc, dec) x6 (18)
R28: (1 sc, dec) x6 (12)
Stuff firmly
R29: dec x6 (6)
FO and close the opening with tapestry needle. Weave in end securely.
🐬 SNOUT/ROSTRUM
Work with WHITE/CREAM yarn
R1: MR, 6 sc (6)
R2: (1 sc, inc) x3 (9)
R3: (2 sc, inc) x3 (12)
R4–5: sc around (12) — 2 rounds
R6: (2 sc, dec) x3 (9)
R7: (1 sc, dec) x3 (6)
FO, leaving a long tail for sewing (at least 12 inches).
Assembly:
- Stuff lightly with fiberfill to create a rounded shape
- Position snout centered on the face, between and slightly below the eyes
- The snout should sit where the blue transitions to white belly
- Sew securely all around, ensuring it protrudes naturally like a dolphin’s beak
- Take your time to shape it properly for that characteristic dolphin look
🐟 FLIPPERS (Make 2)
Work with BLUE yarn
R1: MR, 6 sc (6)
R2: (1 sc, inc) x3 (9)
R3–7: sc around (9) — 5 rounds
R8: (1 sc, dec) x3 (6)
FO, leaving a long tail for sewing (at least 10 inches). Do not stuff.
Flatten the opening and sew it closed to create an oval shape.
Placement: Attach flippers to the sides of body at approximately R18-20 (around the white belly area), positioned slightly toward the front. Angle them slightly downward and outward for a natural swimming pose.
🐳 TAIL FLUKES (Make as one continuous piece)
Work with BLUE yarn
This creates the horizontal tail flukes characteristic of dolphins.
Right Fluke:
R1: Ch 8, sc in 2nd ch from hook and in next 6 ch (7)
R2: Ch 1, turn, inc, 5 sc, inc (9)
R3: Ch 1, turn, inc, 7 sc, inc (11)
R4: Ch 1, turn, sc across (11)
R5: Ch 1, turn, dec, 7 sc, dec (9)
R6: Ch 1, turn, dec, 5 sc, dec (7)
R7: Ch 1, turn, dec, 3 sc, dec (5)
R8: Ch 1, turn, dec, 1 sc, dec (3)
Do not FO. Ch 4 to create center notch between flukes.
Left Fluke (mirror of right):
R9: Sc in 2nd ch from hook and next 2 ch (3), then continue building the left fluke:
R10: Ch 1, turn, inc, 1 sc, inc (5)
R11: Ch 1, turn, inc, 3 sc, inc (7)
R12: Ch 1, turn, inc, 5 sc, inc (9)
R13: Ch 1, turn, inc, 7 sc, inc (11)
R14: Ch 1, turn, sc across (11)
R15: Ch 1, turn, dec, 7 sc, dec (9)
R16: Ch 1, turn, dec, 5 sc, dec (7)
R17: Ch 1, turn, dec, 3 sc, dec (5)
R18: Ch 1, turn, dec, 1 sc, dec (3)
FO, leaving a long tail for sewing (at least 12 inches).
Optional finishing: You can sc around the entire perimeter of both flukes for a cleaner, more defined edge.
Assembly:
- Keep tail completely flat (do not stuff)
- Position horizontally at the back bottom of the body (around R26-28 area)
- The flukes should extend left and right, lying flat like a real dolphin’s tail
- Sew securely all around where it attaches to the body
- You can add a few reinforcing stitches on the underside for durability
🌊 DORSAL FIN (Top Fin)
Work with BLUE yarn
R1: MR, 5 sc (5)
R2: (1 sc, inc) x2, 1 sc (7)
R3: sc around (7)
R4: (1 sc, inc) x3, 1 sc (10)
R5: sc around (10)
R6: (1 sc, dec) x3, 1 sc (7)
R7: (1 sc, dec) x2, 1 sc (5)
R8: dec x2, 1 sc (3)
FO, leaving a long tail for sewing. Do not stuff.
Flatten the fin to create a triangular shape.
Placement: Sew to the top center-back of the body, approximately at R8-11, positioning it so it curves slightly backward. The fin should stand upright with a natural curve.
🧷 ASSEMBLY GUIDE & ORDER
Follow this order for best results:
- Eyes: Already secured during body construction (between R10-11)
- Snout: Sew to face, centered between eyes where blue meets white belly
- Dorsal Fin: Attach to top center-back, curved slightly backward
- Flippers: Sew to sides around the white belly area (R18-20), angled down and out
- Tail Flukes: Attach horizontally at bottom-back of body, extending left-right
- Weave in ends: Secure all loose yarn ends inside the body
✨ FINISHING TOUCHES
Optional Enhancements:
- Smile: Embroider a gentle curved smile with black embroidery thread below and between the snout and eyes
- Blush: Apply pink fabric-safe blush, chalk pastel, or eyeshadow to the cheeks (where white meets blue on sides of face)
- Eye highlights: Add tiny white felt circles or white paint dots to safety eyes for a sparkly, lively look
- Belly definition: You can add a few horizontal stitch lines on the white belly for texture
- Expression: The photo shows a sweet, simple face – less is more!
🎨 CUSTOMIZATION IDEAS
- Color variations:
- Grey and white for a realistic bottlenose dolphin
- Pink and white for a rare river dolphin look
- Pastel colors (lavender, mint, peach) for a kawaii style
- Ombre effect transitioning from dark to light blue
- Size variations:
- Use fingering/sport weight yarn with 2mm hook for a 4-5″ mini version
- Use bulky yarn with 5mm hook for a 12-14″ jumbo cuddle buddy
- Accessories:
- Tiny sailor hat with ribbon
- Small bow between the dorsal fin
- Seashell or starfish friend
- Pearl necklace
- Create a family: Make multiple dolphins in graduating sizes – baby, child, and parent!
📸 STYLING & PHOTOGRAPHY TIPS
Your finished dolphin will look adorable when photographed:
- Props: Wooden slice or round plate (as shown in photo), driftwood, shells, coral, blue fabric waves
- Lighting: Soft natural light from a window, or warm lamp light for cozy ambiance
- Background: Neutral tones (beige, soft grey, white) or ocean blues and teals
- Setting: Create a cozy scene with plants, vintage lamps, or beach-themed decor
- Angle: Slight front-facing angle shows off the snout and round belly best
🔍 TROUBLESHOOTING TIPS
Snout looks flat? Make sure to stuff it lightly and shape it as you sew, pinching it to create dimension.
Body leaning to one side? Ensure even, firm stuffing throughout. Add more stuffing to one side if needed.
Flippers sticking out too much? Flatten them more before sewing and angle them closer to the body.
Tail won’t stay horizontal? Add more reinforcing stitches underneath where it attaches, and ensure it’s sewn flat against the body.
White belly too high/low? The switch should happen around R17 so the white shows on the front chest/belly area when viewing from the front.
Fin won’t stand up? Use a bit of fabric stiffener or insert a small piece of plastic canvas inside before sewing.
💙 CARE INSTRUCTIONS
- Washing: Hand wash gently in cool water with mild detergent, reshape and air dry flat
- Cleaning: Spot clean with damp cloth for minor dirt
- Storage: Keep in a cool, dry place away from direct sunlight to prevent fading
- Safety: Not recommended for children under 3 due to safety eye choking hazard. For babies, embroider eyes instead.
📐 YARN & GAUGE NOTES
Gauge: Approximately 24 sts x 26 rows = 4″ in sc (though exact gauge isn’t critical for amigurumi)
Yarn weight notes:
- DK weight (light worsted/3) with 3mm hook = standard size shown
- Worsted weight (4) with 3.5mm hook = slightly larger (9-11″)
- Sport weight (2) with 2.5mm hook = smaller (5-7″)
Recommended yarn types:
- Cotton: Holds shape well, machine washable, great stitch definition
- Acrylic: Budget-friendly, soft, widely available, easy care
- Cotton/acrylic blend: Best of both worlds – shape retention and softness
⏱️ TIME ESTIMATE
- Body: 1.5-2 hours
- Snout: 15 minutes
- Flippers (both): 30 minutes
- Tail flukes: 45 minutes
- Dorsal fin: 15 minutes
- Assembly: 45 minutes to 1 hour
Total time: 4-5 hours for an intermediate crocheter
💙 Final Thoughts
This sweet dolphin calf captures the playful spirit and gentle nature of these beloved marine mammals! The rounded body, characteristic protruding snout, and horizontal tail flukes give it authentic dolphin charm, while the plump proportions and sweet expression keep it irresistibly cuddly.
Perfect for:
- Ocean-themed nurseries
- Marine biology enthusiasts
- Beach house decor
- Gifts for animal lovers
- Teaching children about sea life
- Your own cuddle companion collection!
Happy crafting! 🧶💙