Oh, the delightful world of amigurumi! 🎉 Every stitch tells a story and brings a tiny creation to life in the palm of your hand. There’s just something wonderfully enchanting about creating amigurumi dollhouses. It’s like shrinking down the charm of a cozy home into the most adorable, pocket-sized version. Imagine capturing the essence of a full-sized dollhouse—with its little rooms, tiny furniture, and miniature inhabitants—but in crochet form! ✨ It’s an adventure in creativity that invites us to play with colors, textures, and the sweet challenge of making something so intricately detailed yet small enough to fit on a shelf.
The process itself is an absolute joyride! 🚀 It starts with a burst of inspiration—perhaps a vintage dollhouse or a whimsical cottage from a storybook. From there, I dive into planning each room and its decor, choosing soft yarns in an array of colors that will bring the mood to life. The pattern-making is like solving a delightful puzzle; figuring out the perfect stitch count to craft a kitchen table or the tiniest crocheted bed. 🛌 Piece by piece, each little component comes together. There’s a magical moment when the last stitch is tied off, and the whole miniature universe is assembled, ready to charm anyone who beholds it. It’s heartfelt craftsmanship that leaves me grinning from ear to ear every time! 🥰
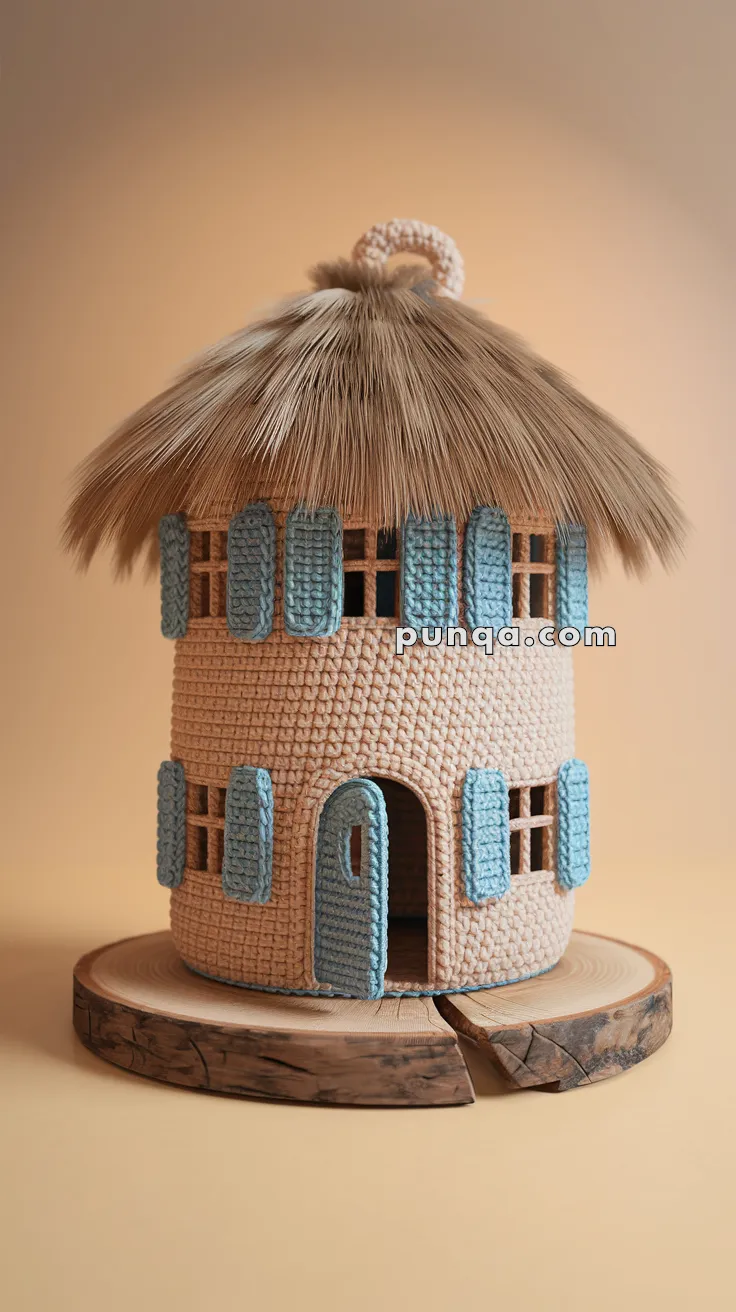
This cozy handmade crochet dollhouse is full of charm, featuring a cylindrical base, working shutters, and a whimsical thatched roof. It’s perfect for fairyland setups, imaginative play, or home decor!
✨ Skill Level
Intermediate – Involves shaping, structural assembly, and sewing multiple components.
📏 Finished Size
Approx. 9–11 inches (23–28 cm) tall, using worsted yarn and a 3.0–3.5 mm hook.
🧶 Materials
Worsted weight yarn in:
Beige or cream (main structure)
Sky blue (shutters, door)
Brown or tan (roof base)
Crochet hook (3.0 mm or size appropriate for your yarn)
Tapestry needle
Stitch markers
Cardboard or plastic canvas (optional, for extra stability)
Raffia yarn or faux fur yarn (for roof texture)
Hot glue (optional for attaching faux fur)
Fiberfill (for optional soft roof core)
🧵 Abbreviations (US Terms)
MR – Magic Ring sc – Single Crochet inc – Increase dec – Decrease ch – Chain sl st – Slip Stitch FO – Fasten Off BLO/FLO – Back Loop Only / Front Loop Only
🏠 House Body (Beige)
Worked in continuous rounds from base up.
MR, 6 sc
inc x6 (12)
(1 sc, inc) x6 (18)
(2 sc, inc) x6 (24)
(3 sc, inc) x6 (30)
(4 sc, inc) x6 (36)
(5 sc, inc) x6 (42) 8–35. sc around (42) – Add cardboard circle inside bottom for base support – FO, weave in end
🚪 Front Door (Sky Blue – Make 1)
ch 8
sc in 2nd ch, sc across (7), ch 1, turn 3–10. sc (7)
sc, dec, sc, sc, dec, sc (5)
dec, sc, dec (3)
sc (3) – FO, leave long tail for sewing – Optionally add a slit or stitch a door knob
🪟 Window Shutters (Sky Blue – Make 6–8)
ch 6
sc in 2nd ch, sc across (5), ch 1, turn 3–6. sc (5) – FO, leave tail for sewing – Sew two on either side of a window space for each opening
🧱 Windows (Frame Openings)
You can crochet open frames or cut small rectangular holes evenly spaced before round 20 of the house body. Use stitch markers to mark placements:
Each window is approx. 5 sts wide x 3 rounds high
You can skip stitches and chain the width on a round, then reconnect on the next
🧢 Roof Base (Brown Yarn – Circle)
MR, 6 sc
inc x6 (12)
(1 sc, inc) x6 (18)
(2 sc, inc) x6 (24)
(3 sc, inc) x6 (30)
(4 sc, inc) x6 (36)
(5 sc, inc) x6 (42) – Continue to match diameter of house top (~42–48 sts) – FO, sew or glue on top of body
🌾 Thatch Roof (Faux Fur or Raffia Yarn)
Option 1: Loop stitch method
Use loop stitch rows to simulate straw
Attach in concentric circles to the top
Option 2: Faux Fur Cap (shown)
Cut faux fur or use fuzzy yarn
Create a circle to match the roof base and hot glue or sew around the top circle
For hanging loop: ch 10, sl st to form loop, sew securely to center top
This amigurumi dollhouse is a whimsical little world in itself — ready to welcome your tiny crochet friends or simply bring joy to your decor shelf! 🧵🏡💙