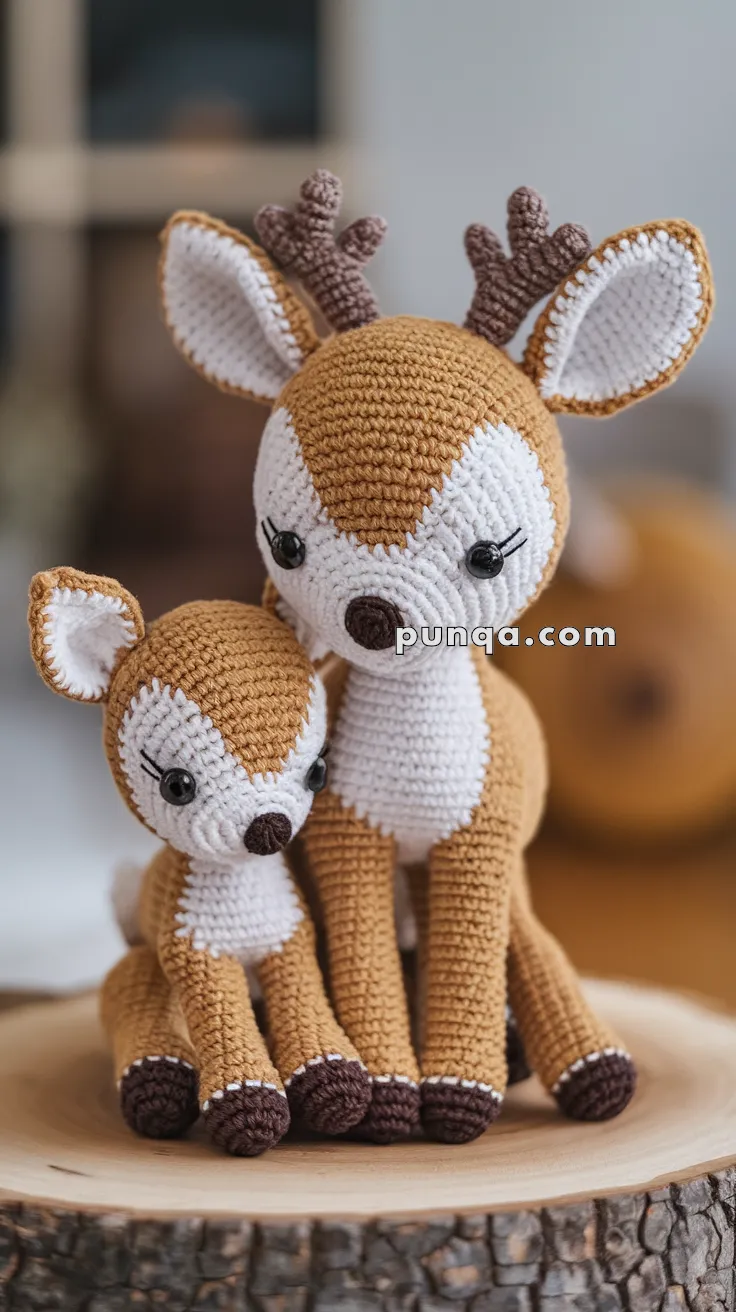
Capture the gentle beauty of the forest with this Amigurumi Deer With Fawn crochet pattern! This heartwarming duo features a graceful mama deer and her sweet little fawn, nestled together in soft stitches and woodland charm. With their delicate spots, floppy ears, and loving expressions, these two are perfect for nature lovers, nursery decor, or anyone who adores crafting tender moments in yarn. 🦌🧶🌿
Designed for warmth and whimsy, this pattern invites you to play with earthy tones, textured details, and sweet extras like a flower crown, leafy base, or even a tiny woodland friend. Whether you’re creating a keepsake gift, adding to your amigurumi menagerie, or simply stitching for the joy of it, this Deer With Fawn set is a peaceful and satisfying project—perfect for bringing a touch of handmade love to every stitch. 💖✨🍂
🦌 Amigurumi Deer & Fawn Crochet Pattern
This tender deer and fawn pair captures the calm, cozy charm of a woodland moment. Both figures sit naturally with long slender legs, softly rounded hooves, expressive eyes, and distinctive white face and chest markings. The adult deer features small textured antlers, while the fawn mirrors the same shape in a smaller, sweeter scale.
Perfect for nursery décor, shelf displays, or heartfelt handmade gifts.
✨ Skill Level
Intermediate
Includes shaping, precise color changes, slim limbs, and clean facial placement.
📏 Finished Size (Approximate)
Using DK yarn and a 2.5 mm hook:
• Adult deer: 23–25 cm (9–10 in) tall seated
• Fawn: 15–18 cm (6–7 in) tall seated
🧶 Materials
Yarn (DK / Sport weight cotton or acrylic):
• Warm light brown – main body
• White – face blaze, chest, belly, inner ears
• Dark brown – hooves, nose, antlers
Notions & Tools
• Crochet hook: 2.5 mm
• Safety eyes: 10–12 mm (adult), 8–10 mm (fawn)
• Polyester fiberfill
• Tapestry needle
• Stitch marker
• Optional: black embroidery thread for eyelashes
🪡 Abbreviations (US Terms)
MR – magic ring
sc – single crochet
inc – increase
dec – decrease
sl st – slip stitch
ch – chain
FO – fasten off
BLO – back loop only
🎨 Clean Color Change Tip
On the final stitch before switching colors, pull through the new color on the last yarn over. Carry unused yarn inside the piece for smooth, invisible joins.
🦌 Adult Deer Pattern
Head (White → Brown)
MR 6 sc
inc ×6 (12)
(1 sc, inc) ×6 (18)
(2 sc, inc) ×6 (24)
(3 sc, inc) ×6 (30)
Rounds 6–8: sc around (30)
Switch to brown
Rounds 9–14: sc around (30)
(3 sc, dec) ×6 (24)
(2 sc, dec) ×6 (18)
Insert safety eyes between Rounds 7–8, about 7 stitches apart.
Stuff firmly.
(1 sc, dec) ×6 (12)
dec ×6 (6)
FO and close.
Nose (Dark Brown)
MR 5 sc
Round 2: sc around
FO, lightly stuff, sew centered low on white muzzle.
Body (White → Brown)
MR 6 sc
inc ×6 (12)
(1 sc, inc) ×6 (18)
(2 sc, inc) ×6 (24)
(3 sc, inc) ×6 (30)
Rounds 6–8: sc around (30)
Switch to brown
Rounds 9–16: sc around (30)
(3 sc, dec) ×6 (24)
(2 sc, dec) ×6 (18)
Stuff firmly, shaping a rounded seated base.
(1 sc, dec) ×6 (12)
dec ×6 (6)
FO and close.
Legs (Make 4 – Long & Slim)
Start with dark brown (hoof):
MR 6 sc
inc ×6 (12)
Rounds 3–4: sc around (12)
Switch to brown
Rounds 5–20: sc around (12)
Lightly stuff only the lower half.
Flatten top and sl st closed.
FO, leave long tail.
The finished legs should appear straight and elongated, not chunky.
Ears (Outer Brown ×2, Inner White ×2)
MR 6 sc
(1 sc, inc) ×3 (9)
Rounds 3–5: sc around (9)
Sew each white ear piece onto a brown ear.
Fold slightly and attach high on the head.
Antlers (Adult Only – Dark Brown)
MR 4 sc
Rounds 2–6: sc around (4)
First branch:
ch 4, sc back down chain, sl st to stem
Second branch:
ch 3, sc back down, sl st to stem
FO, lightly stuff base only.
Attach between ears, angled slightly backward.
Tail
MR 4 sc
(1 sc, inc) ×2 (6)
Round 3: sc around
FO, sew centered on back.
🦌 Fawn Pattern Adjustments
The fawn uses the same construction with these changes:
• Legs: stop at Round 14
• Body: remove 2 brown rounds
• Head: same stitch count, eyes 1 stitch closer together
• No antlers
• Slightly smaller ears (stop at Round 4)
This keeps the proportions baby-soft and compact.
🧵 Assembly
-
Sew head slightly forward onto body
-
Attach legs so the deer naturally sits
-
Position front legs closer together
-
Sew ears, then antlers (adult only)
-
Attach tail
-
Embroider eyelashes (2–3 short stitches per eye)
🧡 Finishing Touches
• Keep stuffing firm but flexible
• Hooves should be rounded, not flat
• White face blaze should form a soft inverted teardrop shape
• Expression should remain gentle and calm
🌿 Final Thoughts
This deer and fawn pair is designed to feel quiet, warm, and storybook-soft—a timeless woodland keepsake that looks beautiful on shelves, in nurseries, or as a heartfelt handmade gift. Their seated posture and long legs give them a graceful, lifelike presence while keeping the crochet approachable and enjoyable.