Stitch up a spot of joy with this Amigurumi Dalmatian Puppy crochet pattern! With its floppy ears, playful tail, and signature black-and-white spots, this adorable pup is ready to bound into your heart. Whether you’re crafting a cuddly companion for a little one, honoring a beloved pet, or simply adding to your amigurumi menagerie, this pattern brings the charm and loyalty of a Dalmatian to life in the sweetest, squishiest way. 🐾🧶🐶
Designed for personality and fun, this pattern invites you to play with bold contrasts, expressive features, and delightful extras like a tiny collar, a wagging tongue, or even a stitched-on bone. Customize the spots for a one-of-a-kind look or add a little name tag for extra flair. Whether perched on a shelf, gifted with love, or tucked into a cozy corner, this Dalmatian Puppy is a heartwarming and satisfying project—perfect for bringing a touch of handmade puppy love to every stitch! 💖✨🖤
🐾 Amigurumi Dalmatian Puppy Crochet Pattern
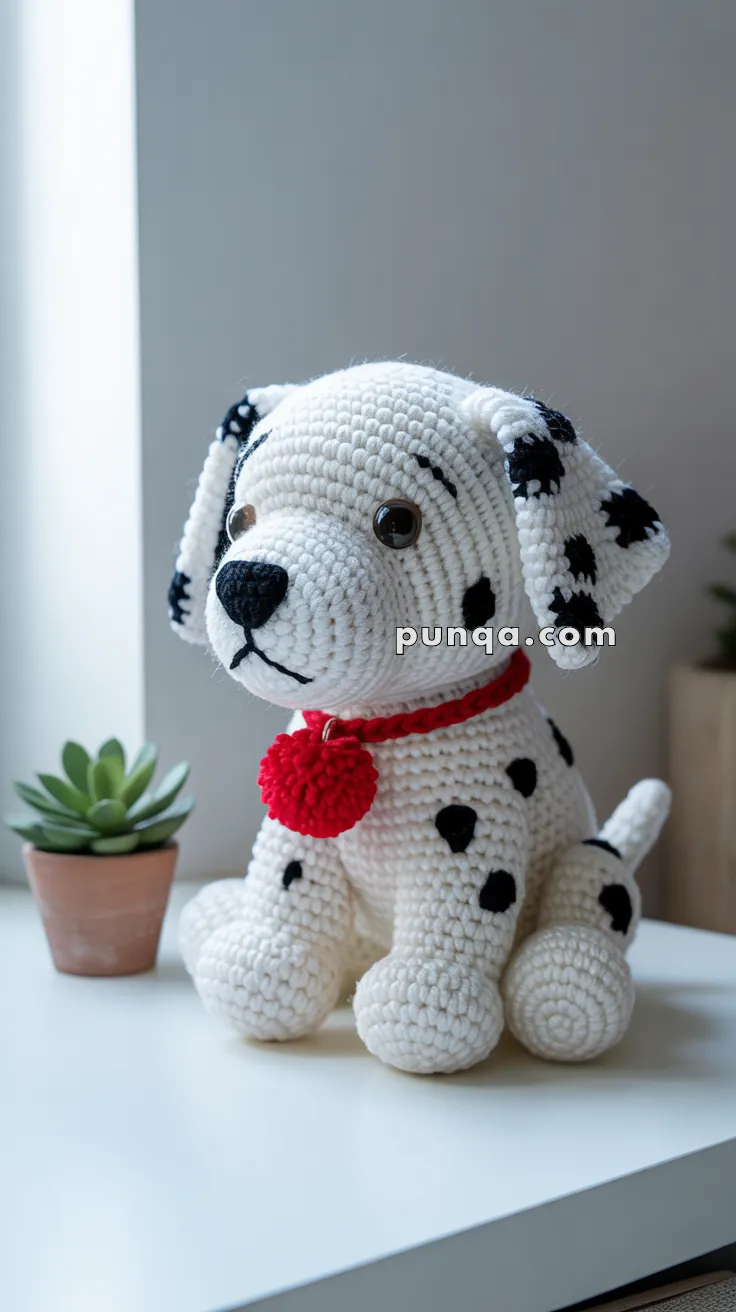
This lovable Dalmatian puppy, made with soft chenille yarn, features floppy spotted ears, a sweet rounded face, chunky paws, and a bright red pom-pom collar. Perfect as a gift, nursery toy, or decorative companion, this plush pup sits in an adorable photogenic pose and works up beautifully thanks to the thick, velvety yarn.
✨ Skill Level
Beginner–Intermediate – uses basic shaping, crocheted appliqués, and simple assembly.
📏 Finished Size
Approx. 10–12 in (25–30 cm) tall when made with plush chenille yarn and a 4 mm hook.
🧶 Materials
- Plush chenille/velvet yarn (Himalaya Dolphin Baby, Bernat Baby Velvet, etc.)
- White – main body
- Black – spots, nose, ear patches
- Red – collar & pom-pom
- 4.0 mm crochet hook
- 12–14 mm brown or black safety eyes
- Fiberfill stuffing
- Tapestry needle
- Stitch markers
- Optional: short piece of wire for poseable tail
🧵 Abbreviations (US Terms)
- MR – magic ring
- sc – single crochet
- inc – increase (2 sc in same stitch)
- dec – invisible decrease
- ch – chain
- sl st – slip stitch
- FO – fasten off
Work in continuous rounds unless otherwise specified.
🐶 Head (White)
Rnd 1: MR, 6 sc (6)
Rnd 2: inc × 6 (12)
Rnd 3: (sc, inc) × 6 (18)
Rnd 4: (2 sc, inc) × 6 (24)
Rnd 5: (3 sc, inc) × 6 (30)
Rnd 6: (4 sc, inc) × 6 (36)
Rnd 7–13: sc around (36)
👉 Insert safety eyes between Rnds 10–11, spaced 10–11 sts apart.
Rnd 14: (4 sc, dec) × 6 (30)
Rnd 15: (3 sc, dec) × 6 (24)
Rnd 16: (2 sc, dec) × 6 (18)
Rnd 17: (sc, dec) × 6 (12)
Rnd 18: dec × 6 (6)
Stuff firmly and close.
🐾 Muzzle & Nose
Muzzle (White)
Rnd 1: MR, 6 sc
Rnd 2: inc × 6 (12)
Rnd 3: (sc, inc) × 6 (18)
Rnd 4–5: sc around (18)
Stuff lightly. FO with long tail.
Nose (Black)
Rnd 1: MR, 6 sc
Rnd 2: inc × 6 (12)
Rnd 3: sc around (12)
sl st, FO.
Assembly
- Sew nose to top center of muzzle.
- Sew muzzle centered beneath eyes.
- Embroider a Y-shaped mouth in black beneath the nose.
👂 Ears (Make 2 – White + Black)
Rnd 1: MR, 6 sc
Rnd 2: inc × 6 (12)
Rnd 3: (sc, inc) × 6 (18)
Rnd 4–18: sc around (18)
Rnd 19: (5 sc, inc) × 3 (21)
Rnd 20–22: sc around (21)
Flatten, do not stuff. FO with long tail.
Ear Spot Coverage
Sew irregular black patches to each ear so that 70–80% of the outer ear surface appears spotted.
Attachment
Sew ears to sides of the head around Rnds 10–12, allowing them to flop downward naturally.
🐕 Body (White)
Rnd 1: MR, 6 sc
Rnd 2: inc × 6 (12)
Rnd 3: (sc, inc) × 6 (18)
Rnd 4: (2 sc, inc) × 6 (24)
Rnd 5: (3 sc, inc) × 6 (30)
Rnd 6: (4 sc, inc) × 6 (36)
Rnd 7–16: sc around (36)
Rnd 17: (4 sc, dec) × 6 (30)
Rnd 18: (3 sc, dec) × 6 (24)
Rnd 19: (2 sc, dec) × 6 (18)
Rnd 20: (sc, dec) × 6 (12)
Stuff firmly and FO with long tail.
🦴 Front Legs (Make 2 – White)
Rnd 1: MR, 6 sc
Rnd 2: inc × 6 (12)
Rnd 3: (sc, inc) × 6 (18)
Rnd 4–5: sc around (18)
Rnd 6: (4 sc, dec) × 3 (15)
Rnd 7: (3 sc, dec) × 3 (12)
Rnd 8–14: sc around (12)
Stuff moderately. FO with long tail.
🐾 Back Legs (Make 2 – White)
Rnd 1: MR, 6 sc
Rnd 2: inc × 6 (12)
Rnd 3: (sc, inc) × 6 (18)
Rnd 4: (2 sc, inc) × 6 (24)
Rnd 5–7: sc around (24)
Rnd 8: (2 sc, dec) × 6 (18)
Rnd 9–13: sc around (18)
Rnd 14: (4 sc, dec) × 3 (15)
Rnd 15–16: sc around (15)
Stuff and FO.
🐕 Tail (White)
Rnd 1: MR, 5 sc
Rnd 2–12: sc around (5)
Stuff lightly (optional wire inside). FO with long tail.
Attach with a gentle sideways curve around the body, matching the pose in the photo.
⚫ Crocheted Spots (Black)
Create 8–12 total in mixed sizes.
Small
MR, 6 sc, sl st, FO
Medium
Rnd 1: MR, 6 sc
Rnd 2: inc × 6 (12)
sl st, FO
Large
Rnd 1: MR, 6 sc
Rnd 2: inc × 6 (12)
Rnd 3: (sc, inc) × 6 (18)
sl st, FO
Placement
For realistic dalmatian patterning:
- 1 small spot on each cheek
- 2–3 spots on each ear (heavy coverage)
- 4–6 medium/large spots on body
- 2–3 small/medium spots on legs
Sew irregularly for a natural look.
🧶 Red Collar & Pom-Pom
Collar
Ch 32–38 (measure around neck).
Row 1: sc across, sl st to first st.
FO.
Pom-Pom
- Wrap red yarn around two fingers 30–40 times.
- Slide off, tie tightly at center.
- Cut loops and trim to a 2–2.5 cm round pom.
- Attach to collar front.
✂️ Assembly
- Attach Head to Body
- Position head slightly tilted forward.
- Sew securely around Rnds 1–2 of body.
- Attach Back Legs
- Sew to lower sides of body (Rnds 14–16).
- Angle slightly outward for natural seated pose.
- Attach Front Legs
- Sew to chest area at Rnds 10–12.
- Keep a small gap between legs (not touching).
- Attach Tail
- Sew to back center, curve sideways around the body.
- Add Ears
- Sew along base, allowing them to hang naturally.
- Sew Spots
- Scatter across body, legs, cheeks, ears.
- Final Details
- Embroider Y-shaped mouth under nose.
- Add collar and pom-pom.
- Fluff and shape.
💡 Customization Ideas
- Add a tiny crocheted bone or toy
- Make a Firehouse Dalmatian with a mini fire hat
- Personalize collar with embroidered initials
- Use pastel spots for a whimsical look
🎉 Your Dalmatian Puppy Is Ready!
Soft, cuddly, and absolutely charming, your crocheted dalmatian puppy will brighten any room. Perfect for gifting, photographing, or displaying proudly on your shelf.
Happy crocheting! 🧶✨