Keep your remote controls organized in the cutest way possible with this Amigurumi Dachshund Remote Holder crochet pattern! Inspired by the lovable long-bodied dachshund, this charming design combines practicality with adorable craftsmanship. With its elongated shape, floppy ears, and sweet expression, this crochet dachshund is perfect for adding a playful touch to your home while keeping your remotes neatly stored. Whether you’re crafting for dog lovers, making a fun and functional decor piece, or simply enjoy creating unique amigurumi designs, this pattern lets you stitch up a delightful dachshund bursting with personality! 🐶✨
Designed for customization, this pattern allows you to experiment with different shades of brown, embroidered details, or even tiny accessories like a miniature collar or bone for extra charm. Craft a classic dachshund with rich earthy tones, create a whimsical version with bright hues, or even stitch up a full set of pet-inspired amigurumi for a heartwarming display! Whether gifted as a cherished keepsake, displayed as a practical accent, or made simply for the joy of crafting, this Amigurumi Dachshund Remote Holder is a fun and creative project—perfect for bringing a touch of handmade charm to every stitch! 🧶💖
🐶 Amigurumi Dachshund Remote Holder Crochet Pattern
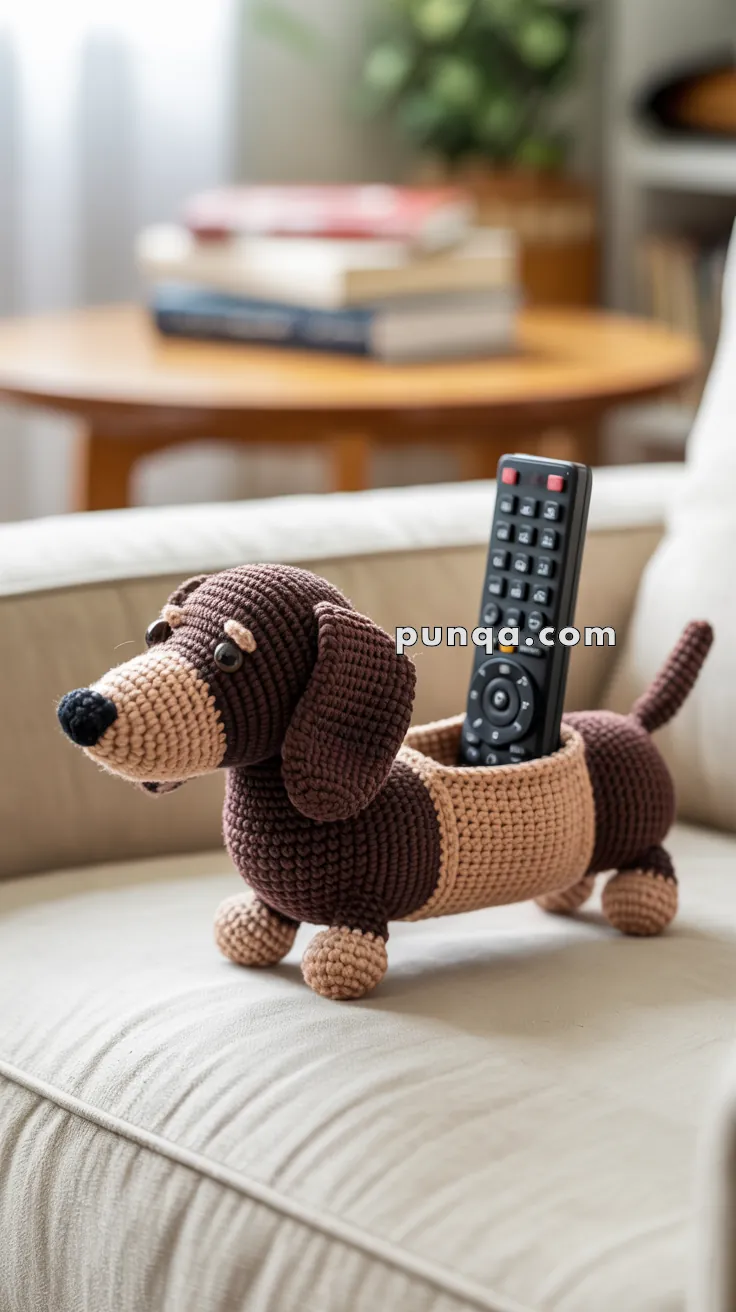
This charming dachshund isn’t just cute — it’s practical. Designed to sit proudly on your sofa arm or coffee table, this crochet dachshund features a firm oval holder built into its body, sized to hold a TV remote upright just like in the photo. With its long, low silhouette, floppy ears, rounded muzzle, and gentle expression, this pattern balances realism with playful charm.
✨ Skill Level
Intermediate
You should be comfortable with:
- Oval crochet
- Shaping with decreases
- Sewing multiple parts cleanly
- Working with firm tension for structure
📏 Finished Measurements
- Length (nose to tail): ~33 cm / 13 in
- Height: ~14 cm / 5½ in
- Holder cavity (inside):
- Length: ~12 cm / 4¾ in
- Width: ~5.5 cm / 2¼ in
- Depth: ~6–7 cm / 2½ in
Fits a standard TV remote as shown in the photo.
🧶 Materials
Yarn (worsted / aran weight)
- Dark Brown (main body, head, ears, legs, tail): ~120 g
- Light Tan (muzzle, chest, inner tub liner): ~80 g
- Black (nose, facial embroidery): ~5 g
Cotton or acrylic works well. Choose a yarn that gives a dense fabric with your hook.
Other Supplies
- 3.5 mm crochet hook
- 10–12 mm black safety eyes + washers
- Polyester fiberfill stuffing
- Plastic canvas or thin craft foam (essential for tub structure)
- Tapestry needle
- Stitch markers and pins
- Scissors
- Optional: small pouch of poly pellets for extra weight
🧵 Abbreviations (US Terms)
MR – magic ring
sc – single crochet
inc – increase (2 sc in same stitch)
dec – decrease (sc2tog)
ch – chain
sl st – slip stitch
BLO – back loop only
FO – fasten off
All pieces are worked in continuous rounds unless stated otherwise.
🧠 Construction Overview
The dachshund is built around a rigid open oval holder:
• The holder is double-walled for strength
• The tan section forms a decorative outer sleeve
• The dark brown wall is the hidden support
• The dog’s chest and rump are crocheted directly onto the holder rim
Think of the holder as a small reinforced bucket with a dachshund wrapped around it.
🟤 Center Holder (Reinforced Oval Tub)
The holder remains open at the top and both ends.
Inner Structural Tub — Dark Brown
This forms the hidden support wall.
Oval Base
R1 — Ch 23
Sc in 2nd ch from hook and next 20 sts (21)
3 sc in last ch
Working along underside: sc 20
3 sc in first ch → 48 sts
R2 — BLO sc around (48) — creates upright wall
R3–R12 — sc around (48)
FO. Do not close.
Decorative Outer Tub — Light Tan
This becomes the visible panel around the dog’s middle.
Repeat R1–R12 exactly as for the dark brown tub.
Before finishing, cut a plastic canvas oval to fit the base and insert it flat into the tan tub.
Do not close.
Joining the Two Layers
- Place the dark brown tub upright
- Turn the tan tub inside out
- Slide the tan tub over the brown tub like a sleeve
The tan fabric is now on the outside and the brown wall becomes the hidden support.
With dark brown yarn, sc through both layers around the rim (48 sc).
You now have a firm, double-wall holder with a clean reinforced edge.
🟤 Front Body (Chest & Shoulders)
Join dark brown yarn to the front half of the holder rim.
R1 — sc around rim (48)
R2 — (6 sc, dec) ×6 → 42
R3 — (5 sc, dec) ×6 → 36
R4 — (4 sc, dec) ×6 → 30
R5 — (3 sc, dec) ×6 → 24
R6 — (2 sc, dec) ×6 → 18
Stuff firmly to form a rounded chest.
R7 — sc around (18)
FO
Neck Tube
Join yarn to the 18-st opening.
R1 — sc 18
R2 — (2 sc, inc) ×6 → 24
R3–R4 — sc around (24)
FO, leave tail for head.
🐕 Head — Dark Brown
R1 — MR 6
R2 — inc ×6 → 12
R3 — (sc, inc) ×6 → 18
R4 — (2 sc, inc) ×6 → 24
R5 — (3 sc, inc) ×6 → 30
R6 — (4 sc, inc) ×6 → 36
R7 — (5 sc, inc) ×6 → 42
R8–R12 — sc around (42)
Insert safety eyes between R8–9, spaced 8–9 sts apart.
R13 — (5 sc, dec) ×6 → 36
R14 — (4 sc, dec) ×6 → 30
R15 — (3 sc, dec) ×6 → 24
Stuff firmly.
FO, leaving a long tail.
Sew head to neck tube (24 sts to 24 sts).
🐽 Muzzle — Light Tan
R1 — Ch 8
Sc 6, 3 sc in last ch
Sc 6 on underside, 3 sc in first ch → 16
R2 — sc 6, inc ×3, sc 6, inc ×3 → 22
R3 — BLO sc around (22)
R4 — sc around (22)
Stuff lightly and sew low on face.
Nose & Face
Nose: MR 6 in black, sew to muzzle tip
Mouth: small curved backstitch
Brows: two short stitches above eyes
👂 Ears (Make 2)
Dark Brown
Ch 13
Sc 12, ch 1, turn
R2–R7 — sc 12, ch 1, turn
R8 — sc evenly around rectangle, adding extra sts at corners
FO. Lightly steam and fold top edge.
Sew so ears drape forward naturally.
🟤 Back Body (Hips & Rump)
Join dark brown yarn to the back half of the holder rim.
R1 — sc around rim (48)
R2 — (6 sc, dec) ×6 → 42
R3 — (5 sc, dec) ×6 → 36
R4 — (4 sc, dec) ×6 → 30
R5 — (3 sc, dec) ×6 → 24
Attach tail now.
R6 — (2 sc, dec) ×6 → 18
R7 — (sc, dec) ×6 → 12
R8 — dec ×6 → 6
FO and close.
🐾 Tail
Dark Brown
R1 — MR 6
R2 — inc ×3, sc 3 → 9
R3–R12 — sc around (9)
FO, sew centered on back.
🦴 Legs (Make 4)
Paws — Light Tan
R1 — MR 6
R2 — inc ×6 → 12
R3 — (3 sc, inc) ×3 → 15
R4 — BLO sc around (15)
R5 — sc around (15)
Switch to dark brown.
R6 — (3 sc, dec) ×3 → 12
R7–R12 — sc around (12)
Stuff firmly.
Front legs: 6 total rounds
Back legs: 7–8 rounds
FO.
Sew two legs under the chest and two under the rump, aligned for balance.
🧩 Final Assembly
• Reinforce holder rim
• Attach chest and rump domes
• Sew head to neck
• Attach legs for stable stance
• Shape ears to drape forward
• Adjust tail angle slightly upward
🐾 Finished Dachshund Remote Holder
Your dachshund is now complete — sturdy, balanced, and perfectly proportioned. The reinforced oval holder keeps the remote upright, while the contrasting tan panel wraps around the body like a cozy jacket. With its long silhouette, floppy ears, and gentle expression, this little pup brings warmth, charm, and practical storage into any living space.
Place it on your sofa arm, coffee table, or sideboard and enjoy the smiles it brings every time you reach for the remote. A faithful helper with wag-worthy personality, stitched entirely by hand. 🧶🐶💛