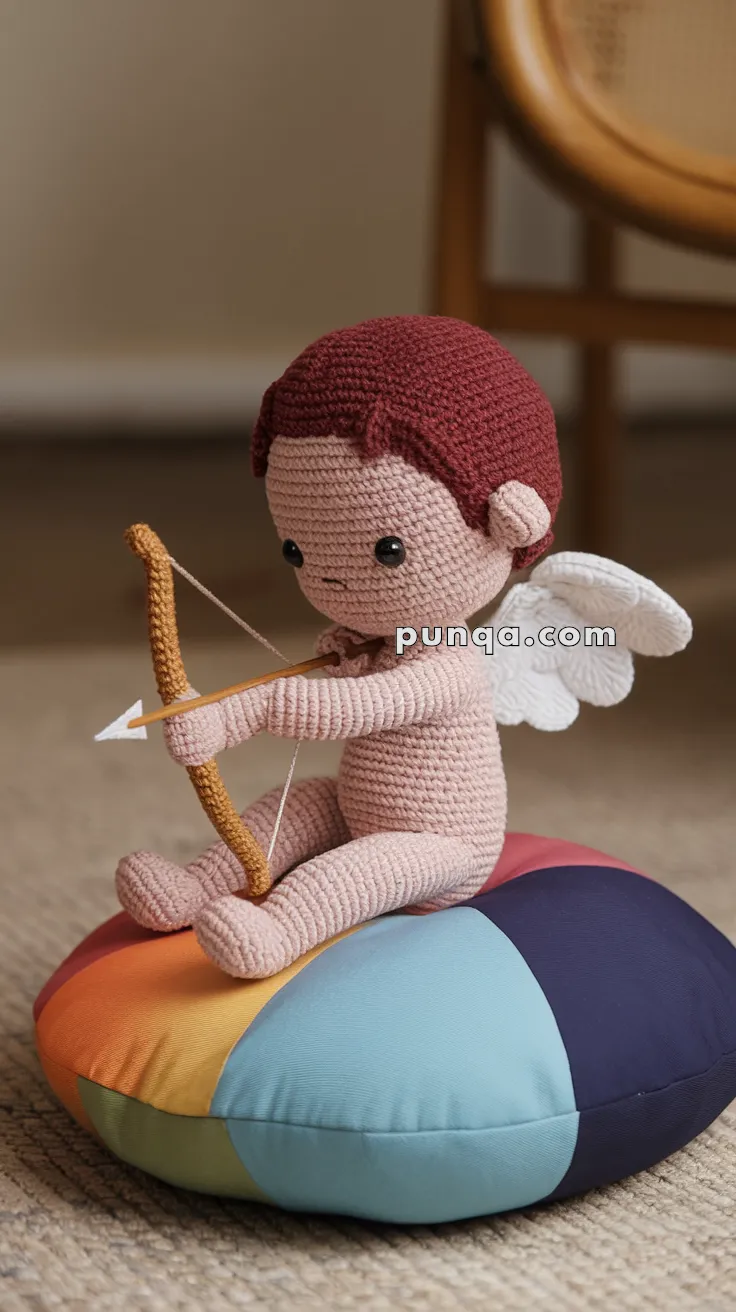
Welcome to the romantic and whimsical world of amigurumi! 💘✨ Today, I’m excited to share my free crochet pattern for an Amigurumi Cupid With Bow And Arrow—a charming and playful creation perfect for Valentine’s Day, gift-giving, or anyone who enjoys crafting adorable and expressive plush designs! 🧶 Whether you love stitching up mythical figures, creating textured and lifelike details, or simply want to add a sweet Cupid to your handmade lineup, this pattern will guide you through crafting a beautifully sculpted plush with delicate wings, a tiny bow, and a heart-tipped arrow ready to spread love! 💖
This design embraces soft textures, intricate shaping, and delightful details to bring a magical and heartwarming presence to your crochet projects! 🧶✨ I’ve carefully outlined each step to ensure your Amigurumi Cupid With Bow And Arrow turns out just right—ready to brighten up your space or become a treasured handmade gift! 🎁 So grab your hooks, pick out gentle pinks, classic whites, and shimmering golds, and let’s stitch up a lovable Cupid! 💘

🏹 Amigurumi Cupid with Bow and Arrow Crochet Pattern
Create a timeless little guardian of love with this seated amigurumi Cupid. With softly sculpted limbs, tiny wings, a gentle expression, and a curved bow held carefully in both hands, this sweet cherub is perfect for Valentine’s Day, nursery décor, or as a heartfelt handmade gift.
This design focuses on smooth shaping, balanced proportions, and a natural sitting pose so your finished Cupid looks peaceful, delicate, and full of charm.
✂️ Skill Level
Intermediate
You should be comfortable with:
• Working in continuous rounds
• Shaping with increases and decreases
• Sewing limbs in posed positions
• Creating small accessories
📏 Finished Size
Approx. 20–22 cm (8–9 inches) tall in seated position
Using sport or DK yarn with a 2.5–3.0 mm hook
🧶 Materials
Yarn (sport or DK weight):
• Skin tone – body, head, arms, legs
• Burgundy – hair
• White – wings
• Golden yellow – bow
• Beige or tan – arrow shaft
• White – arrow tip
Other Supplies:
• 2.5–3.0 mm crochet hook
• Fiberfill stuffing
• 8–10 mm safety eyes
• Black embroidery floss (mouth + brows)
• Tapestry needle
• Stitch marker
• Optional: thin wire or pipe cleaner for bow shape
🧵 Abbreviations (US Terms)
MR – magic ring
sc – single crochet
inc – increase
dec – decrease
ch – chain
sl st – slip stitch
BLO – back loop only
FO – fasten off
All parts are worked in continuous rounds unless stated otherwise.
🧠 Construction Overview
Cupid is built as a seated figure:
• Head and torso are separate
• Legs are sewn bent for sitting
• Arms are posed to hold the bow
• Wings are small and curved
• Hair is a smooth fitted cap
• Bow is gently arched
🧑 Head
Skin tone
R1 — MR 6
R2 — inc ×6 → 12
R3 — (sc, inc) ×6 → 18
R4 — (2 sc, inc) ×6 → 24
R5 — (3 sc, inc) ×6 → 30
R6 — (4 sc, inc) ×6 → 36
R7–R16 — sc around (36)
Insert safety eyes between R11–12, about 7 stitches apart.
R17 — (4 sc, dec) ×6 → 30
R18 — (3 sc, dec) ×6 → 24
R19 — (2 sc, dec) ×6 → 18
Stuff firmly.
R20 — (sc, dec) ×6 → 12
R21 — dec ×6 → 6
FO and close.
Embroider a small straight mouth.
💇 Hair Cap
Burgundy
R1 — MR 6
R2 — inc ×6 → 12
R3 — (sc, inc) ×6 → 18
R4 — (2 sc, inc) ×6 → 24
R5 — (3 sc, inc) ×6 → 30
R6 — (4 sc, inc) ×6 → 36
R7–R9 — sc around (36)
FO and sew onto head, aligning low at the forehead.
Add one or two small fringe curls if desired.
👂 Ears (Make 2)
Skin tone
MR 5
sl st, FO
Flatten slightly and sew to sides of head just under hairline.
🧍 Body (Torso)
Skin tone
R1 — MR 6
R2 — inc ×6 → 12
R3 — (sc, inc) ×6 → 18
R4 — (2 sc, inc) ×6 → 24
R5 — (3 sc, inc) ×6 → 30
R6–R12 — sc around (30)
R13 — (3 sc, dec) ×6 → 24
R14 — (2 sc, dec) ×6 → 18
R15 — (sc, dec) ×6 → 12
Stuff firmly.
R16 — dec ×6 → 6
FO and close.
Sew head to body.
🦵 Legs (Make 2)
Skin tone
R1 — MR 6
R2 — inc ×6 → 12
R3 — (sc, inc) ×6 → 18
R4–R6 — sc around (18)
R7 — (2 sc, dec) ×4, sc 2 → 14
R8–R11 — sc around (14)
Stuff lightly at foot and more firmly toward thigh.
Flatten and curve slightly into seated shape.
FO and sew to lower front of body so legs extend forward.
💪 Arms (Make 2)
Skin tone
R1 — MR 6
R2 — inc ×6 → 12
R3–R10 — sc around (12)
Stuff lightly.
Flatten top and bend gently at elbow.
FO.
Sew arms slightly forward so hands meet at center to hold bow.
🪽 Wings (Make 2)
White
Ch 10
Row 1: sc in 2nd ch and across (9)
Rows 2–5: ch 1, turn, sc across
FO.
Add surface stitches for feather lines if desired.
Curve slightly and sew to upper back.
🏹 Bow
Golden yellow
Ch 26
Row 1: sc across (25)
FO.
Curve into a gentle arc and stitch ends together.
Attach to hands.
Bowstring:
Use white embroidery thread or fine yarn.
Tie between both ends of bow.
Optional: insert thin wire inside bow for shaping.
➳ Arrow
Shaft (beige)
Ch 10
sl st back along chain to make firm
FO
Tip (white)
MR 3
inc ×3 → 6
(sc, inc) ×3 → 9
FO
Sew tip onto shaft.
Place arrow resting across lap or against bow.
🧩 Final Assembly
• Attach legs in seated position
• Sew arms so hands hold bow
• Attach wings high on back
• Shape bow curve
• Position arrow gently
💘 Finished Cupid
Your Cupid is now complete — seated peacefully with his bow ready and wings tucked gently behind. With soft proportions, smooth shaping, and a calm expression, this little guardian of love brings warmth and sweetness wherever he sits.
Perfect for romantic décor, thoughtful gifts, or as a timeless symbol of affection, this handmade Cupid is sure to become a cherished keepsake stitched straight from the heart. 🧶🏹💛


