Create a cozy retreat for your furry friend with this Amigurumi Cozy Cottage Dog House crochet pattern! Designed to bring warmth and charm to your handmade collection, this adorable dog house captures the essence of a snug little cottage in every stitch. With its charming roof, welcoming doorway, and delightful details, this crochet creation is perfect for pet lovers and amigurumi enthusiasts alike. Whether you’re crafting for a beloved pup, adding a whimsical touch to your decor, or simply enjoy making unique crochet designs, this pattern lets you stitch up a miniature dog house bursting with personality! 🏡🐶✨
Designed for customization, this pattern allows you to experiment with different colors, embroidered details, or even tiny accessories like a miniature bone or cozy blanket for extra charm. Craft a classic cottage with soft neutral tones, create a vibrant version with bright hues, or even stitch up a full set of pet-inspired amigurumi for a heartwarming display! Whether gifted as a cherished keepsake, displayed as a playful accent, or made simply for the joy of crafting, this Amigurumi Cozy Cottage Dog House is a fun and creative project—perfect for bringing a touch of handmade comfort to every stitch! 🧶💖
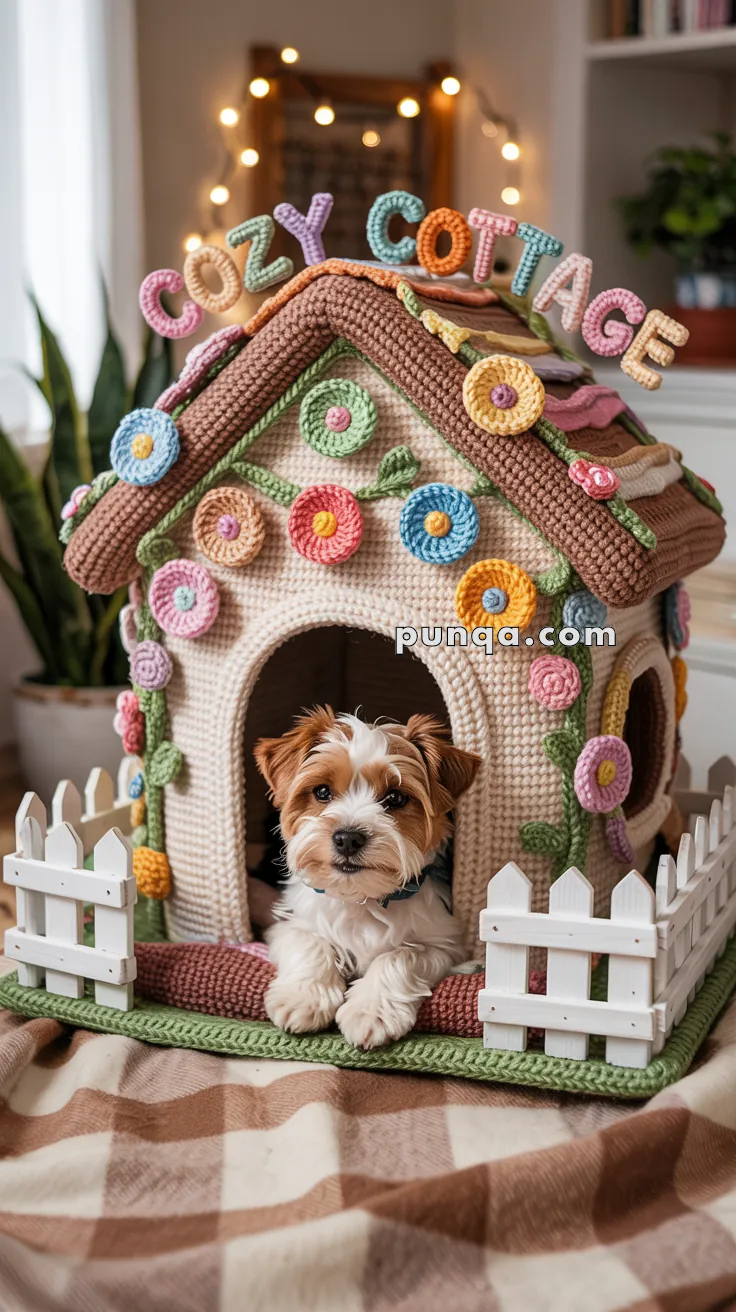
🐾 Amigurumi Cozy Cottage Dog House Crochet Pattern
Create the coziest little home for your furry friend with this charming fully crocheted cottage. Featuring soft cream walls, pastel round flowers, swirling wall motifs, leafy climbing vines, round windows framed in yellow flowers, a brick-textured porch, white picket fences, a cushioned grass base, a layered ripple roof, and pastel stuffed letters spelling “COZY COTTAGE” across the peak, this delightful house looks straight from a storybook and makes an adorable resting spot for small dogs.
✂️ Skill Level
Advanced – Includes 3D applique, structural assembly, stuffed lettering, ripple roof layering, and interior reinforcement.
📏 Finished Size
Approx. 18–20 inches (45–50 cm) wide and tall, suitable for small dogs or puppies.
🧶 Materials
Yarn (Worsted weight):
• Cream – Walls and doorway
• Brown – Roof base, window panes, porch step
• Pink (pale), Caramel tan, Muted olive, Rose-mauve – Roof ripple bands
• Green – Grass base, vines, scalloped trim, leaves
• Pastel pink, lilac, mint, sky blue, yellow, coral – Flowers and 3D letters
• Yellow – Window frame rings and select flower centers
• Black – Subtle outlines on lettering (optional)
Tools:
• 4.0–5.0 mm crochet hook
• Yarn needle
• Poly-fill stuffing (flowers, letters)
• Plastic canvas or foam board (internal wall support)
• Light fabric glue (optional, for securing spirals or flowers)
• Stitch markers
• Flexible wire (optional inside lettering for shaping)
• Small premade miniature white picket fences (2 pieces)
🧵 Abbreviations (US Terms)
MR – Magic Ring
sc – Single Crochet
inc – Increase (2 sc in same stitch)
dec – Invisible decrease
sl st – Slip stitch
ch – Chain
hdc – Half Double Crochet
dc – Double Crochet
FO – Fasten Off
🌿 Grass Base
Green
- ch 60
- sc in each st (60), ch 1, turn
3–50. sc rows to form a large rectangle
Scalloped Border
Work evenly around all sides:
(skip 2 sts, 5 dc in next st, skip 2, sl st)
Repeat to form wide, soft scallops.
Set aside.
🧱 Walls (4 Panels – Cream)
Front Wall with Doorway
- ch 40
- sc rows for 30 rows total
- Center doorway opening:
Rows 31–36: leave 10 center sts unworked - Shape rounded arch:
Rows 37–40: dec 1 st at each inner edge until smooth curve forms
Add Internal Support:
Cut plastic canvas or foam to match the wall shape, including door arch.
Spiral Swirl Motifs (Front Triangle Space):
Make 3 swirls in mint with pink centers:
• MR, 10–14 sc tightly
• Curve into spiral while stitching to wall
Place one at top center, one left, one right of triangle under roof.
Flower Clusters Along Doorway:
Add flowers to both sides near vine paths.
Side and Back Walls (Cream)
ch 40 → sc 30 rows for each
Before assembly, add:
• vines
• round flower circles
• one round window per side
Round Window (Cream + Brown + Yellow):
Window Pane: MR, 10–12 sc in brown
Frame Ring: MR 6–8 sc in yellow
Sew ring over brown circle
Attach one per side wall
🌿 Vines (Green)
ch 30–60 depending on placement
sc back down chain
Leaves:
Every 6–8 sts, work leaf:
ch 5, sl st, sc, hdc, sc, sl st back along chain
Arrange vines so they rise diagonally toward roof edges, curving naturally.
🌸 Round Flowers (Pastels)
Make approx. 14–18 flowers in assorted pastel colors.
Flower Base:
MR, 10–12 sc
Center Dot:
MR, 5–6 sc in a contrasting pastel or yellow
Flatten and stitch to center
Some flowers may be lightly stuffed for lift.
Place flowers:
• Around doorway vines
• Climbing roof edge
• Around window frames
• At side wall corners
🪟 Windows (Round Style)
As noted above
One window on each side
Optional tiny vine beneath each
🧱 House Assembly
Sew all four walls together vertically to form a box structure.
Edges should meet softly — not rigid.
Slide foam/board supports inside walls if extra firmness is desired, keeping corners slightly rounded.
Attach walls to grass base using whip stitch, making sure doorway aligns with porch space on base.
🧁 Brick-Texture Porch Step
Brown
- ch 20
- sc in rows 6–8 rows total
Lightly stuff for cushioned thickness
Position partially inside the doorway, resting atop grass base.
🏠 Ripple Roof Panels (2 Pieces)
Brown with pastel ripple layers
Base Roof:
- ch 45
- sc across (45), ch, turn
3–40. repeat sc rows
FO
Layered Ripple Stripes (Worked into Roof Surface, Not Surface Slip Stitched):
Using pink, caramel tan, muted olive, and rose-mauve yarns:
Add alternating ripple rows to create padded icing-like drips:
(dc, hdc, sc, hdc, dc) pattern across with small waves
Add 4 thin raised ripple stripes per roof:
• 2 pink
• 1 caramel
• 1 mixed olive or rose
Keep stripes soft and thick.
Flower Placement Near Roof Edge:
Add small flowers at lower roof edges and one near right side peak.
🪴 Attach Roof
Join both roof pieces at top seam by whip stitching the long edges together.
Roof peak should be softly rounded with thick join.
Sew roof to wall tops all around.
🪟 White Picket Fences
Place 2 miniature white fences only along the front half of the cottage on grass base.
Position symmetrically on the left and right side of doorway.
Secure by stitching or gluing into grass base.
💜 3D “COZY COTTAGE” Roof Letters
Pastel Colors: pink, mint, blue, lilac, yellow, coral
Method:
Work as soft tube-like I-cord letters
Lightly stuff each one
General Letter Build:
ch 18–30 depending on letter height
Work sc tightly around the length multiple passes until thick tube forms
Bend into shape while stuffing
Placement Notes:
• Each letter sewn individually to roof peak
• Letters sit playfully angled
• Heights vary slightly
• Colors alternate randomly
• Optional soft black outline stitched along shadows for depth
Order: C-O-Z-Y space C-O-T-T-A-G-E
🌿 Additional Decorating Notes
• Add 2–3 flowers around side windows
• Add vines trailing down roof sides
• Place small mint-pink swirl on side if desired for full match
• Ensure vines up front rise toward roof, and vines near roof edges angle downward naturally
🧵 Final Assembly Steps
- Attach porch step on grass base, partially inside doorway
- Sew walls to base
- Mount roof
- Attach vines with curved flow
- Add all round flowers
- Sew windows at eye-height, flowers around frames
- Add spiral motifs to front triangle panel
- Position 3D letters along roof peak
- Place white fences at front on grass base
- Smooth scallop trim
- Add optional soft black outline to letter edges
- Insert dog’s cushion or blanket inside
🐶 Finishing Touches
• Keep corners slightly rounded
• Avoid excess stiffness
• Arrange flowers densely for cottage garden look
• Add 1–2 small vines on roof edge
• Trim any loose yarn tails
Your Cozy Cottage Home is complete — soft, whimsical, floral, and ready for your little buddy to curl up and feel safe. With its pastel garden style, thick ripple roof, blooming flowers, spiraled wall motifs, airy round windows, and playful stuffed letters, it makes an adorable home décor showpiece and comfy retreat all in one.