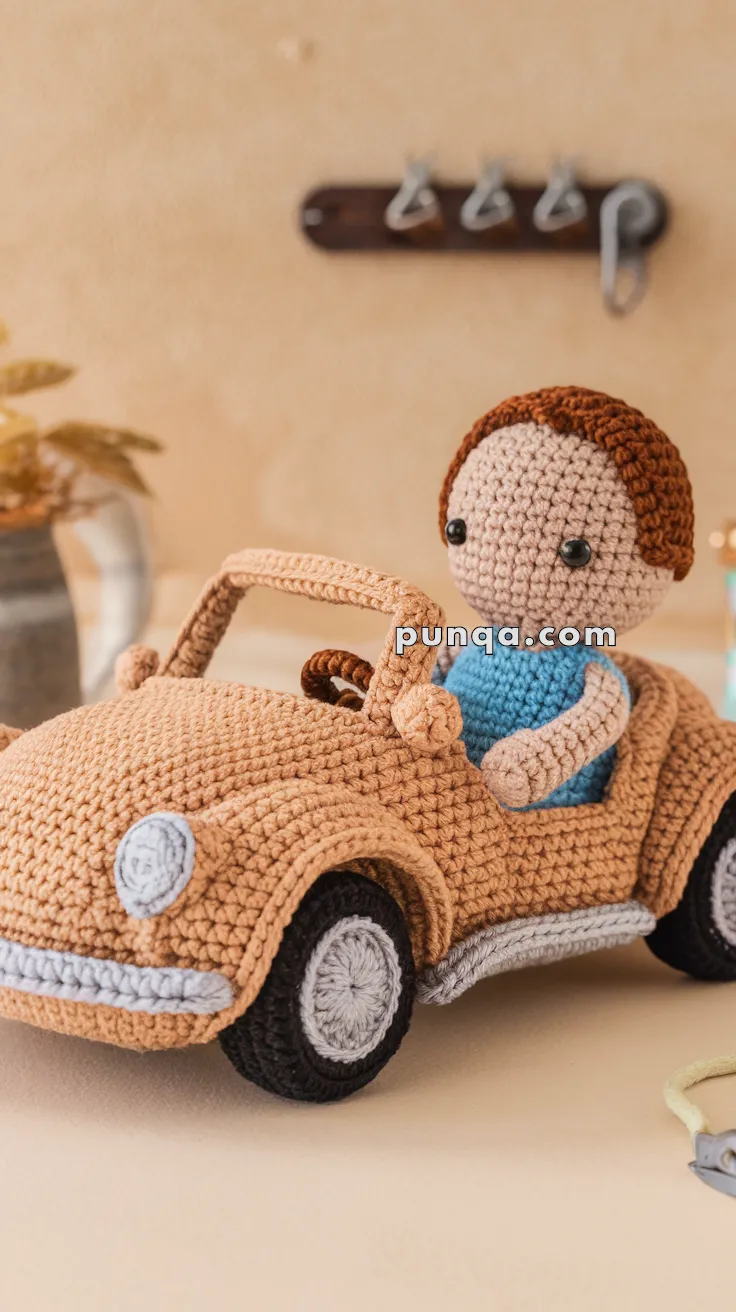
Cruise into creativity with the Amigurumi Convertible, a cheerful crochet project that’s full of charm and character! 🚗🧶 With its cozy tan body, soft black wheels, curved fenders, and a smiling driver behind the wheel, this adorable car brings a playful touch to any handmade collection. Whether it’s parked on a shelf, gifted to a little one, or used as a whimsical décor piece, it’s sure to spark joy and imagination.
Perfect for crocheters who love crafting fun shapes and expressive details, this pattern invites you to stitch up a scene that’s both decorative and delightful. Add tiny accessories like luggage or a road sign, play with color variations, or create a whole convoy of crochet cars. The Amigurumi Convertible is a joyful way to stitch up adventure, personality, and a sprinkle of handmade magic—one loop at a time! 🧵✨🌟
🚗 Crochet Convertible Car & Driver Amigurumi Pattern
Bring joy and creativity to your crochet time with this adorable amigurumi convertible car and driver pattern! This charming tan Beetle-style car features a soft open top, gray bumpers, round headlights, and a smiling little driver in a blue shirt. Perfect as a handmade gift or display piece — it’s sure to make anyone smile. 💛
✨ Skill Level
Intermediate – You’ll need experience with shaping, attaching 3D parts, and clean color changes.
📏 Finished Size
-
Car: about 25 cm (10 in) long
-
Driver: about 13 cm (5 in) tall
🧶 Materials
Yarn (Worsted or Aran Weight):
-
Tan – 100 g (main car body and interior)
-
Light Gray – 35 g (bumpers, wheel rims, trim)
-
Black – 25 g (tires)
-
White – 10 g (headlight centers)
-
Blue – 15 g (driver’s shirt)
-
Skin tone – 20 g (head and arms)
-
Brown – 15 g (hair and steering wheel)
Tools:
-
Crochet hook: 3.0 mm
-
Safety eyes (10–12 mm)
-
Fiberfill stuffing
-
Yarn needle and scissors
-
Plastic canvas (optional for base support)
🧵 Abbreviations (US Terms)
MR – Magic Ring
sc – Single Crochet
inc – Increase (2 sc in one stitch)
dec – Decrease (sc2tog)
sl st – Slip Stitch
ch – Chain
BLO – Back Loop Only
FO – Fasten Off
🚙 Car Pattern
Car Base (Tan)
-
MR, 6 sc [6]
-
inc ×6 [12]
-
(sc, inc) ×6 [18]
-
(2 sc, inc) ×6 [24]
-
Continue increasing evenly until the base measures about 18–19 cm long (≈ 96 sc).
-
Work 4 more rounds even for depth.
-
BLO sc around [96]
8–10. sc rounds to form side walls. -
Skip 6 sts for each wheel arch; ch 6 to bridge gaps.
12–13. sc across again to form full arches.
Fasten off and stuff lightly. Insert a plastic base if desired.
Bumpers & Trim (Light Gray)
-
Front & Rear Bumpers: ch 22, sc across for 2 rows. Sew smoothly along curves.
-
Side Trim: surface stitch a continuous gray line around lower side edges.
Wheels (Black + Gray)
-
With black: MR, 6 sc → inc ×6 [12] → (sc, inc) ×6 [18] → 2 rounds even.
-
Switch to gray: BLO sc 2 rounds [18].
-
Stuff slightly and flatten.
-
Sew evenly under each arch.
Headlights (Gray + White)
-
Gray Base: MR, 6 sc → (sc, inc) ×3 [9], FO.
-
White Center: MR, 6 sc, FO.
Sew white circles onto gray bases, then attach to front corners.
Windshield Frame (Tan)
-
ch 24, sc back once, dec both ends.
-
Sew in an upright arc above the dashboard, securing both sides.
(Optional: reinforce inside with thin wire.)
Interior & Seats (Tan)
-
Seats: ch 12, sc 4 rows, fold, stuff slightly, and sew at back interior.
-
Dashboard: ch 14, sc 2 rows, slightly curved, sew to front interior edge.
-
Steering Wheel: ch 12, join to ring, sc around twice, sew at an angle.
🧍 Driver Doll Pattern
Head (Skin Tone)
-
MR, 6 sc → inc ×6 [12] → (sc, inc) ×6 [18] → (2 sc, inc) ×6 [24].
-
4 rounds even.
-
Insert eyes between R6–7, stuff head.
-
(2 sc, dec) ×6 [18] → (sc, dec) ×6 [12] → dec ×6 [6], FO.
Hair (Brown)
MR, 6 sc → inc ×6 [12] → (sc, inc) ×6 [18] → (2 sc, inc) ×6 [24] → 1 round even.
FO and sew onto head.
Body (Blue)
MR, 6 sc → inc ×6 [12] → (sc, inc) ×6 [18] → 4 rounds even.
(sc, dec) ×6 [12], FO. Stuff lightly.
Arms (Skin → Blue)
MR, 6 sc → 2 rounds skin tone → switch to blue, 3 rounds sc, FO.
Attach to upper body angled slightly forward.
Attach head to body securely.
Place the doll in the driver’s seat and stitch the base of the torso to the seat.
🪡 Assembly
-
Attach bumpers and wheels.
-
Add headlights and side trim.
-
Secure windshield and dashboard.
-
Insert and stitch the driver inside.
-
Adjust stuffing for a smooth, rounded car body.
-
Optional: embroider a small gray circle emblem on hood.
🌟 Finishing Touches
-
Steam block gently to soften edges.
-
Add a soft gray slip-stitch border along the car’s base.
-
Brush seat tops lightly for plush texture.
🎉 You Did It!
Your Crochet Convertible Car & Driver is ready to roll!
With its tan body, gray bumpers, and smiling driver, it looks just like a real handmade classic — the perfect centerpiece for your amigurumi collection or a delightful handmade gift.