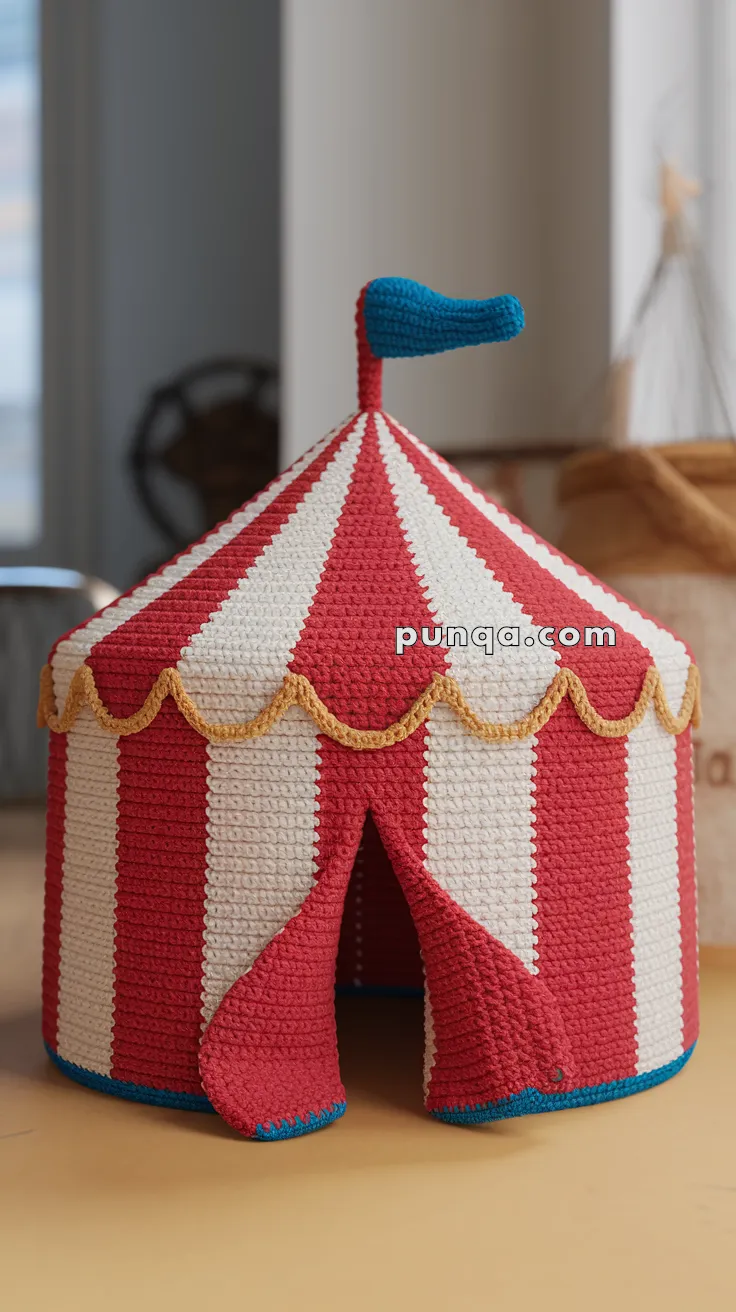
Welcome to the dazzling and whimsical world of amigurumi! 🎪✨ Today, I’m excited to share my free crochet pattern for an Amigurumi Circus Tent—a vibrant and playful creation perfect for carnival lovers, themed décor enthusiasts, or anyone who enjoys crafting charming and imaginative plush designs! 🧶 Whether you love stitching up festive structures, experimenting with bold stripes, or simply want to add a magical circus tent to your handmade lineup, this pattern will guide you through crafting a beautifully sculpted plush with a peaked roof, flowing curtains, and a touch of showtime charm! 🎭
This design embraces bright reds, cheerful yellows, and intricate shaping to bring a lively and theatrical presence to your crochet projects! 🧶✨ I’ve carefully outlined each step to ensure your Amigurumi Circus Tent turns out just right—ready to become a centerpiece in your collection or a treasured handmade gift! 🎁 So grab your hooks, pick out dazzling hues, and let’s stitch up a fantastic circus tent! 🎪
🎪 Amigurumi Circus Tent Crochet Pattern
Step right up! Add whimsical charm to your playroom or nursery with this eye-catching amigurumi circus tent. With bold stripes, a wavy trim, and playful flag topper, this tent is perfect as a toy centerpiece or cozy spot for small amigurumi friends.
✨ Skill Level
Intermediate – Includes color changes, shaping, and basic structural assembly.
📏 Finished Size
Approx. 9 inches (23 cm) tall and 8 inches (20 cm) in diameter using worsted weight yarn and a 3.5 mm hook.
🧶 Materials
-
Worsted weight yarn:
-
Red (Main stripe color)
-
White (Alternate stripe color)
-
Gold (Trim)
-
Blue (Base and flag)
-
-
Crochet hook: 3.5 mm
-
Stitch marker
-
Tapestry needle
-
Scissors
-
Stiff felt or plastic canvas (for base and roof structure)
-
Hot glue or fabric glue (optional for structural support)
-
Optional: Polyfill if you want the tent to be more plush than hollow
🧵 Abbreviations (US Terms)
MR – Magic Ring
sc – Single Crochet
inc – Increase
dec – Decrease
sl st – Slip Stitch
ch – Chain
FO – Fasten Off
BLO – Back Loop Only
🏗️ Tent Body (Make 6 red panels and 6 white panels)
Each panel is worked as a long triangle from the base upward.
Panel (make 12 total, alternating colors):
-
ch 2
-
Row 1: 1 sc in 2nd ch from hook (1)
-
Row 2: ch 1, turn, inc (2)
-
Row 3: ch 1, turn, 2 sc (2)
-
Row 4: ch 1, turn, inc, sc (3)
-
Continue increasing 1 stitch per row until you reach 25 stitches across
-
FO and leave a long tail for sewing
Sew the panels side-by-side alternating red and white until you form a full circle. Do not sew the last red panel fully—leave the bottom 2″ open for the tent flap.
🔵 Tent Base (Blue)
-
MR, 6 sc (6)
-
inc x6 (12)
-
(1 sc, inc) x6 (18)
-
(2 sc, inc) x6 (24)
-
(3 sc, inc) x6 (30)
-
Continue increasing evenly until you reach 72 stitches (or match base of tent body)
-
FO and leave a long tail
Optional: Glue or stitch stiff felt/plastic canvas to underside for stability.
🪄 Wavy Gold Trim
Use gold yarn. Work a surface slip stitch around the roof seam.
-
Join with sl st at starting point
-
(Skip 2 sts, 5 dc in next st, skip 2 sts, sl st in next) repeat around
-
FO and weave in ends
🚩 Flag Topper (Blue)
-
ch 11
-
Row 1–5: sc across (10)
-
Row 6: dec at both ends (8)
-
Row 7: sc across (8)
-
Row 8: dec at both ends (6)
-
Row 9: sc across (6)
-
FO and shape into a curled flag. Sew to the red pole topper.
🎪 Tent Roof Peak (Red)
-
MR, 6 sc (6)
-
inc x6 (12)
-
(1 sc, inc) x6 (18)
-
(2 sc, inc) x6 (24)
-
(3 sc, inc) x6 (30)
-
Continue increasing evenly until it fits the top of the tent body (approx. 72 sts)
-
FO and attach to body
✂️ Assembly
-
Attach roof to body
-
Sew base to bottom edge
-
Attach flag to peak
-
Tuck or stitch the tent flaps to the sides for an open look
💡 Optional Ideas
-
Add small animal amigurumi inside
-
Create a removable roof for interactive play
-
Add pompoms or mini lights for extra circus flair
Bring the magic of the big top into your handmade world with this vibrant circus tent—perfect for display or imaginative play! 🎟️🎠
📌Tips
To make your amigurumi circus tent stand straight and hold its shape like in the photo, follow these structural support tips during or after assembly:
🧱 1. Use Stiff Felt or Plastic Canvas for the Base
Insert a circle of stiff felt, plastic canvas, or cardboard between the crocheted base and the bottom edge of the tent:
-
Cut to size: Trace the bottom of the finished tent onto stiff felt or canvas and cut a circle that fits snugly inside.
-
Insert: Place the stiff base between two crocheted layers (if you double the base), or glue/stitch it onto the underside of the tent.
-
Optional: Cover cardboard with fabric or felt to prevent fiber wear.
🪢 2. Reinforce Vertical Panels
To prevent the tent walls from flopping, you can reinforce the seams:
-
Insert pipe cleaners, craft wires, or thin plastic rods vertically between the red and white panels as you sew them together.
-
Alternatively, cut thin strips of plastic canvas and stitch them flat inside each panel from base to roof peak.
-
This technique gives the panels backbone without affecting the shape.
🔺 3. Support the Roof
The steep cone roof can sag if unsupported. Here’s how to keep it upright:
-
Insert a cone-shaped lining inside using thick felt or double-layered interfacing.
-
You can also use a cone made of cardstock, taped and slid inside before sewing the roof down.
-
Glue or stitch the cone in place along the seam line of the roof and body.
🎏 4. Anchor the Flag Pole
To keep the flag upright:
-
Insert a wooden skewer, dowel, or firm straw inside the pole section.
-
Stitch tightly around it and anchor it deep into the roof peak.
-
Optionally, glue it in place from the inside before closing up the roof.
🧵 Bonus Tip: Use Tighter Stitches
Crocheting with tight tension using a smaller hook helps stiffen the fabric. For example, using a 3.0 mm hook with worsted weight yarn gives you a dense fabric that naturally stands better.
✅ Summary
| Tent Part | Reinforcement Method |
|---|---|
| Base | Stiff felt, plastic canvas, cardboard |
| Side Panels | Craft wire, plastic canvas strips |
| Roof | Cone insert made from felt/cardstock |
| Flag Pole | Wooden stick or skewer inside |
| Entire Structure | Tight stitches + sturdy joining seams |
With these supports, your circus tent will stay proudly upright—ready for all the amigurumi performers to move in! 🎪✨