Get ready to stitch up some cryptid cuteness with the Amigurumi Chupacabra, a wildly fun crochet project inspired by one of folklore’s most mysterious creatures! 🧶🦇 With its spiky back, curious eyes, and mischievous little grin, this pint-sized beast is more cuddly than creepy. Whether you’re a fan of mythical monsters or just love adding quirky characters to your amigurumi collection, this Chupacabra is sure to spark conversation and charm everyone who meets him.
Perfect for crocheters who enjoy playful designs with a touch of the unexpected, this pattern invites you to experiment with bold textures, earthy tones, and imaginative details. Make him as a spooky desk buddy, a Halloween mascot, or a gift for your favorite cryptid enthusiast. The Amigurumi Chupacabra is a delightful way to stitch up mystery, folklore, and a whole lot of handmade fun—one loop at a time! 🌕🧵
🐾 Amigurumi Chupacabra Crochet Pattern
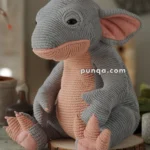
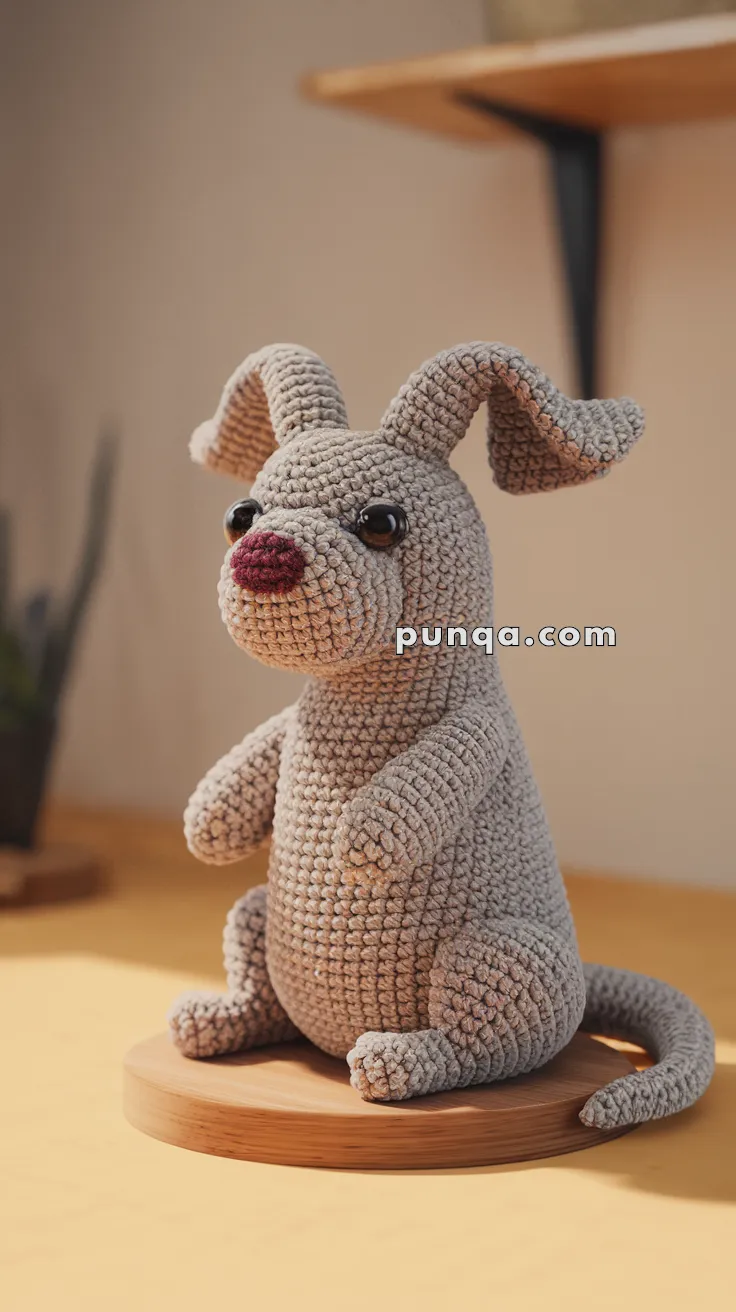
Meet your handmade Chupacabra — a mysterious yet adorable creature with floppy curved ears, a rounded belly, tiny arms, and a long curled tail. This design captures the exact proportions and soft texture seen in the photo: short legs, a slightly forward-leaning seated pose, large glossy eyes, and a small dark red nose. The ears are gently curved and can be shaped with or without wire.
This project is perfect for fantasy lovers and intermediate crocheters who enjoy sculpted amigurumi with character.
✨ Skill Level
Intermediate – includes shaping, facial embroidery, and careful assembly.
📏 Finished Size
Approx. 20–22 cm (8–9 in) tall when using velvet or chenille yarn and a 3.5–4 mm hook.
🧶 Materials
Yarn (velvet / chenille or plush DK):
-
Light gray (main body)
-
Beige or cream (muzzle shading, optional)
-
Dark red or burgundy (nose)
-
Black (eyebrows, mouth)
-
Small amount of pink or blush (cheeks, optional)
Other supplies:
-
10–12 mm safety eyes (black or dark brown)
-
Crochet hook: 3.5–4 mm
-
Polyfill stuffing
-
Tapestry needle
-
Stitch marker
-
Optional: thin floral wire or pipe cleaner (for ears/horns shaping)
🧵 Abbreviations (US)
MR – Magic Ring
sc – Single crochet
inc – Increase (2 sc in same stitch)
dec – Decrease (sc2tog)
sl st – Slip stitch
ch – Chain
FO – Fasten off
🐺 Head (Light Gray)
R1: MR 6 (6)
R2: inc x6 (12)
R3: (sc, inc) x6 (18)
R4: (2 sc, inc) x6 (24)
R5: (3 sc, inc) x6 (30)
R6: (4 sc, inc) x6 (36)
R7–12: sc around (36)
Insert safety eyes between R9–10, about 7 stitches apart.
R13: (4 sc, dec) x6 (30)
R14: (3 sc, dec) x6 (24)
R15: (2 sc, dec) x6 (18)
Stuff firmly.
R16: (sc, dec) x6 (12)
R17: dec x6 (6)
FO and close.
👃 Muzzle (Beige or Gray)
R1: MR 6 (6)
R2: inc x6 (12)
R3: sc around (12)
FO, stuff lightly and sew to front of head.
❤️ Nose (Dark Red)
R1: MR 6 (6)
R2: inc x6 (12)
R3: sc around (12)
FO, stuff lightly and sew to muzzle center.
Embroider small mouth line below nose.
👂 Ears (Make 2 – Light Gray)
R1: MR 6 (6)
R2: inc x6 (12)
R3: (sc, inc) x6 (18)
R4–6: sc around (18)
R7: (sc, dec) x6 (12)
FO, flatten slightly.
Shape ears into soft backward curve before sewing.
🧠 Wiring for the Ears (Optional but Recommended)
The ears in the photo curve gently outward and backward. To achieve this:
-
Insert a thin floral wire or pipe cleaner inside each ear before final stitching.
-
Bend slightly into a soft arc.
-
This allows you to pose the ears and keeps them from drooping over time.
⚠️ If making for children, skip wire and simply shape with stuffing and firm stitching.
🐾 Body (Light Gray)
R1: MR 6 (6)
R2: inc x6 (12)
R3: (sc, inc) x6 (18)
R4: (2 sc, inc) x6 (24)
R5: (3 sc, inc) x6 (30)
R6: (4 sc, inc) x6 (36)
R7–12: sc around (36)
R13: (4 sc, dec) x6 (30)
R14: (3 sc, dec) x6 (24)
R15: (2 sc, dec) x6 (18)
Stuff firmly.
R16: (sc, dec) x6 (12)
R17: dec x6 (6)
FO and close.
💪 Arms (Make 2)
R1: MR 6 (6)
R2: inc x6 (12)
R3–6: sc around (12)
Stuff lightly, flatten top, FO and leave tail for sewing.
🦵 Legs (Make 2)
R1: MR 6 (6)
R2: inc x6 (12)
R3: (sc, inc) x6 (18)
R4–6: sc around (18)
Stuff lightly, flatten base, FO.
🐍 Tail
R1: MR 6 (6)
R2–18: sc around (6)
Lightly stuff only at base.
FO and curve gently before sewing.
(Optional wire can be inserted for poseable curl.)
🪡 Assembly
-
Sew head onto body, slightly tilted forward.
-
Attach ears to top sides of head, angled backward.
-
Sew arms to upper body front.
-
Attach legs at base in seated position.
-
Sew tail to back and curve along ground.
-
Embroider eyebrows (arched shape), small smile, and optional blush cheeks.
🌟 Final Look
Your Amigurumi Chupacabra now matches the photo:
rounded belly, floppy curved ears, expressive eyes, short limbs, and a curled tail. The optional wire in the ears gives you full control over the signature horn-like curves while keeping the plush look soft and friendly.
This little cryptid makes a perfect fantasy companion, shelf mascot, or handmade gift for creature lovers. 🐾✨