Deck the halls with handmade charm using this Amigurumi Christmas Wreath crochet pattern! Inspired by the festive beauty of holiday decorations, this delightful design captures the lush greenery, bright berries, and cozy warmth of a classic Christmas wreath in every stitch. Whether you’re crafting for seasonal decor, adding a cheerful touch to your home, or simply enjoy making holiday-inspired amigurumi designs, this pattern lets you stitch up a miniature wreath bursting with festive spirit! Perfect for brightening up any space, this crochet creation brings a touch of handmade holiday magic to your collection. 🎄✨
Designed for customization, this pattern allows you to experiment with different shades of green, embroidered details, or even tiny accessories like a miniature bow or twinkling lights for extra flair. Craft a traditional wreath with rich evergreen tones, create a whimsical version with pastel hues, or even stitch up a full set of Christmas-inspired amigurumi for a stunning holiday display! Whether gifted as a thoughtful keepsake, displayed as a festive accent, or made simply for the joy of crafting, this Amigurumi Christmas Wreath is a fun and creative project—perfect for bringing a touch of handmade holiday magic to every stitch! 🧶💖✨
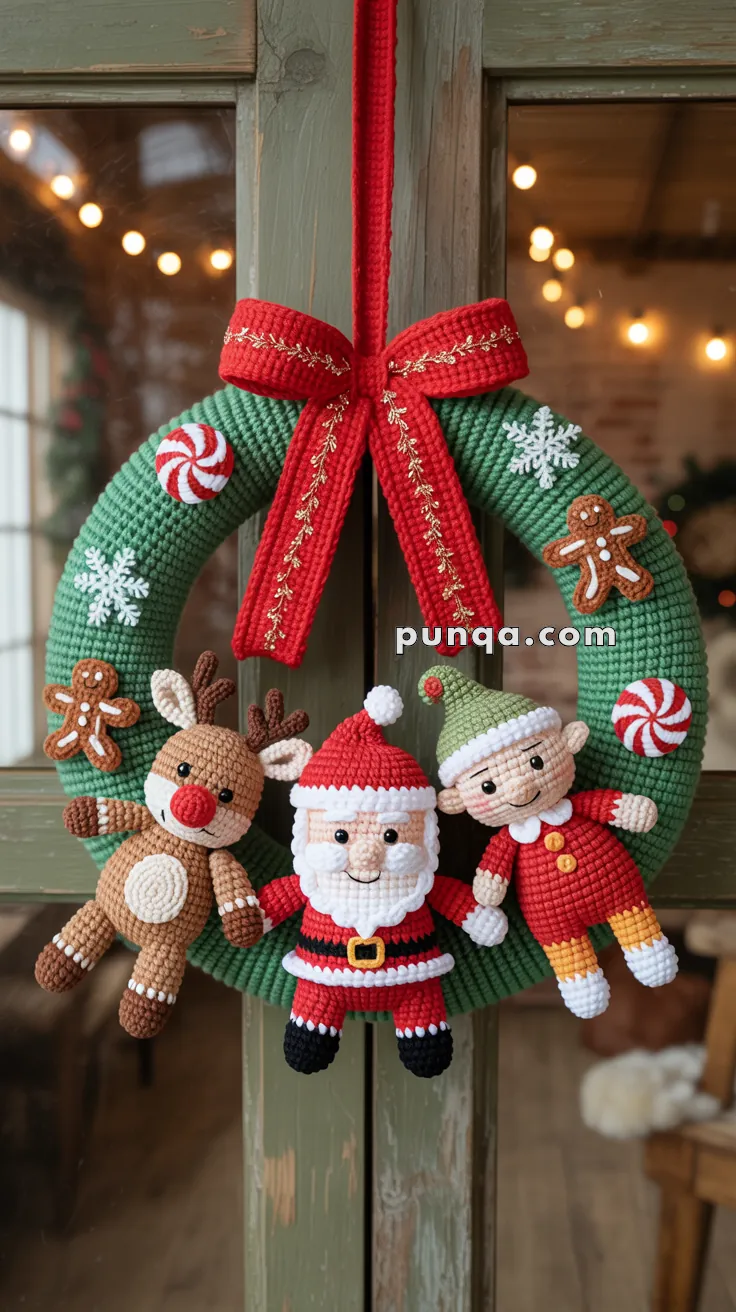
🎄 Amigurumi Christmas Wreath with Santa, Reindeer & Elf – FREE Crochet Pattern
Celebrate the festive season with this joyful crochet Christmas wreath! Featuring an adorable trio—Santa Claus, a cheerful reindeer, and a smiling elf—alongside candy swirls, gingerbread men, and snowflakes, this wreath is the perfect handmade decoration for your door or wall. 🎅🦌🍬
✨ Skill Level
Intermediate – Includes color changes, shaping, embroidery, and small part assembly.
📏 Finished Size
Wreath diameter: ~10–12 in (25–30 cm)
Each figure: ~5–6 in (13–15 cm) tall
🧶 Materials
- DK or worsted weight yarn in:
- Crochet hook: 2.5–3.0 mm
- Fiberfill stuffing
- Safety eyes (6 mm) or black yarn
- Embroidery needle
- Stitch markers, scissors
- Felt for peppermint swirls
- Hot glue or sewing thread for embellishments
🧵 Abbreviations (US Terms)
MR – Magic Ring
sc – Single Crochet
inc – Increase (2 sc in one stitch)
dec – Decrease (sc 2 together)
sl st – Slip Stitch
ch – Chain
FO – Fasten Off
BLO – Back Loop Only
🟢 Wreath Base
With Green yarn:
- MR, 6 sc
- inc x6 (12)
- (1 sc, inc) x6 (18)
Continue increasing evenly until you reach ~60–66 sts (depending on your desired thickness)
Work even in sc for 40–50 rounds, stuffing as you go to create a long tube
Form a ring and sew both ends together
Wrap a red crocheted strip or ribbon around the top to hang
🎀 Red Bow
With Red yarn:
- Ch 31
- sc in 2nd ch and across (30)
3–6. sc rows (30 sts)
FO, fold and wrap a small band around center
Sew to top of wreath
🎅 Santa Claus
Head (Light Beige)
- MR, 6 sc
- inc x6 (12)
- (1 sc, inc) x6 (18)
- (2 sc, inc) x6 (24)
5–10. sc around (24)
Insert safety eyes between Rnds 6–7
Embroider eyebrows and smile - (2 sc, dec) x6 (18)
Stuff, (1 sc, dec) x6 → 12
FO
Nose (Beige)
- MR, 6 sc
- sc around, FO and sew between eyes
Beard (White)
Ch 16, work sc, hdc, dc, hdc, sc across for scallops
Sew around face and under chin
Body (Red → White → Black → Red)
- MR, 6 sc
- inc x6 (12)
- (1 sc, inc) x6 (18)
4–5. sc (18)
Change to White (do final yarn-over of last red stitch in White)
6–7. sc around (White belt edge)
Change to Black - sc around (18)
Change to Red
9–12. sc
Stuff and FO
Arms (Make 2 – Beige → Red → White Cuffs)
- MR, 5 sc (Beige)
2–3. sc
Change to Red
4–7. sc
Change to White for cuffs, 1 row
Stuff lightly, sew to body
Legs (Make 2 – Black Boots → Red)
- MR, 6 sc (Black)
- inc to 12
3–4. sc
Change to Red
5–7. sc
Stuff and sew
Hat (Red + White Trim)
- MR, 4 sc
- inc every other row until ~18 sts
3–7. sc
FO and add white fluffy trim (ch 20, sc back)
Sew small pompom at tip
🦌 Reindeer
Head (Beige)
Same as Santa’s
Add small red nose and smile
Insert safety eyes
Embroider eyebrows
Ears (Make 2 – Beige Inner, Brown Outer)
Inner: ch 6, return with sc, hdc, dc, sl st
Outer: same, sew together and attach to head
Antlers (Brown, Make 2)
Ch 5, sc down
Ch 3 off side at top for fork
Sew behind ears
Body (Light Brown → Cream belly circle)
- MR, 6 sc
- inc x6 (12)
- (1 sc, inc) x6 (18)
4–9. sc
FO and sew beige patch circle on front
Stuff
Arms & Legs (Brown → Cream Tips)
Same as Santa’s but with cream instead of black
Arms are slightly shorter
Sew in hugging pose
🧝 Elf
Head (Light Beige)
Same as Santa
Add rosy cheeks with pink yarn or blush
Insert eyes and smile
Ears (Pointy – ch 5, sc, hdc, dc back)
Sew to sides of head
Hat (Green + Red Tip)
Work in spiral cone shape to 18 sts
Add red band at base and red pom at tip
Sew to head
Body (Red → Yellow Trim)
- MR, 6 sc
- inc x6 (12)
3–4. sc
Change to yellow trim - sc
Change to red
6–10. sc
Add yellow buttons or embroider dots
Stuff and FO
Legs (Yellow → White boots)
Same as others
Add white rows at bottom to imitate shoes
Arms (Beige → Red sleeves)
Same method as above
Sew to body with hands resting outward
❄️ Snowflakes
White yarn
Ch 4, sl st to ring
Ch 4, sl st in 2nd ch, sc, dc back to ring x6
Sew to wreath
🍬 Peppermint Swirls
Make 2 – Red & White
- MR, 6 sc alternating colors
- inc with color change every few sts
OR make a spiral with red & white felt glued to a crochet disc
Sew to wreath
🍪 Gingerbread Men (Make 2)
With Brown yarn:
- MR, 6 sc
- inc to 12
Make arms & legs with ch 4s
Decorate with white embroidery for icing
Add buttons (french knots or tiny felt)
✂️ Assembly Instructions
- Attach Santa, Reindeer & Elf to base with strong sewing thread
- Sew embellishments around evenly
- Sew bow at top
- Add hanging loop and display!
This adorable Christmas wreath is festive, colorful, and sure to be a showstopper in any home. Customize colors or character faces for a personal touch. Happy hooking! 🎅🧶🦌