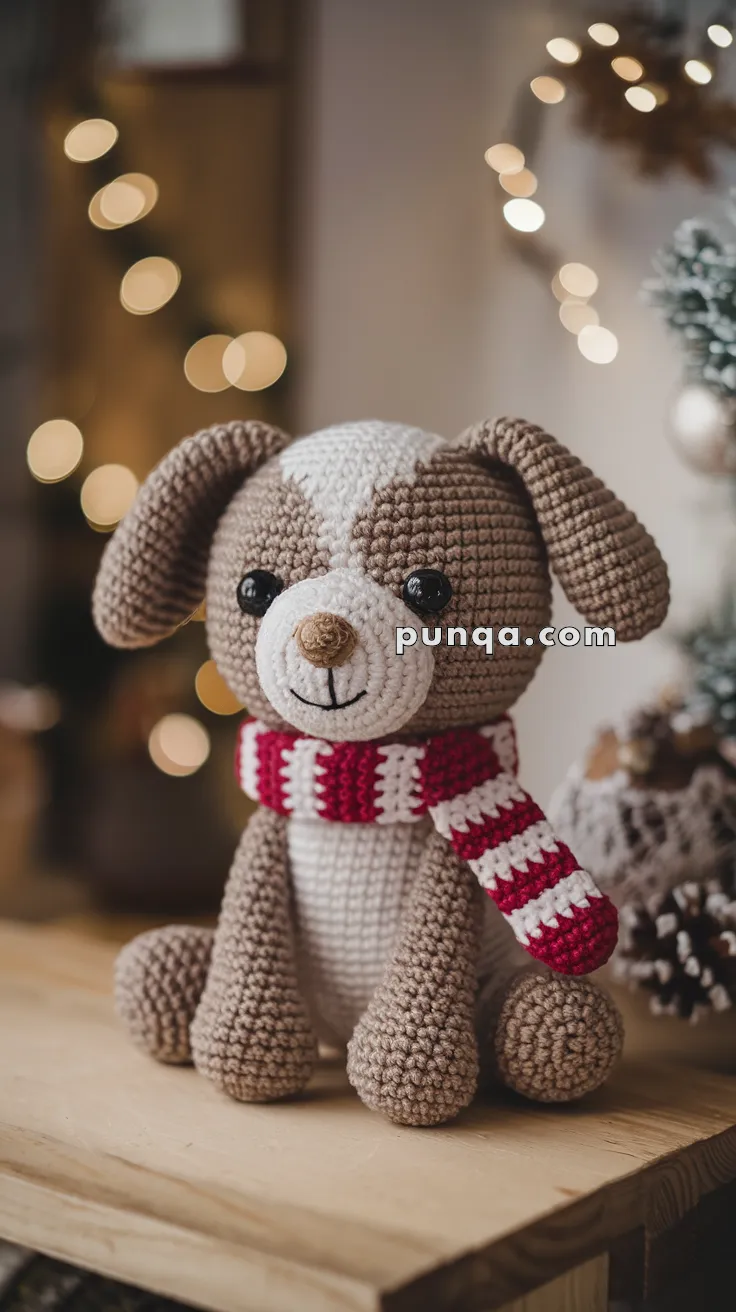
Celebrate the holiday season with this Amigurumi Christmas Puppy with Scarf crochet pattern! With its cozy little scarf, floppy ears, and adorable expression, this festive pup is ready to bring warmth and cheer to your handmade collection. Whether you’re crafting for holiday decorations, a heartfelt gift, or simply love seasonal amigurumi, this FREE pattern is a delightful way to add a touch of Christmas magic to your crochet lineup.
Designed for intermediate crocheters, this pattern allows for customization in scarf colors, fur textures, and even tiny accessories to enhance its festive charm. Choose classic red and green for a traditional holiday look or experiment with soft winter hues for a cozy, wintry vibe! Whether displayed under the Christmas tree or gifted to a fellow crochet enthusiast, this charming puppy is sure to spread joy. Grab your hook, select your favorite yarn, and let’s bring this holiday cutie to life! 🎄🐶✨🧶
🐾 Amigurumi Christmas Puppy With Scarf Crochet Pattern
This sweet holiday pup with floppy ears and a striped scarf is ready to spread Christmas cheer! With his cozy look, warm colors, and big smile, he’s perfect for gifting or decorating your festive home.
✨ Skill Level
Beginner–Intermediate – simple shaping, color changes, and assembly.
📏 Finished Size
Approx. 22–25 cm (9–10 inches) tall using DK yarn and a 2.5–3.0 mm hook.
🧶 Materials
DK yarn (or light worsted, cotton or acrylic):
-
Light brown – 60–70 g (head, ears, back and sides of body, arms, legs)
-
White – 30–35 g (belly, muzzle, forehead patch)
-
Beige / light tan – 5 g (nose)
-
Red – 10 g (scarf)
-
White (for scarf stripes) – 10 g
Notions:
-
2.5–3.0 mm crochet hook
-
10 mm black safety eyes
-
Fiberfill stuffing
-
Black embroidery thread (smile)
-
Yarn needle, stitch marker, scissors
All parts are worked in continuous rounds unless stated.
🪡 Abbreviations (US Terms)
MR – magic ring
sc – single crochet
inc – increase (2 sc in same st)
dec – decrease (sc2tog)
ch – chain
sl st – slip stitch
FO – fasten off
🐶 Head
Colors: light brown + white patch
With light brown:
R1: MR, 6 sc [6]
R2: inc ×6 [12]
R3: (sc, inc) ×6 [18]
R4: (2 sc, inc) ×6 [24]
R5: (3 sc, inc) ×6 [30]
R6: (4 sc, inc) ×6 [36]
White forehead patch
Identify the center front of the round and place a marker there. For the next rounds, work the front 8 stitches in white and the remaining stitches in light brown, carrying the unused yarn inside.
R7–R14: sc around (front 8 sts in white, back 28 sts in light brown) [36]
R15: (4 sc, dec) ×6 [30] – keep the center 8 front stitches in white, others brown.
R16: (3 sc, dec) ×6 [24] – all light brown from this round onward.
📌 Eyes: Insert safety eyes between Rounds 10–11, spaced 7–8 stitches apart, each eye sitting just at the outer edge of the white patch.
R17: (2 sc, dec) ×6 [18]
R18: (sc, dec) ×6 [12]
R19: dec ×6 [6]
FO, close opening and stuff head firmly.
🐶 Muzzle (White)
R1: MR, 6 sc [6]
R2: inc ×6 [12]
R3: (sc, inc) ×6 [18]
R4–R5: sc around [18]
FO, stuff lightly.
Placement: Center on the face across Rounds 13–16, so it overlaps the lower 2–3 rounds of the white forehead patch, creating one continuous white area from forehead to muzzle. Sew in place.
🐶 Nose (Beige / Light Tan)
R1: MR, 6 sc [6]
R2: (sc, inc) ×3 [9]
R3: sc around [9]
FO, stuff lightly and sew on the top center of the muzzle.
With black thread, embroider a small curved smile directly below the muzzle.
🐶 Ears (Make 2 – Light Brown)
R1: MR, 6 sc [6]
R2: (sc, inc) ×3 [9]
R3: (2 sc, inc) ×3 [12]
R4–R12: sc around [12]
R13: (2 sc, dec) ×3 [9]
R14–R16: sc around [9]
FO, do not stuff.
Placement: Sew ears to the sides of head at approx. R7–R9, aligned roughly with the eyes. Angle them so they frame the face and hang straight down, not toward the back.
🐾 Body – Front/Back Two-Color Belly
Front belly is entirely white; back and sides are light brown.
R1: With white, MR, 6 sc [6]
R2: inc ×6 [12] – all white
R3: (sc, inc) ×6 [18]
-
Front 9 sts: white
-
Back 9 sts: light brown
R4: (2 sc, inc) ×6 [24]
-
Front 12 sts: white
-
Back 12 sts: light brown
R5: (3 sc, inc) ×6 [30]
-
Front 15 sts: white
-
Back 15 sts: light brown
R6–R18: sc around [30]
-
Continue working front 15 stitches in white, back 15 in light brown for each round, keeping the color change line centered at each side of the body.
R19: (3 sc, dec) ×6 [24]
– Maintain front/back colors (front 12 sts white, back 12 light brown).
R20: (2 sc, dec) ×6 [18]
– Maintain front/back colors (front 9 sts white, back 9 light brown).
FO and stuff firmly. Make sure the full white belly is centered at the front.
🐾 Legs With Paw Shaping (Make 2 – Light Brown)
R1: MR, 6 sc [6]
R2: inc ×6 [12]
R3: (sc, inc) ×6 [18]
R4–R12: sc around [18]
R13: (sc, dec) ×6 [12]
R14–R15: sc around [12]
Paw pad shaping
R16: (sc, inc) ×6 [18]
R17: sc around [18]
R18: (sc, dec) ×6 [12]
FO, stuff firmly. Flatten the bottom slightly so the puppy sits stably.
Sew legs to front bottom of body so the puppy sits with legs straight forward.
🐾 Arms (Make 2 – Light Brown)
R1: MR, 6 sc [6]
R2: (sc, inc) ×3 [9]
R3–R9: sc around [9]
FO, stuff lightly.
Sew low on the sides of the body, slightly toward the front, so paws rest gently beside the belly.
🧣 Striped Winter Scarf – Vertical Stripes
The scarf is thick and wraps around the neck, with bold vertical red and white blocks running along its length.
With red, ch 10.
Row 1: sc in 2nd ch from hook and across [9]
Rows 2–8: sc across [9] in red.
Rows 9–16: switch to white, sc across [9] each row.
Rows 17–24: red
Rows 25–32: white
Rows 33–40: red
Rows 41–48: white
Continue alternating 8-row blocks of red and white until the scarf measures about 28–32 cm (11–12 in) long (approx. 70–80 rows).
FO and weave in ends.
Wrap scarf snugly around the neck, cross the ends in front, and let them hang down as in the photo.
🧷 Final Assembly
-
Sew head firmly onto the top of the body, centered over the white belly.
-
Attach legs to the front bottom so the puppy sits upright.
-
Sew arms in place on the sides.
-
Adjust ears so they hang evenly on both sides of the face.
-
Wrap and tie the striped scarf around the neck.
-
Shape the puppy gently with your hands, redistributing stuffing if needed.
Your Christmas Puppy is ready to decorate your mantel, snuggle under the tree, or be wrapped up as a heartfelt handmade gift. 🎄🐶💕