Bring a touch of Nordic magic to your holiday décor with the Christmas Gnome Ornament, a whimsical crochet project that’s full of festive charm! 🎅🧶 With its cozy hat, fluffy beard, and tiny nose peeking out, this little gnome is ready to spread cheer from the branches of your tree or nestled into a handmade garland. Whether you’re crafting a single ornament or a whole troop of merry mischief-makers, these gnomes are sure to become a beloved part of your seasonal traditions.
This pattern is perfect for crocheters who love quick, joyful projects with plenty of personality. You can customize each gnome with different hat styles, add sparkly embellishments, or even stitch up themed versions for every holiday. Whether you’re decorating your home, gifting handmade magic, or simply indulging in some cozy crafting, the Christmas Gnome Ornament is a delightful way to celebrate the season—one jolly stitch at a time! 🎄✨
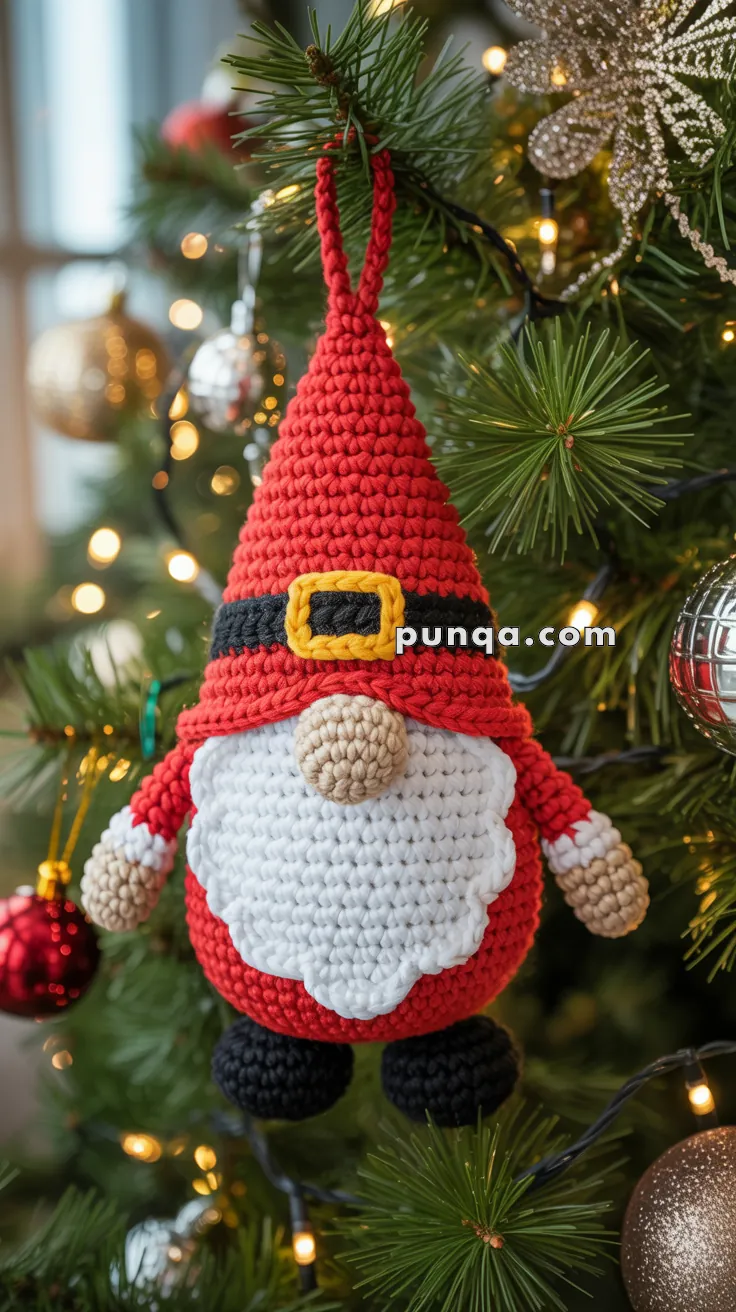
🎅 Christmas Gnome Ornament Crochet Pattern
Add a touch of handmade charm to your holiday décor with this adorable Christmas Gnome Ornament. With his tall red hat, fluffy scalloped beard, round nose, festive belt, and tiny boots, he’s ready to bring cheer to your Christmas tree.
✨ Skill Level
Easy–Intermediate – requires basic amigurumi skills, shaping, color changes, and sewing small appliqués.
📏 Finished Size
Approximately 14–16 cm (5.5–6.5 inches) tall, including hat and hanging loop.
🧶 Materials
Yarn
Worsted weight yarn (approx. 220–270 yards total):
- Red: 90–110 yards (hat, body, arms)
- White: 50–60 yards (beard, cuffs)
- Black: 20–25 yards (boots, belt)
- Beige/Tan: 15–20 yards (nose, hands)
- Yellow: 5–10 yards (buckle)
Other Supplies
- Crochet hook: 3.5–4.0 mm (E–G)
- Fiberfill stuffing
- Yarn needle
- Scissors
- Stitch markers (optional)
- Wire brush or pet slicker brush (optional, for fluffing beard)
🪡 Abbreviations (US Terms)
- MR = Magic Ring
- sc = single crochet
- inc = increase (2 sc in same stitch)
- dec = decrease (sc2tog – invisible decrease)
- sl st = slip stitch
- ch = chain
- hdc = half double crochet
- dc = double crochet
- FO = fasten off
- BLO = back loop only
📝 Pattern Instructions
🔴 Body (Red)
Start with red yarn.
R1: MR, 6 sc (6)
R2: inc × 6 (12)
R3: (sc, inc) × 6 (18)
R4: (2 sc, inc) × 6 (24)
R5: (3 sc, inc) × 6 (30)
R6: (4 sc, inc) × 6 (36)
R7–R12: sc around (36)
R13: (4 sc, dec) × 6 (30)
R14–R15: sc around (30)
R16: (3 sc, dec) × 6 (24)
R17: sc around (24)
R18: (2 sc, dec) × 6 (18)
R19: (sc, dec) × 6 (12)
Stuff firmly. Continue decreasing:
R20: dec × 6 (6)
FO, leaving a tail. Weave through remaining stitches and pull tight to close.
⚫ Boots (Make 2, Black)
R1: MR, 6 sc (6)
R2: inc × 6 (12)
R3–R5: sc around (12)
R6: dec × 6 (6)
Stuff lightly. FO, leaving a long tail for sewing.
Assembly Note: Sew boots to the bottom of the body, positioning them slightly apart and angled outward for stability.
🟥 Hat (Red)
Start with red yarn.
R1: MR, 6 sc (6)
R2: (sc, inc) × 3 (9)
R3: sc around (9)
R4: (2 sc, inc) × 3 (12)
R5: sc around (12)
R6: (3 sc, inc) × 3 (15)
R7: sc around (15)
R8: (4 sc, inc) × 3 (18)
R9: sc around (18)
R10: (5 sc, inc) × 3 (21)
R11: sc around (21)
R12: (6 sc, inc) × 3 (24)
R13: sc around (24)
R14: (7 sc, inc) × 3 (27)
R15: sc around (27)
R16: (8 sc, inc) × 3 (30)
R17: sc around (30)
R18: (9 sc, inc) × 3 (33)
R19: sc around (33)
R20: (10 sc, inc) × 3 (36)
R21–R28: sc around (36)
FO, leaving a long tail.
Hat Brim (optional but recommended):
With hat opening facing you, join red yarn to any stitch.
Work 1 round of reverse sc (crab stitch) around the opening for a decorative edge. FO.
Hanging Loop:
Ch 25, sl st to tip of hat to form loop. FO and weave in ends.
🤍 Beard (White, Scalloped)
Start with white yarn. Work in rows.
Row 1: Ch 15, sc in 2nd ch from hook, sc across (14), ch 1, turn
Row 2: inc, sc 12, inc (16), ch 1, turn
Row 3: inc, sc 14, inc (18), ch 1, turn
Row 4: inc, sc 16, inc (20), ch 1, turn
Row 5: inc, sc 18, inc (22), ch 1, turn
Row 6: inc, sc 20, inc (24), ch 1, turn
Row 7: inc, sc 22, inc (26), ch 1, turn
Row 8: inc, sc 24, inc (28)
Do not turn. Continue to scalloped edge.
Scalloped Edge:
Working along the bottom curved edge of the beard, attach yarn to corner.
Skip 1 st, (sl st, ch 1, 3 dc, ch 1, sl st) in next stitch — repeat 6–7 times across the bottom edge to create evenly spaced scallops.
FO, leaving a long tail for sewing.
Finishing: Use a wire brush or pet slicker brush to gently fluff the beard for extra texture.
👃 Nose (Beige)
R1: MR, 6 sc (6)
R2: inc × 6 (12)
R3–R4: sc around (12)
R5: dec × 6 (6)
Stuff lightly. FO, leaving a long tail for sewing.
👋 Arms (Make 2)
Start with white yarn (cuff first – work top-down).
R1: MR, 6 sc (6)
R2: sc around (6)
Switch to red.
R3–R7: sc around (6)
Switch to beige.
R8–R9: sc around (6)
R10: (sc, dec) × 2 (4)
FO, leaving a long tail. Flatten the hand slightly to create a mitten/paddle shape before sewing.
🖤 Belt (Black)
Ch 26–30 (measure around your gnome’s body at the hat/body junction and adjust chain length as needed).
Row 1: sc in 2nd ch from hook, sc across
FO, leaving long tails for sewing.
🟨 Buckle (Yellow)
Ch 5, join with sl st to form a small ring.
R1: ch 1, 8 sc around the ring, join with sl st (8)
R2: ch 1, (sc, hdc) in next st, (hdc, sc) in next st, repeat 2 times to create squared corners (16)
FO, leaving a tail for sewing.
Alternative simpler buckle: ch 6, sc in 2nd ch from hook, sc 4, working on opposite side of ch, sc 5. Join and FO.
🧵 Assembly Instructions
Follow these steps in order for best results:
Step 1: Prepare Body
Ensure body is firmly stuffed and closed. Attach boots to the bottom, positioning them slightly apart.
Step 2: Attach Hat
Position the hat so it sits low on the body, covering approximately the top third to half of the body. The hat opening should overlap the body significantly. Pin in place, then sew securely around the entire opening with the red tail.
Step 3: Attach Beard
Position the beard so it covers most of the visible body area below the hat. The top of the beard should tuck slightly under the hat brim. The beard should be wide and reach nearly to the edges of the body. Sew in place with the white tail.
Step 4: Attach Nose
Position the nose at the center, right where the hat meets the beard, tucked just under the hat brim. Sew securely.
Step 5: Attach Arms
Sew arms to the sides of the body, just below where the hat ends, with white cuffs at the top near the body. Position them slightly forward for a cheerful pose.
Step 6: Add Belt and Buckle
Wrap the belt around the body right at the junction where the hat meets the body (covering the seam). Sew the ends together at the back. Sew the buckle to the center front of the belt.
Step 7: Final Check
Ensure all pieces are secure. Weave in any remaining ends. Fluff the beard if desired.
🎀 Finishing Touches & Variations
- Fluffy Beard: Gently brush the white beard with a wire brush or pet slicker brush to separate the fibers and create a fluffy texture.
- Sparkle: Add a tiny bit of glitter glue to the buckle or hat for extra shine.
- Color Variations: Make multiple gnomes with different colored hats (green, blue, purple) for a festive collection.
- Gift Tag: Add a small loop to the back and use as a gift tag ornament with the recipient’s name written on the belt.
- Stability Tip: If your ornament tends to tip over when displayed, add a small weighted object (like a few coins or a washer) inside the body before closing.
🎅 Your Gnome is Complete!
Your Christmas Gnome Ornament is ready to hang on the tree! With his tall pointed red hat, wide fluffy beard, round nose, tiny boots, and festive belt with buckle, he’s a joyful handmade addition to your holiday décor. Make several to give as gifts or create a whole gnome family for your tree!
📌 Pattern Notes
- Gauge: Not critical for this project, but using a smaller hook creates tighter stitches and better structure.
- Tension: If your gnome seems floppy, try using a smaller hook or stuffing more firmly.
- Hat Height: The hat should be quite tall and pointed – don’t skip rounds!
- Beard Placement: The key to getting the right look is positioning the beard wide and low, covering most of the visible body.
- Color Changes: When switching colors, carry the old color up the inside if you’ll use it again soon.
⏱️ Estimated Time
- Beginner: 4–6 hours
- Intermediate: 2–4 hours
- Advanced: 1.5–2.5 hours
Happy Crocheting! 🎄