Add a sprinkle of holiday cheer to your table with these Amigurumi Christmas Gnome Cutlery Holders—a festive and functional way to dress up your place settings! 🎄🧶 With their fluffy beards, pointy hats, and cozy charm, these tiny gnomes are ready to cradle your forks and spoons while spreading smiles all around. Whether you’re hosting a holiday feast or just love adding handmade touches to your décor, these cutlery holders bring warmth and whimsy to every meal.
Designed to be both adorable and practical, each gnome can be customized with seasonal colors, sparkly yarns, or even tiny embroidered snowflakes. You can make a matching set for the whole family or mix and match styles for a playful twist. Whether tucked beside a plate or gifted as part of a festive table set, these Christmas Gnome Cutlery Holders are a joyful and satisfying project—perfect for stitching up a little holiday magic, one loop at a time! 🎅🍽️✨
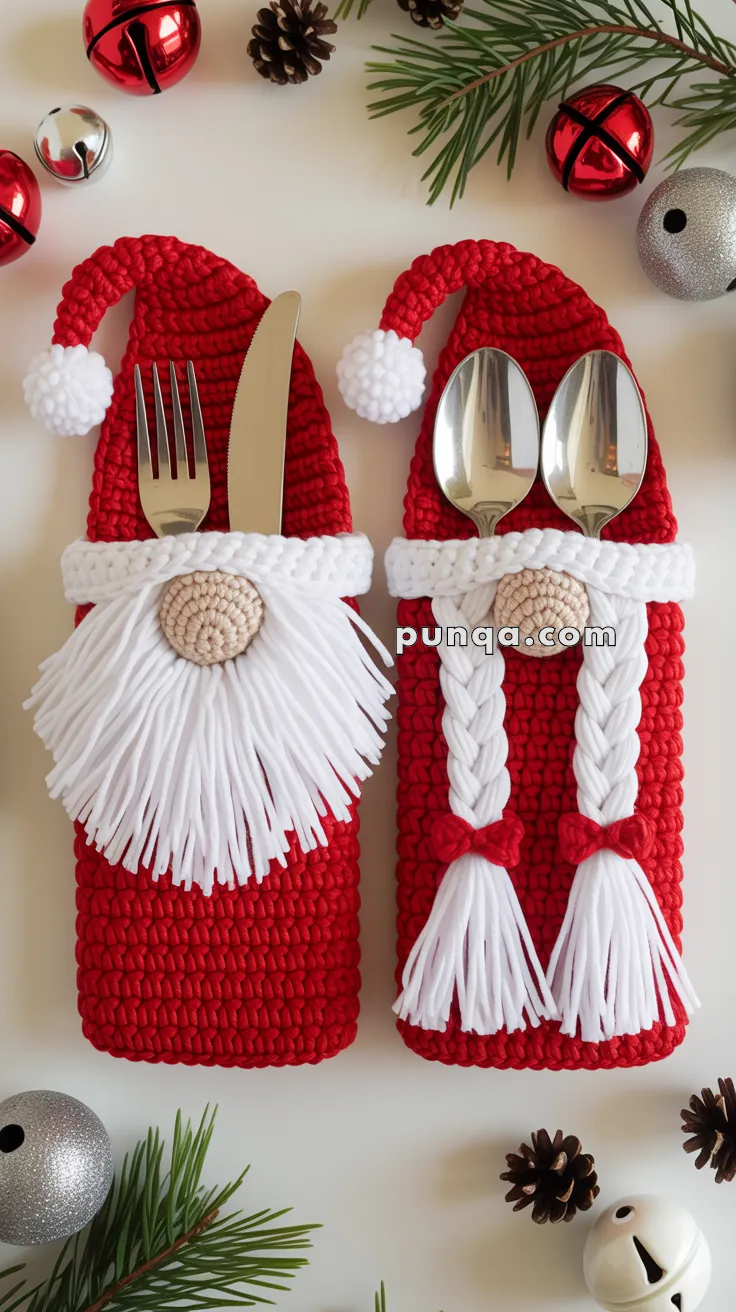
🎅🤶 Crochet Christmas Gnome Cutlery Holders (Santa & Mrs. Claus)
Bring festive charm to your holiday table with these adorable crochet gnome cutlery holders made from soft, chunky T-shirt yarn. Each holder features a tall red pouch for your silverware, a full white cuff, a slouchy Santa-style hat, and signature details like Santa’s fluffy beard or Mrs. Claus’s long braids with red bows. They look beautiful on any Christmas tablescape and make thoughtful handmade gifts.
✨ Skill Level
Beginner–Intermediate — simple shaping, easy assembly, and fun decorative details.
📏 Finished Size
Using super bulky T-shirt yarn and a 7–8 mm hook:
- Height: ~18–19 cm
- Width: ~8–9 cm
- Pocket opening: full width beneath the brim
🧶 Materials Needed
T-shirt yarn (super bulky):
- Red: ~60 g per holder
- White: ~45 g per holder
- Beige/tan: ~5 g for noses
- Small amount of red yarn for braid bows
Tools & Notions
- 7–8 mm crochet hook
- Yarn needle
- Scissors
- Stitch marker
- Small amount of stuffing for noses
- Optional: jingle bell for hat tip
🪡 Abbreviations (US Terms)
MR – magic ring
sc – single crochet
inc – increase (2 sc in same st)
dec – decrease
sl st – slip stitch
ch – chain
FO – fasten off
🍷 Front & Back Panels (Pouch Body)
The pocket is made from two flat pieces sewn together.
Front Panel
With red yarn:
Ch 15 (14 sc across)
Row 1: sc across (14)
Rows 2–38: sc across (14)
FO. Height will be about 18–19 cm with T-shirt yarn and large hook.
Back Panel
Ch 15
Row 1: sc across (14)
Rows 2–45: sc across (14)
FO.
🧷 Join the Panels
Place front panel over back panel.
Sew the left side, bottom, and right side together.
Leave the entire top open for inserting cutlery.
🤍 Full White Brim (Wrap-Around Cuff)
With white yarn:
Ch 32
Row 1: sc across (31)
Rows 2–4: sc across (31)
FO, leaving a long tail.
Wrap the brim fully around the top opening of the pouch and stitch neatly along the lower edge only.
Top edge remains open to form the pocket.
🎩 Slouchy Red Hat
With red yarn:
Ch 18 (17 sc)
Row 1: sc across (17)
Rows 2–6: sc across (17)
Start shaping:
Row 7: dec, sc 13, dec (15)
Row 8: sc (15)
Row 9: dec, sc 11, dec (13)
Row 10: sc (13)
Row 11: dec, sc 9, dec (11)
Row 12: sc (11)
Row 13: dec, sc 7, dec (9)
Rows 14–18: sc (9)
Row 19: dec, sc 5, dec (7)
Rows 20–24: sc (7)
Row 25: dec, sc 3, dec (5)
Rows 26–30: sc (5)
Row 31: dec, sc 1, dec (3)
Rows 32–34: sc (3)
Row 35: dec, dec (1)
FO.
Fold into a cone and sew up the back seam.
Slightly tack the tip to the side to shape the slouch.
❄️ Pom-Pom (Fluffy Version)
To match the soft, full pom-pom in the photo:
- Wrap white yarn around 3–4 fingers 40–50 times
- Slide off and tie tightly in the center
- Cut both folded sides
- Trim into a round, fluffy pom-pom
- Sew securely to the tip of the hat
👃 Nose (Make 1)
With beige/tan yarn:
Round 1: MR, 6 sc
Round 2: inc × 6 (12)
Rounds 3–4: sc around (12)
Round 5: (sc, dec) × 4 (8)
FO with tail.
Stuff lightly and sew centered onto the white brim.
🧔 Santa Gnome Beard
Cut 70–80 strands of white yarn, each 12–14 cm long.
(The larger amount creates the full, fluffy look.)
Working below the nose:
- Fold strand in half
- Pull folded loop through stitch
- Pull ends through loop and tighten
Attach strands densely in rows:
- Row 1 directly under nose
- Row 2 beneath
- Row 3–4 widening outward
Brush lightly and trim into soft triangular shape.
👩 Mrs. Claus Braids (Make 2)
Cut 24 strands per braid, each 30–32 cm long.
Attach at the point where the hat meets the brim:
- Pull folded loops through stitches
- You now have 48 working strands per braid
- Divide into 3 equal groups
- Braid 10–12 cm
- Tie bottom with red yarn
- Trim ends neatly
Small Red Bows (Make 2)
Ch 5
Row 1: sc across (4)
Rows 2–3: sc across (4)
FO
Wrap center with red yarn and attach to ends of braids.
🎩 Attach the Hat
Position the hat so it covers the back panel only, leaving the pocket under the brim fully open.
Sew the bottom edge of the hat along the top of the brim on the back panel.
Shape the tip to lean gently to one side.
🎁 Final Touches
- Smooth the beard or braids
- Ensure the brim is securely wrapped
- Check that the pocket is fully open
- Adjust hat slouch as desired
Slide your fork, knife, and spoon into the wide opening beneath the brim — perfectly held in place for a festive and charming holiday table setting.



Merci pour le partage
Très belle réalisation à offrir, merci beaucoup
Gracias por compartir tan hermoso patrón
Bonjour,
merci pour tous ces jolis modèles.
Je vais me régalez à les réaliser.
Encore merci
Pascale