Step into a winter wonderland with this Amigurumi Christmas Cottage crochet pattern! 🏡✨ With its snow-covered roof, festive wreath, and glowing windows, this design captures the cozy magic of the holiday season in yarn form. Whether you’re crafting for Christmas décor, a heartfelt gift, or simply love miniature cottages, this pattern is a charming addition to your collection.
Designed for intermediate crocheters, this pattern allows for customization in architectural details, seasonal embellishments, and even tiny accessories like embroidered snowflakes or a miniature chimney to enhance its festive charm. Choose classic reds and greens for a traditional holiday look or experiment with pastel hues for a whimsical twist! Whether displayed as part of a winter village setup or gifted to a fellow crochet enthusiast, this amigurumi Christmas cottage is sure to spread seasonal cheer.
Grab your hook, select your favorite yarn, and let’s bring this cozy holiday retreat to life—one stitch at a time! 🧶✨
🏡 Crochet Christmas Cottage Pattern
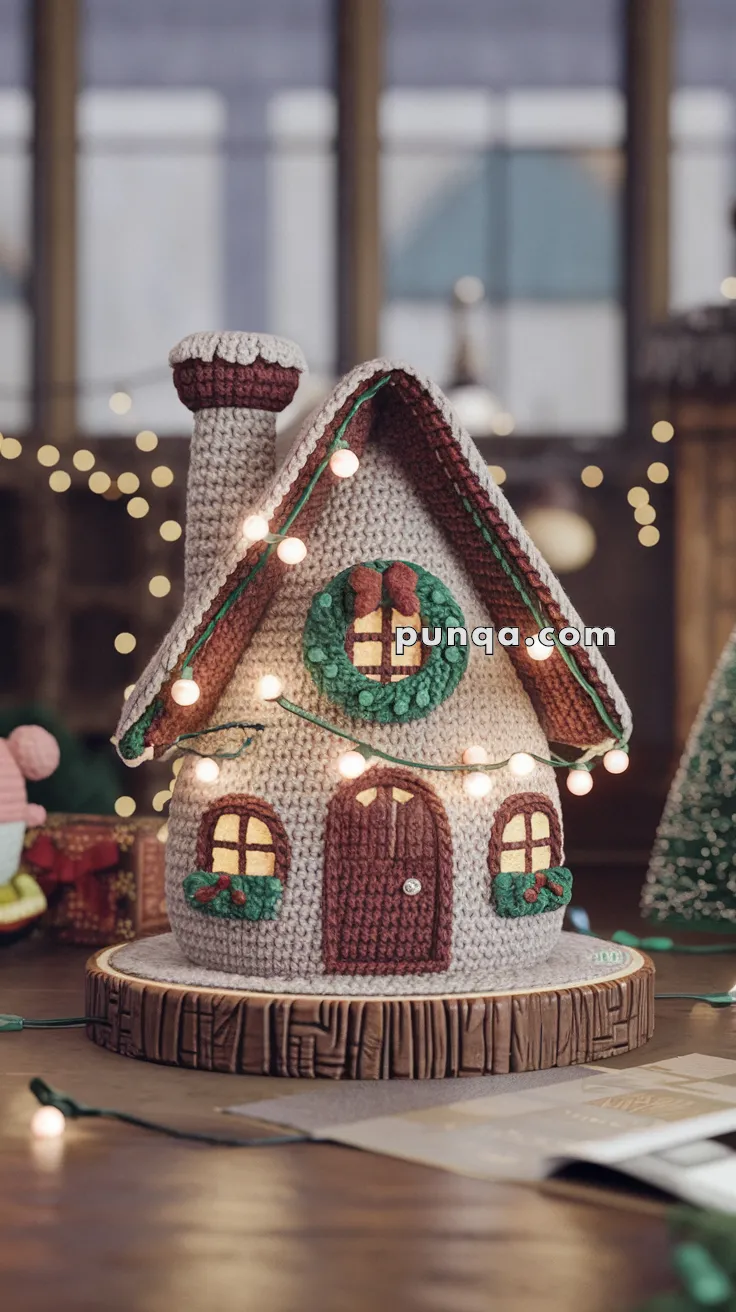
Create a magical Christmas cottage with a steep A-frame roof, tall chimney, glowing windows, wreath, and light garland. This pattern is written to match the cozy cottage in the image, with cream roof trim, burgundy accents, and a soft rounded house shape. ✨
✨ Skill Level
Intermediate – you should be comfortable crocheting in the round, working flat pieces, sewing appliqués, and doing simple color changes.
📏 Finished Size
Approx. 22–26 cm (9–10 in) tall using worsted weight yarn and a 3.5 mm hook.
🧶 Materials
-
Worsted weight yarn
-
Beige / light cream – walls, roof trim, roof lining, chimney body (≈ 80–90 g)
-
Burgundy / deep red – roof outer panels, door, window frames, chimney top, bow (≈ 60–70 g)
-
Dark brown – wood-style base (≈ 30 g)
-
Green – wreath, light garland string, roof inner stripe (≈ 25 g)
-
Soft yellow – window panes (≈ 10 g)
-
White – light bulbs, tiny accents (≈ 10 g)
-
-
Crochet hook 3.0–3.5 mm
-
Fiberfill or foam cylinder/cone for support
-
Optional plastic canvas for stiffening roof/walls
-
Needle, scissors, stitch markers
-
Mini LED fairy lights (for glowing window effect)
🪡 Abbreviations (US Terms)
MR – Magic ring
sc – single crochet
inc – increase (2 sc in same st)
dec – decrease (sc2tog)
ch – chain
sl st – slip stitch
BLO – back loop only
FO – fasten off
🏠 Base & Walls
🪵 Round Cottage Base (Cream/Beige)
R1: MR, 6 sc
R2: inc ×6 → 12
R3: (1 sc, inc) ×6 → 18
R4: (2 sc, inc) ×6 → 24
R5: (3 sc, inc) ×6 → 30
R6: (4 sc, inc) ×6 → 36
R7: (5 sc, inc) ×6 → 42
R8: (6 sc, inc) ×6 → 48
R9: (7 sc, inc) ×6 → 54
R10: (8 sc, inc) ×6 → 60
R11: (9 sc, inc) ×6 → 66
R12: (10 sc, inc) ×6 → 72
FO and weave in. This is the flat circle the cottage sits on.
🧱 Cottage Walls (Cream/Beige)
Join yarn to BLO of any stitch on the base.
R1–15: sc around (72)
Stuff lightly or insert a foam cylinder as you go so the walls stay plump and slightly tapered. FO, leaving top open (roof will sit on top).
🚪 Door & Windows
🚪 Tall Arched Door (Burgundy)
Ch 9
Row 1: sc in 2nd ch from hook and across (8)
Rows 2–10: ch 1, turn, sc 8
Shape arch:
Row 11: ch 1, turn, dec, sc 4, dec → 6
Row 12: ch 1, turn, dec, sc 2, dec → 4
Row 13: ch 1, turn, sc 4
FO, leaving long tail.
Texturing (to mimic the dense stitch look in the photo):
Work surface slip stitches in vertical lines from top to bottom, spaced 1 st apart.
Sew door centered on front of cottage, close to the base.
Add a small bead / French knot in white or silver for the door knob.
🪟 Yellow Window Centers (Make 3 – All the Same)
These are the glowing yellow panes that sit inside burgundy frames.
R1: MR, 6 sc
R2: (1 sc, inc) ×3 → 9
R3: (2 sc, inc) ×3 → 12
FO, leaving a tail for sewing.
You’ll use:
-
2 × centers for lower arched windows
-
1 × center for upper wreath window
🪟 Burgundy Window Frames – Lower Arched Windows (Make 2)
These pieces frame the yellow circles and give the tall arched shape.
Ch 20
Row 1: sc in 2nd ch and across (19)
Row 2: ch 1, turn, sc 19
Form the arch:
Row 3: ch 1, turn, dec, sc 15, dec → 17
Row 4: ch 1, turn, dec, sc 13, dec → 15
With yarn still attached, work sc around all edges to smooth the arch. FO, leaving long tail.
Assembly (each window):
-
Place one yellow circle centered near the top of the burgundy rectangle/arch.
-
Sew yellow circle onto frame.
-
With yellow yarn, surface stitch a cross: a vertical and a horizontal line dividing the circle into 4 panes.
-
Sew finished window to cottage walls:
-
Left window: front left
-
Right window: front right
Both sit symmetrically with bottoms a little above the base.
-
Add mini holly beneath each:
-
Leaves (Green, make 2 per window): ch 5, sl st back along chain.
-
Berries (Red or burgundy): 2–3 French knots.
Sew leaves and berries as a little cluster under each window.
🪟 Upper Window Inside the Wreath
Use the third yellow circle and a smaller burgundy frame.
Small Round Frame (Burgundy)
R1: MR, 6 sc
R2: inc ×6 → 12
FO.
Sew yellow circle on top of this burgundy circle.
Add a cross with yellow surface stitch so it has 4 panes (not radial slices).
This window gets attached first (see wreath section).
🎄 Wreath & Upper Window
🎄 Textured Wreath (Green)
R1: MR, 12 sc
R2: (inc) around → 24
R3: [bobble (3–4 dc in same st, closed together), sc in next st] repeat around
FO, leaving long tail. The bobbles should face outward for a fluffy wreath.
🎀 Bow (Burgundy)
Ch 10
Rows 1–3: sc 9
FO, leaving tail. Wrap yarn many times around the center to pinch into a bow.
🧩 Assembly – Window + Wreath (Order Matters!)
-
Sew the small upper window (yellow circle with burgundy ring) to the front of the cottage, centered and about 2–3 rounds below the wall top.
-
Place the wreath so the window is perfectly centered in the opening. Sew the wreath around the window edges, ensuring the window remains fully visible through the middle.
-
Sew the bow to the bottom of the wreath.
🏚 A-Frame Roof With Cream Trim & Lining
The roof has:
-
Burgundy outer panels
-
Cream trim along ALL exposed edges
-
Cream lining visible on the underside
-
A green stripe just inside the trim
You will make two-layered panels: burgundy outer + slightly smaller cream inner.
🔺 Outer Roof Panels (Make 2 – Burgundy)
R1: Ch 2, 2 sc in 2nd ch (2)
R2: ch 1, turn, inc in each st → 4
R3: ch 1, turn, sc 1, inc, sc 1, inc → 6
R4: ch 1, turn, (2 sc, inc) ×2 → 8
Continue increasing 2 sts each row by working inc in last st of each row:
Row n: ch 1, turn, sc across to last st, inc in last st.
Work until you have 48 sts across the row (wide and steep like in the photo).
Then work straight:
Rows: ch 1, turn, sc 48 across
Repeat straight rows until the triangular panel’s height is about 1.75× the cottage wall height.
FO and weave ends.
🔺 Inner Roof Lining (Make 2 – Cream/Beige)
Make the same shape but stop when width is 44 sts (slightly smaller).
R1–…: Increase as above until 44 sts, then work straight rows to nearly match outer panel height. FO.
🧵 Joining Panels & Cream Trim
With wrong sides together (burgundy outside, cream inside):
-
Align one lining piece behind one burgundy piece.
-
With cream yarn, work sc through both layers all the way around the roof panel edges. This creates the visible cream edge trim along the roof like in the photo.
-
Repeat for second panel.
🌿 Green Inner Stripe
With green yarn on the burgundy side, surface crochet a narrow line that mirrors the roof edge, about 1–2 sts in from the cream trim. Do this on both panels.
🧷 Roof Assembly
Place both panels together, cream sides facing inward, burgundy sides outward.
With cream yarn, sew or sc together along the top seam to form the A-frame.
Position assembled roof on top of cottage so it overhangs evenly front and back, then sew along the top edge of the walls only, leaving the overhang free.
🪜 Tall Chimney (Beige + Burgundy Cap)
Chimney Shaft (Beige/Cream)
R1: MR, 6 sc
R2: inc ×6 → 12
R3: (1 sc, inc) ×6 → 18
R4–18: sc around (18)
FO, stuff lightly.
Chimney Cap (Burgundy With Cream Band)
R1: Join burgundy, sc around (18)
R2: (1 sc, inc) ×9 → 27
R3: sc around (27)
Optional scallop edge:
R4: sc, skip 1, 5 dc in next st, skip 1 repeat around.
With cream yarn, surface stitch a thin band just below the cap for the light trim seen in the photo.
Sew chimney onto left roof slope, leaning slightly back.
✨ Garland With White Bulbs
Garland String (Green)
Ch 80–90 (wrap and test length around roof before fastening off).
FO.
Bulbs (White – Make 10–12)
R1: MR, 6 sc
R2: sc around (6)
FO, lightly stuff.
Sew bulbs directly to the green chain at roughly even intervals.
Wrap garland across roof edges and front, tacking in place with green yarn. The bulbs should sit snugly against the roof like in the picture.
🪵 Wood-Style Display Base (Dark Brown)
R1: MR, 6 sc
R2: inc ×6 → 12
R3: (1 sc, inc) ×6 → 18
Continue increasing until base is 2–3 rounds larger than cottage base (e.g., 84–90 sts).
R next: BLO sc around to create a slight edge.
Work 2–3 more rounds sc.
With tan or lighter brown yarn, surface stitch irregular lines and rings to mimic wood grain. Sew or glue cottage centered onto this base.
🎁 Finishing Touches
-
Place a small strand of warm white LED lights inside the cottage so the windows glow.
-
Add a light dusting of white yarn surface stitches as “snow” on the roof or around the base if you like.
-
Surround your cottage with mini crochet trees, tiny gnomes, or presents for a complete holiday village. 🎄🎁
Your Christmas Cottage is ready to shine on your mantel, table centerpiece, or under the tree — cozy lights, wreath window, cream-trim roof, and all. ✨