Add a dash of farmhouse charm to your crafting with this Amigurumi Chicken Egg Basket crochet pattern! Featuring a plump, cheerful hen with a cozy basket body, this delightful design is perfect for holding eggs, treats, or even your favorite trinkets. Whether you’re decorating for spring, prepping for Easter, or just love whimsical home decor, this pattern lets you stitch up a feathered friend that’s both functional and full of personality. 🐔🥚🌸
Designed for creativity, this pattern invites you to play with soft yarns, warm colors, and fun textures to bring your chicken to life. Add sweet details like a comb, wings, or even a tiny bow for extra flair. Whether perched on your kitchen counter or gifted to a fellow crochet enthusiast, this Amigurumi Chicken Egg Basket is a joyful and satisfying project—perfect for bringing a touch of handmade country charm to every stitch! 🧶💖🌾
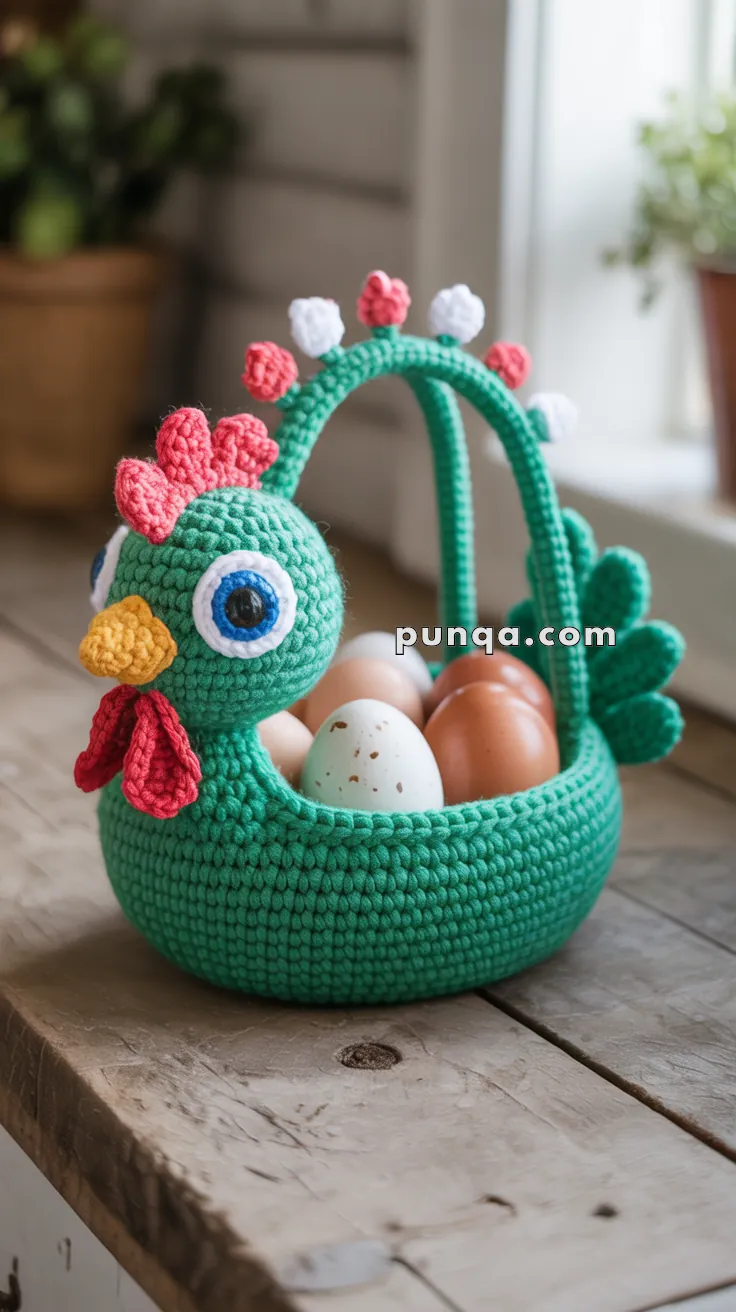
🐔Amigurumi Chicken Egg Basket Pattern
Add charm and cheer to your springtime table or kitchen counter with this adorable chicken-shaped egg basket! Perfect for holding Easter eggs or storing fresh ones from your backyard hens, this cute and sturdy amigurumi design is both decorative and functional.
✨ Skill Level
Intermediate – Involves shaping, joining parts, surface details, and reinforcing structure for basket use.
📏 Finished Size
Approx. 6–7 inches tall and 7 inches wide using bulky cotton yarn and a 3.5–4 mm hook.
🧶 Materials
- Green yarn (basket base, body, wings, tail) – bulky cotton or acrylic
- Coral pink/salmon pink yarn (comb, wattle, handle decorations)
- White yarn (handle decorations, eye whites)
- Yellow yarn (beak)
- Blue yarn (eye outline)
- Black yarn (pupil)
- 4 mm crochet hook
- Yarn needle, scissors, stitch marker
- Fiberfill stuffing (for head, comb, beak, pompoms)
- Optional: plastic bowl insert for sturdier basket shape
🧾 Abbreviations (US Terms)
- MR = magic ring
- sc = single crochet
- hdc = half double crochet
- dc = double crochet
- inc = increase (2 sc in 1 st)
- dec = decrease (sc2tog)
- ch = chain
- sl st = slip stitch
- BLO = back loop only
- FLO = front loop only
- rnd = round
🪡 Pattern Instructions
🟢 Basket Base & Body (Green)
Base:
- MR, 6 sc (6)
- inc × 6 (12)
- (sc, inc) × 6 (18)
- (2 sc, inc) × 6 (24)
- (3 sc, inc) × 6 (30)
- (4 sc, inc) × 6 (36)
- (5 sc, inc) × 6 (42)
- (6 sc, inc) × 6 (48)
- (7 sc, inc) × 6 (54)
- (8 sc, inc) × 6 (60)
- (9 sc, inc) × 6 (66)
Basket Walls:
12–22. sc in BLO around (66) – work 11 rounds to create sturdy walls
FO, weave in ends.
🟢 Handle (Green)
- Ch 50 (or adjust length to create desired arch)
- Row 1: sc in 2nd ch from hook and across (49)
- Row 2: ch 1, turn, sc across (49)
- Row 3: ch 1, turn, sc across (49)
- Row 4: ch 1, turn, sc across (49)
FO, leave long tail for sewing.
Attachment: Position handle ends inside opposite sides of basket rim, creating a smooth arch. Sew securely with multiple stitches for strength.
🎀 Handle Decorations
Coral Pink Pompoms (Make 3):
- MR, 6 sc (6)
- inc × 6 (12)
- inc × 12 (24)
- Stuff lightly, gather opening closed
White Pompoms (Make 2):
- MR, 6 sc (6)
- inc × 6 (12)
- inc × 12 (24)
- Stuff lightly, gather opening closed
Assembly: Alternate coral pink and white pompoms along the top of the handle, sewing them securely. Arrange as: coral, white, coral, white, coral.
🐔 Head (Green)
- MR, 6 sc (6)
- inc × 6 (12)
- (sc, inc) × 6 (18)
- (2 sc, inc) × 6 (24)
- (3 sc, inc) × 6 (30) 6–10. sc around (30) – work 5 rounds
- (3 sc, dec) × 6 (24)
- (2 sc, dec) × 6 (18)
FO, leave long tail. Stuff firmly. Sew to front of basket rim.
🌸 Comb (Coral Pink)
Make 4 bumps:
Bump 1 (largest):
- MR, 6 sc (6)
- inc × 6 (12) 3–4. sc around (12)
- dec × 6 (6) FO, stuff lightly
Bump 2:
- MR, 6 sc (6)
- inc × 6 (12)
- sc around (12)
- dec × 6 (6) FO, stuff lightly
Bump 3:
- MR, 6 sc (6)
- inc × 4, 2 sc (10)
- sc around (10)
- dec × 5 (5) FO, stuff lightly
Bump 4 (smallest):
- MR, 6 sc (6)
- sc around (6)
- dec × 3 (3) FO, stuff lightly
Assembly: Sew bumps together in a row, then attach to top of head.
🌸 Wattle (Coral Pink, Make 2)
- Ch 6
- sc in 2nd ch from hook, sc 3, 3 sc in last ch
- Working on opposite side of chain: sc 3, sl st in first sc
FO, leave tail for sewing. Attach below beak on each side.
🟡 Beak (Yellow)
- MR, 6 sc (6)
- (sc, inc) × 3 (9)
- sc around (9)
- sc around (9)
- dec × 4, sc (5)
- dec × 2, sc (3)
FO, stuff lightly. Sew to center front of head.
👁️ Eyes (Make 2)
White Base:
- MR, 6 sc (6)
- inc × 6 (12)
- (sc, inc) × 6 (18)
FO, leave tail.
Blue Outline:
Attach blue yarn to edge of white circle. Work 1 rnd of sc around the white base, creating a blue border.
Black Pupil:
- MR, 6 sc (6)
- inc × 6 (12)
FO, leave tail.
Assembly: Sew black pupil to center of white base. Position on sides of head and sew securely.
🟢 Wings (Green, Make 2)
- MR, 6 sc (6)
- (sc, inc) × 3 (9)
- (2 sc, inc) × 3 (12) 4–5. sc around (12)
- dec × 6 (6)
FO, leave tail. Flatten slightly. Sew to sides of basket body.
🟢 Tail Feathers (Green)
Large Feather (Make 2):
- Ch 10
- sc in 2nd ch from hook, sc 2, hdc 2, dc 2, hdc, sc, 3 sc in last ch
- Working on opposite side: sc, hdc, dc 2, hdc 2, sc 2, sl st
FO, leave tail.
Medium Feather (Make 2):
- Ch 8
- sc in 2nd ch from hook, sc, hdc 2, dc, hdc, 3 sc in last ch
- Working on opposite side: hdc, dc, hdc 2, sc, sl st
FO, leave tail.
Small Feather (Make 2):
- Ch 6
- sc in 2nd ch from hook, sc, hdc, dc, 3 sc in last ch
- Working on opposite side: dc, hdc, sc, sl st
FO, leave tail.
Assembly: Arrange feathers in a fan shape on the back edge of the basket. Position large feathers on outside, medium in middle, small near center. Sew securely.
🧵 Final Assembly
- Head: Sew firmly to front rim of basket
- Comb: Attach to top of head
- Beak: Center on face
- Eyes: Position on sides of head, slightly toward front
- Wattles: Attach below beak on each side
- Handle: Sew both ends inside basket, creating arch
- Pompoms: Attach along top of handle, alternating colors (coral, white, coral, white, coral)
- Wings: Sew to sides of basket body
- Tail feathers: Arrange in fan shape on back rim
🎉 Finishing Touches
- Optional: Insert a plastic bowl or cardboard circle inside for extra sturdiness
- Fill with Easter eggs, candies, or small toys
- Display on your table, kitchen counter, or use as unique yarn storage
🐣 Your Chicken Egg Basket is Complete!
This adorable chicken basket is perfect for Easter celebrations, farmhouse décor, or as a charming gift. The sturdy construction means it’s both decorative and functional – enjoy your new feathered friend! 🌸🥚